The dreaded “blue screen of death”, infamously known as BSOD, can wreck your day. There are more than 500 BSOD error codes, but the Critical Process Died Stop Code gets the most attention.
In fairness, BSODs are much less common in Windows 10 than they were in previous versions of the OS, but when they happen, it is still annoying. Losing the stuff you were working on is the least of your worries.
So, how do you fix this unforeseen error in Windows 10? Keep reading and we’ll explain everything.
What Is the “Critical Process Died” Stop Code?
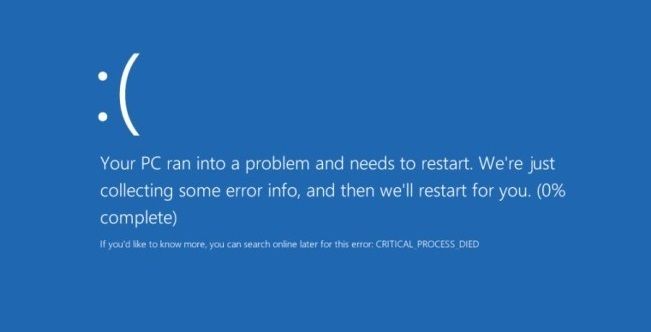
A critical process unexpectedly stopping is responsible for the majority of BSODs. You’ll know if you’re a victim because you’ll see error code 0x000000EF on the blue crash screen.
At its most basic level, the cause is simple—a background process which Windows relies on has become corrupted. It could have either stopped entirely, or its data has been incorrectly modified.
Digging deeper, it becomes much harder to pinpoint the precise issue. Everything from iffy drivers to memory errors could be the culprit. Worse still, there are near-endless scenarios in which the BSOD could arise. Perhaps it only happens when you’re gaming, when you log into your machine, when you open a certain app, or when you wake your machine from sleep.
The diversity of possible causes means there are several troubleshooting steps you need to work through. Let’s take a closer look.
1. Run the Hardware and Device Troubleshooting Tool
Before we move onto the more complicated solutions, let’s begin with the easiest one.
Windows now offers a broad range of specialized troubleshooting tools. One of them specifically designed for hardware and device issues.
To run the tool, open the Settings app and go to Update and Security > Troubleshoot. Scroll down and select Hardware and Devices, then click on Run the troubleshooter. Your system will spend a few minutes scan for problems and report back with its findings.
2. Run the System File Checker
The next step is to run the System File Checker tool. It’s a well-known utility that can cure a wide variety of Windows-based aliments by repaired corrupted or incorrectly modified system files.
In truth, it’s not always useful; people run it out of habit more than out of necessity. However, in the case of the 0x000000EF error code, it’s a critical troubleshooting step.
To run the checker, you will need to fire up Command Prompt as an admin. The easiest way is to run a search for cmd, right-click on the result, and select Run as administrator.
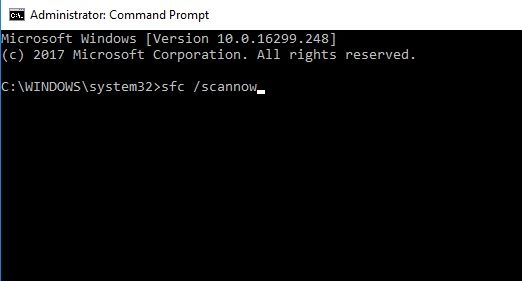
Once Command Prompt is open, type sfc /scannow and hit Enter. The process might take a while to complete.
When it’s finished, you’ll see an on-screen list of any problems and the steps that the scan took to remedy them.
Make sure you restart your computer before continuing to work.
3. Run an Antivirus Scan
The stop code could be caused by malware on your system. Malware can alter system files and processes and make them unusable.
You can use either Windows Defender or your third-party antivirus suite of choice. Just make sure you run a deep, full-system scan.
4. Run the Deployment Imaging and Servicing Management Tool
If you’re still encountering errors, it’s time to move on to the Deployment Imaging and Servicing Management (DISM) tool. It will repair a corrupt system image.
The tool has three switches:
- /ScanHealth,
- /CheckHealth
- /RestoreHealth
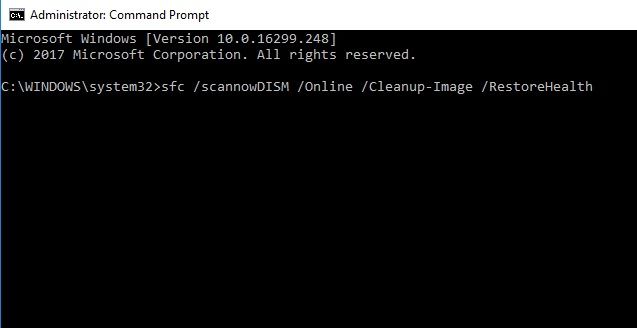
We are only interested in the last one. To use DISM, open Command Prompt as an administrator using the steps described previously. When the app is open, type DISM /Online /Cleanup-Image /RestoreHealth and hit Enter.
The process typically takes between 10 minutes and half an hour. Do not be alarmed if the progress bar pauses on 20 percent for several minutes; it is expected behavior.
After the scan has finished, restart your machine.
5. Update Your Drivers
Bad drivers are one of the most common causes of the stop code. Therefore, it’s sensible to check that none of them require updates.

To check the status of your drivers, right-click on the Start tile, select Device Manager, and scan through the list to see whether any devices have a yellow exclamation point alongside them.
If you find an exclamation point, right-click on the device in question and choose Update Driver Software from the context menu.
6. Uninstall Recent Windows Updates
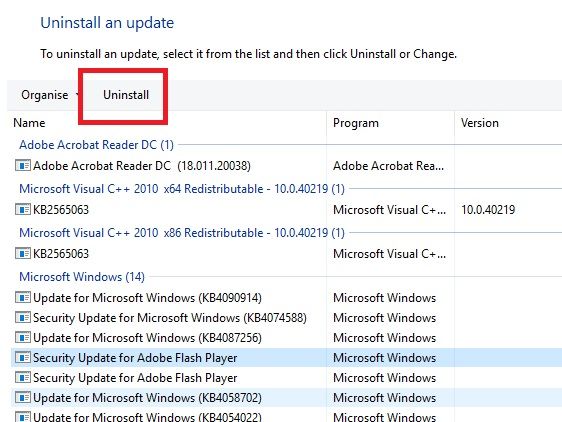
If your problem has only just started, a recent Windows update could be to blame. Thankfully, it’s easy to uninstall recent updates so you can see if your issue goes away.
To uninstall an update, open the Settings app and go to Update and Security > Windows Update > Update History > Uninstall Updates. Highlight the update you want to remove from your system, then hit the Uninstall button at the top of the window.
7. Perform a Clean Boot
A clean boot is a start-up mode which uses the bare minimum number of drivers, processes, and programs. Once your computer is running, you can start to load the missing processes in a bid to isolate the problem.
To clean boot your computer, follow the step-by-step instructions below:
- Open the Windows search bar
- Type System Configuration and press Enter
- Click on the Services tab
- Unmark the checkbox next to Hide all Microsoft Services
- Click on the Disable All button
- Select the Startup tab
- Click on Open Task Manager
- In the new windows, click on the Startup tab again
- Disable all the items in the list
- Restart your computer
8. Restore Your System
You can try to roll back your computer to a previous state using the System Restore tool. This option is only a possibility if you have enabled the creation of restore points prior to your stop code problems starting.

To use the System Restore tool, go to Settings > Update & Security > Recovery > Reset this PC > Get Started > Keep Files and follow the on-screen instructions.
9. Update the BIOS
As a final throw of the dice, you can try to update your computer’s BIOS.
Unfortunately, there is not a standardized method to do so; it depends on your computer manufacturer. Refer to the company’s support literature for guidance.
The Last Troubleshooting Step: Reset or Reinstall
If none of the above tips fix your problem, is it time to throw your computer against the nearest wall and head to the shops?
Actually, there’s one throw of the dice still remaining. The last recourse is to reset Windows or reinstall a fresh copy of Windows. Now, if that fails it definitely means you have a hardware issue on your hands.
Image Credit: natashin/Depositphotos
https://ift.tt/2wxpwGsvia MakeUseOf


0 comments:
Post a Comment