Friday, April 27, 2018

How to Merge and Unmerge Cells in Excel: Tips and Tricks to Know

When you want to combine two cells into one in Excel, you have a few options. Merging cells is one of the best ways to do it. But it has a few drawbacks, too. Even so, you might find that it’s useful for working with text in Excel.

We’ll take a look at how to merge cells in Excel, how to unmerge them, and another method for combining two cells into one without losing the data in the cells.

How to Merge Cells in Excel

Before we get into how to merge cells, let’s talk about exactly what happens when you merge in Excel. In this example, we’ll look at two columns, one for first name and one for last name:

how to merge cells in excel - Two Excel columns before merging

When we merge two of these cells, we end up with the contents of those cells in a single cell, like this:

how to merge cells in excel - A single merged cell in Excel

The two cells have been combined, leaving a single cell that’s twice as wide and only contains one value. Excel only keeps the upper-left value of any merged cells. That’s one drawback to merging in Excel. We’ll talk about how to get around that in a moment.

To merge cells in Excel, select the cells you want to merge. You can select any number of cells; in our example, we’ll select just two. Once you’ve selected the cells, head to the Home tab and click Merge & Center in the Alignment section:

how to merge cells in excel - Excel Merge & Center button

If you’ve selected more than one with text in it, you’ll get a warning:

how to merge cells in excel - Excel merge cells warning

If you want to continue, just hit OK. You’ll then have your merged cell as in the screenshot below. That’s all there is to it.

how to merge cells in excel - Excel merged cell

Merging Columns in Excel

In some cases, you’ll want to merge entire columns instead of just a few cells. Merging columns in Excel is easy; just select both columns and use the same steps.

First, highlight the two columns you want to merge:

Selecting columns to merge in Excel

If you hit the Merge & Center button right now, you’ll end up with one huge cell that has a single value in it. Instead, click the dropdown arrow next to Merge & Center and select Merge Across:

Excel Merge Across button

After clicking Merge Across, you’ll receive another warning from Excel. But instead of a single warning, you’ll get one warning for each row in your selection. Which is a lot. After clicking OK for each row, you’ll have a newly combined column:

Excel merged columns

You might be wondering why you wouldn’t just delete the second column in this case. Well, you probably would. Merging columns doesn’t do a whole lot for you.

Let’s talk about a better way to merge cells in Excel.

Combining Cells With CONCATENATE

The fact that combining cells makes you lose data is a big disadvantage of using Excel’s merging function. However, you can get around that by using a formula. Here’s the syntax of the CONCATENATE function, one of Excel’s most useful text functions:

=CONCATENATE(text 1, [text 2],...)

The function takes multiple text inputs and creates a new cell that combines all of them. This lets you merge cells without losing any data. Let’s use the same spreadsheet as before, with the list of first and last names. Instead of merging the cells and losing the last names, we’ll create a new column and use CONCATENATE to bring in both the first and last names.

Here’s the formula we’ll use in the new columns:

=CONCATENATE(B2, " ", C2)

Notice that between B2 and C2 we have a space between two quotes. This is important because it inserts a space between the contents of the cells being merged. If you forget it, you’ll get the first and last names mashed together.

Here’s what it looks like in Excel:

Using CONCATENATE to merge cells in Excel

When I hit Enter, here’s what we get:

Merged cells using CONCATENATE

Much better than our first attempt, isn’t it?

You also have the advantage of being able to modify the combination later, whereas you cannot do that when you merge cells the regular way.

How to Unmerge Cells in Excel

If you decide to merge cells, you’ll also want to know how to unmerge them.

Unfortunately, unmerging doesn’t bring any of your lost data back. When you merge cells in Excel, you’re going to lose some information, and it’s gone forever. Merged cells can create weird spaces in your spreadsheet, though, and unmerging them solves the problem.

To unmerge cells, just select the merged cell, click the dropdown arrow next to Merge & Center, and click on Unmerge Cells:

how to unmerge cells in excel - Unmerge Cells button in Excel

The cells will go back to their original count and size. You’ll still only have the data from the upper-left corner of your selection, though. This is one reason why it’s a good idea to work on a copy of your spreadsheet (or use the CONCATENATE function).

Merging Cells Can Still Be Useful

While you’ll need to use CONCATENATE to merge cells without losing data, there are still some uses of merging in Excel. It’s often used for formatting to clean up a table, for example, which may help you get a better print of your spreadsheet:

Using Merge in Excel for formatting

In general, though, it’s better to use CONCATENATE if you’re looking to merge cells without losing data.

That being said, you may find that you come across a situation where you need to merge cells in Excel. Even an Excel beginner will need to use them every day. So, when you find one of those situations now, you’ll know exactly how to do it.

And don’t forget that you can merge Excel files and sheets too!

https://ift.tt/2r4GaqR

via MakeUseOf

Transform Your Email ROI With Image-Genius’ Dynamic, Personalized Images

Digital and email marketing are key parts of branding and outreach for startups. If you’re not getting the results you need from your current strategy, you may want to consider something as simple as the images you use. Stop sending valued customers and prospects repeated, static, low-design messages – instead, use Image-Genius, a content service from Say It Visually, and transform email ROI for your brand.
 

Image-Genius delivers custom email images, personalized for every recipient, marketer-updatable live in the inbox, from any email or marketing platform. The platform works with all major ESP and marketing platforms, and allows for both use-based or tiered pricing.
 

Header
 

Image-Genius helps raise email ROI and extend engagement. Agencies can create jaw-dropping experiences their your clients and their customers; platforms can give their customers real-time personalized content and add competitive features, customers, and revenue; and brands can use Image Genius’s provided standard or ESP-specific tags.
 

Benefits of the platform include low creative costs, the ability to continue to use current platforms, and personalized, dynamic, high-impact visuals for your most valuable channel. Stop sending valued customers and prospects repeated, static, low-design messages.
 

Features

tent_composite_labelled
 

Image-Genius extends the impact and lifespan of campaigns with deep personalization and content updates. Key features include:
 

  • Rich but simple template layout
  • Complete creative control
  • Unlimited text, merge fields, and image overlays
  • Schedule-based replacement values
  • Date-based values like “Friday”
  • Location-based data like City (currently in beta)
  • Multiple backgrounds, data-driven
  • Built-in slicing of personalized images
  • Automatic DPR handling for mobile
  • Recipient-specific image sequences (currently in beta)


Interested?

If you are looking to up your email images and digital marketing game, you have a few options. First, you should schedule a demo. From there, you can use the Free plan as long as you like. If you opt to try the paid plan, you can use Image-Genius for 30 days. If you decide to cancel, they will refund the $10 monthly fee, and if you actually use it and still cancel, they’ll refund double the fee – $20.
 

Photos

Image-Genius

The post Transform Your Email ROI With Image-Genius’ Dynamic, Personalized Images appeared first on KillerStartups.


via KillerStartups

How to Easily Switch Between Multiple DNS Servers in Windows

If you’ve looked into your boosting your internet speed or getting around blocked content, you’ve probably come across DNS servers, which are used to translate website domain names into IP addresses.

While using your ISP’s default DNS works fine, customizing your DNS has lots of advantages. But digging into your computer settings to change your DNS provider is a hassle, and keeping all those DNS server IP addresses straight isn’t always easy. Thankfully, a small utility can help solve both these issues.

Easily Switching Between Multiple DNS Servers

Public-DNS-Server-Tool

  1. Download the free Public DNS Server Tool (the link is in step 1 under Setting up public DNS servers).
  2. Extract the downloaded ZIP and run the PublicDNS.exe file inside.
  3. Confirm administrator access for the app. You’ll see the tool’s main interface once it launches.
  4. First, you should create a backup of your current DNS settings for easy restoration. Select Backup > Backup from the menu bar and choose a location to save the backup.
  5. Once that’s done, select your wireless card from the top dropdown menu or choose Select all to apply changes to all of them (if applicable). You might see multiple options if you have both an Ethernet and wireless connection available.
  6. Next, select the DNS server you’d like to use from the list. This tool currently supports 16 options, including Cloudflare’s new DNS, Google’s Public DNS, OpenDNS, and more.
  7. With the server you want to use highlighted, click Change.
  8. You’ve successfully changed your DNS options!

To restore your original settings, just visit Backup > Restore and import your backup file. For further reading, check out why third-party DNS is more secure.

https://ift.tt/2HsVzMG

via MakeUseOf

How to Set Specific Download Folders for File Types in Chrome and Firefox

Keeping your downloads folder organized can be a hassle, but there are a few automated ways to keep the mess under control. You can automatically delete files older than 30 days, and you can save files to specific folders based on file type. We’ll show you how to do the latter in this article.

How to Auto-Save File Types to Specific Folders

The Chrome extension RegExp Download Organizer allows you to create rules for downloaded file types. For example, every time you download a PDF, it will be automatically saved to a folder of your choice in the downloads folder.

You can also filter down to specific file types. For example, you can save all images to one folder, or you can create a separate folder for JPEGs, another for PNGs, etc. The Chrome extension comes with a couple of rules already created: one for images and one for torrents.

Let’s say you want to create a new rule for PDFs, enter the following:

  1. For MIME (Filetype), enter application/pdf.
  2. For Destination Path, select pdf/ (or the folder name of your choice).

The extension includes a list of rules you can use for various file types, including compressed files (ZIP), Windows executable files (EXE), audio files, and video files.

As you can see from the screenshot above, you can also create rules based on specific URLs and file names.

How to Add “Save In” Folders to the Right-Click Menu

If you would rather add specific locations you can choose from as you save the file, there is an extension available that does that.

The Save In extension (ChromeFirefox) requires extensive permissions when installing, including the ability to read and change all data on websites you visit. By way of contrast, the aforementioned RegExp Download Organizer extension only requires permission to manage your downloads.

If you decide Save In is right for you, once you’ve installed the extension, when you right-click a link or file in your browser, you’ll now see Save in in your context menu, with two folder options already listed: images and video. If you save a file to these locations, your browser will automatically create those subfolders in your Downloads folder if they don’t exist.

To add or modify the locations on that list, open the extension options in your browser and just add them to the existing list:

When you right-click a file, those locations will now be available in your context menu:

If you want to select a folder that isn’t in the downloads folder, it gets a little more complicated and will require you to create a symbolic link. If that seems too complicated for you and you really want to save your files to folders that aren’t in the downloads folder, there is one more option to consider:

Mac users can automatically move files to and from specific folders using automated rules with Hazel or Mac’s Automator, while Windows users can give QuickMove a try.

https://ift.tt/2r2Db2n

via MakeUseOf

How to Deactivate Facebook Messenger

Most people are aware of the difference between deleting and deactivating a Facebook account. In short, deactivating is akin to a temporary deletion where you can reactivate your account at any time, whereas deleting your account is a permanent removal of data.

But you might not realize that deactivating your Facebook account does NOT deactivate your Facebook Messenger account. People will still see be able to see you and can attempt to contact you. Indeed, the process for deactivating Facebook Messenger is entirely separate.

How to Deactivate Facebook Messenger

Before you can deactivate Facebook Messenger, you need to deactivate your Facebook account. We’ve previously explained how to deactivate your account, so if you’ve not yet deactivated Facebook, you need to go and do it before continuing.

Next, to deactivate Facebook Messenger, just follow the simple instructions below:

  1. Open Messenger on a mobile device.
  2. Tap on your profile picture in the upper right-hand corner.
  3. Scroll down and select Privacy and Terms.
  4. On the next screen, choose Deactivate Messenger.
  5. Enter your password.
  6. Tap on Deactivate.

To reactivate Facebook Messenger, just log back into the Messenger app using your username and password.

Note: Reactivating Messenger will also reactivate your main Facebook account. If you only want to keep the Messenger service, you will need to deactivate your Facebook account for a second time.

Remember, you can still appear invisible on Messenger and Facebook Chat without taking the drastic step of deactivating your account. Lastly, keep in mind that if you delete your Facebook account completely, you will lose access to Messenger as well. There is no way to keep Messenger without maintaining a Facebook profile.

https://ift.tt/eA8V8J

via MakeUseOf

Snap Launches Spectacles 2.0 for Snapchat Addicts

In 2016, Snap Inc. launched Spectacles. These Spectacles from Snap, formerly known as Snapchat, were sunglasses capable of shooting video. Snap hoped Spectacles would take off in a big way, but in the end the company only sold 150,000 pairs.

However, undeterred, Snap Inc. has launched Spectacles 2.0. This new and improved version of Spectacles has a better design, better specs (excuse the pun), and some new features to boot. Unfortunately, Snap has increased the asking price accordingly.

Snap Spectacles Version 2.0

Snap’s new Spectacles are smaller, slimmer, and slightly more aesthetically pleasing. However, they still look like cheap sunglasses, even in Ruby, Onyx, and Sapphire. Unfortunately, they’re not cheap, as Snap has upped the price from $129 to $150.

Addressing one of the biggest complaints about the originals, the new Spectacles feature improved transfer speeds for uploading your photos and videos. That’s right, Spectacles 2.0 can now take photos as well as shoot videos. And both are in high-definition.

Snap Inc. has also made the new and improved Spectacles water-resistant, meaning they can stand trips into swimming pools and the sea. Spectacles 2.0 also feature a second microphone to help pick up conversations between the wearer and those in the shot.

The new Spectacles are available exclusively from Spectacles.com. They’re currently available to customers in the U.S., Canada, and the U.K., with other parts of Europe having to wait until May 3rd to get their hands on them. So please form an orderly queue.

Are They Still Just a Novelty?

Snap’s Spectacles 2.0 are clearly an improvement over the original. However, they still look like a novelty you would only wear occasionally. They’re also more expensive, and don’t offer anything mind blowing over the original. So it’s difficult to see them selling well.

If this is the first you’re hearing about Snap’s hardware—which is entirely possible given the lack of sales—then be sure to check out our overview of the original Spectacles. And if you can pick some up cheap they may even be worth owning.

https://ift.tt/eA8V8J

via MakeUseOf

6 Ways to Make Vacations More Fun Using Technology

8 Adobe Illustrator Tips to Help You Design Faster

Adobe Illustrator is the best program for graphic design work; for pros and amateurs alike. But it’s so powerful it can be a pretty overwhelming experience. There’s so many things to do, and so many ways to do them, it’s hard to know where to begin.

The good news is that Illustrator has plenty of ways to simplify—or even automate—tasks that could otherwise be quite complex.

Here are several essential Adobe Illustrator tips and tricks that will help you design faster than ever.

1. Apply Multiple Strokes to an Object

Adobe Illustrator is a program that is built around vector objects that have a stroke (the outline) and a fill (the central color). If you’re relatively new to Illustrator, you might not realize that objects can have multiple strokes and fills.

illustrator strokes

This target board image might look like it’s made from lots of different objects combined. In fact, it’s one object. A circle with a yellow fill, and red, blue, black, white, and black strokes.

Here’s how it was done:

illustrator strokes outside

Draw the circle, 80px across. Set the fill to yellow, and the stroke to red with a 40pt width. Click the dotted line under the Stroke option and set Align Stroke to Align Stroke to Outside.

Now open the Appearance panel through the Window menu, or hit Shift + F6. Select the stroke and click Duplicate Selected Item. This creates a copy above the existing stroke.

Select the one below (we want the original stroke to be above) and set the color to blue and the size to 80pt. Then duplicate that.

illustrator repeat stroke

Repeat the process, changing the color and adding 40pt to the size of the stroke each time. For the final stroke, add just 2pt extra.

illustrator appearance

There are lots of other options. You can combine gradient and texture fills, add effects, change the opacity of elements, and more. You can also play with the order the strokes are placed on the image, to see the effect that has. Just drag and drop them into position.

Once you get used to the feature it becomes a whole lot easier than combining lots of elements to make relatively simple objects.

2. Make Patterns and Textures the Easy Way

Creating patterns and textures can be time consuming if you try to do it manually. The same job can be achieved in seconds if you learn how to use the Blend Tool.

With the Blend Tool you can repeat objects a set number of times, morph one shape into another, or create smooth gradients between different colors. And it’s really simple to master.

illustrator blend tools

To get started, draw two objects on your canvas. Now double click the Blend Tool to open the options dialog box. Set Spacing to Specified Steps and enter the number of times you want the object to be duplicated.

The other options are Specified Distance, which sets the distance between each repeated object in pixels, and Smooth Color for smoothly blending between two colors.

illustrator simple blend

Click OK. Then, with the Blend Tool selected, click the first object on your canvas followed by the second. The gaps fill in automatically.

types of illustrator blend

The Blend Tool works with almost any object, including text, with only a few exceptions. Try experimenting to see what you can achieve.

3. Hide Parts of Objects With Masks

Learning how to use masks can be a massive time saver. A clipping mask, as it’s called in Illustrator, is a shape that masks the object below it. Only the content that is positioned directly below the mask is visible. Everything else is hidden.

Masks let you combine patterns, textures, and gradients with shapes and text very quickly, and in a non-destructive way.

create illustrator mask

Start with the object you want to be masked, open on your canvas. Now draw a new shape on top of it. Make sure it’s on the same layer.

masked item illustrator

Use the Selection Tool to select both objects. In the Quick Actions panel on the right, click Make Clipping Mask.

You can reposition either the mask or the object being masked at any time.

illustrator compound path

To create a mask from multiple objects you need to combine them first. Select all the objects you want to include then go to Object > Compound Path > Make. This turns them into a single shape.

multi mask illustrator

Select your new compound path plus the object below it. From the Quick Actions panel choose Make Clipping Mask to finish the job.

4. How to Create Complex Shapes

Shapes are an integral part of the Illustrator experience, but creating complex shapes has always been quite tricky. The problem has now been solved by the best of Illustrator’s more recent additions, the Shape Builder Tool.

The Shape Builder Tool works by dividing a group of selected objects into segments, wherever their lines cross. All you need to do is select which of those segments you want to include in your shape, and which you want to exclude.

Here’s simple example to explain.

build shapes illustrator

Draw a few shapes, then use the Selection Tool to select all of them.

Click the Shape Builder Tool.

shape builder tool

When you move your mouse pointer over the selected objects you’ll see each individual “segment” become shaded. Simply click and drag through all the ones you want to add to your shape.

You can create more than one complex shape from any group. Just click and drag as often as you need.

custom shape illustrator

To discard segments you no longer need, hold Alt and click inside them.

5. Draw Shapes Freehand

An even quicker way to build shapes or objects is to draw them freehand.

illustrator shaper tool

The Shaper Tool recognizes certain gestures. Draw a rough circle, rectangle, triangle, and so on, with your mouse or pen and Illustrator will convert them into perfect shapes.

But that’s not all. You can use the Shaper Tool to combine shapes using an additional “scribble” gesture:

  • You can scribble inside a shape to remove its fill.
  • Scribble inside, then cross over the stroke to delete the shape completely.
  • Or scribble inside then draw a continuous line through connected shapes to combine them into a single shape.

scribble gesture

Although less precise than the other options available to you, the Shaper Tool is an effective way to get quality sketches down quickly. It’s particularly useful if you’re using a graphics tablet.

6. Draw Inside Shapes

Illustrator has three Draw modes that control where and how your tools can draw on the canvas. They’re found through a tiny button below the toolbar on the left edge of the screen.

The default setting is Draw Normal. This means you can draw anywhere on the canvas.

paint inside only

Select an object and set the Draw mode to Draw Inside. Now, anything you add to your image will only be visible if it’s within the bounds of that object. This is effectively a masking shortcut, and is very useful when working on icons, buttons, or small details.

The Draw Outside option has the opposite effect, and lets you isolate and protect certain parts of your image without needing to worry about re-ordering your layers.

7. Select Objects With the Same Properties

Say you want to drop the stroke on certain objects down by half a point, or change that shade of blue to something just slightly different. You grab the Selection tool, select all objects you want to edit, then make the changes, right?

Except when you’re working on large or complex documents, actually finding all instances of the same color, stroke weight, or whatever else, can be a challenge in itself.

select same illustrator

Fortunately, you don’t need to do it manually. The Same option will do it for you.

Select an object with the properties you’re looking for. Now go to Select > Same and choose the property you’re searching. It could be the Fill Color, Stroke Weight, Blending Mode, or several other options.

Once you click, all the objects that share those same properties will be selected.

8. Switch Colors Quickly

When you’re experimenting with colors or color schemes you will often find you need to change all instances of a single color within your image. You can do this quickly using the Recolor Artwork option.

First up, select the object whose color you want to change. It may be a single object. Or, use the Same option outlined in Step 8 to select all the objects containing the same fill or stroke color. Alternatively, hit Ctrl + A or Cmd + A to select everything on the page.

recolor artwork illustrator

Next, click the Recolor Artwork button in the Options Bar at the top of the screen.

The color of your selected objects will be shown under Current Colors. Double click the box under New to select a new color to change them to.

preset colors illustrator

If you’re working with logos, web artwork, or the like, hit the Harmony Rules dropdown at the top of the window to see a range of preset color schemes based on your existing choices. The colors update in real time, so keep clicking through until you find a combination you like.

Now You Can Work Faster in Illustrator

As daunting as it may be at first, the more you know about Illustrator, the faster you’ll become at working in it.

These Adobe Illustrator tips and tricks should help you become a whole lot more efficient with the app, and you can then start using it for all your design projects. From creating logos to designing business cards, and much more.

And if you still feel like you need to get up to speed on what the program has to offer, check out our beginner’s guide to Adobe Illustrator.

http://static.makeuseof.com/wp-content/uploads/2018/04/multi-strokes.png

via MakeUseOf

Thursday, April 26, 2018

How to Turn Your Amazon Echo Into a Smart Home Security System

How to Automatically Log Your Daily Life to Google Sheets

Life can blind us with its routine. Let’s turn to Google and open up new opportunities to improve your life? The simple act of life logging with Google Sheets can uncover details which often go unnoticed. You don’t have to sweat because you can do it automatically. There’s no special knowledge required.

In this article, we’re going to cover five specific examples of how a daily log of your life activities can be used to identify opportunities. These might uncover opportunities to improve your health, saving money, or even your relationships.

The examples used here require only simple Google Script code to create the automated logging and notifications. If you want you can copy the scripts right out of this article and into your own Google Sheet project.

Get Weight Log Reminders

When you’re done setting up this automation, all you’ll have to do is remember to step on your smart scale every day.

This will submit a new entry to your Google Sheet. However, if you go more than a week without getting on the scale, you’ll receive an email reminding you to weigh yourself.

Smart Scale

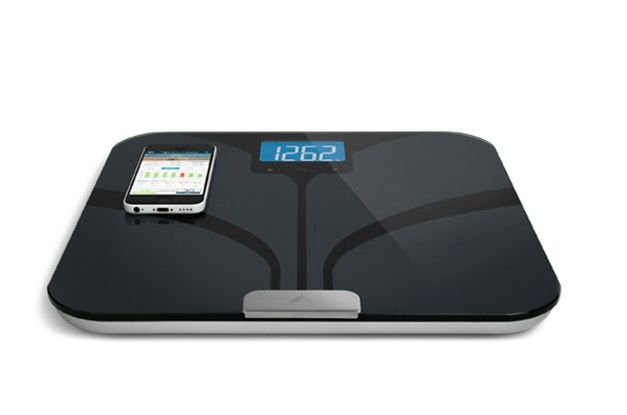
The important thing for this automation to work is that you purchase a smart scale that provides a way to log your weight to Google Sheets automatically. There are usually multiple ways to accomplish this depending on the manufacturer.

  • The scale may let you send an email notification, which you can use to trigger an IFTTT action that writes the weight to a Google Sheet.
  • The scale may be compatible with IFTTT, so you only need to select it in IFTT as a trigger, and choose Google Sheets as the action.
  • Direct Google Sheets integration may be available.

Make sure to do your homework before you buy the scale so you know it will let you log your weight.

In my case, I failed to do my homework. The Weight Gurus smart scale does not provide an automated output to email or IFTTT, but the app does allows me to export all weight recordings to a CSV file, which I export into Google Sheets every day.

logging your daily life to google sheets automatically

This isn’t ideal, and hopefully, you’ve purchased a smart scale that will automatically log using one of the three solutions above.

Once the scale is sending new data to Google Sheets, the next step is to create a Google script that will check every day whether you’ve weighed yourself.

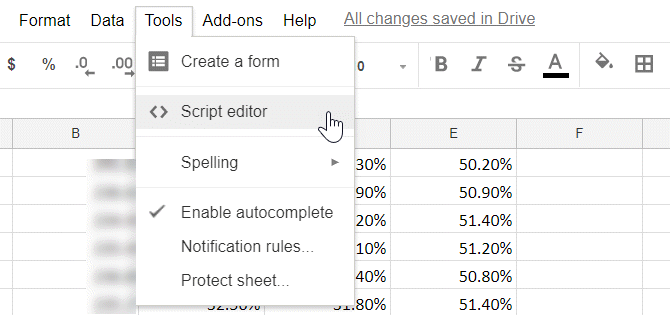
To create this new script, open that Google Sheet where your weight is getting logged and select Tools from the menu, then Script editor.

logging your daily life to google sheets automatically

In the script editor, paste the following code and save it as a new project.

function myFunction() {
  var ss = SpreadsheetApp.getActiveSpreadsheet();
  var sheet = ss.getActiveSheet();
  var lastRow = CountColA();
  var lastDate = new Date(sheet.getRange(lastRow,1).getValues());
  var thisDate = new Date();
  var DateDiff = (thisDate.getTime() - lastDate.getTime())/1000/60/60/24;

  if (DateDiff > 7) {
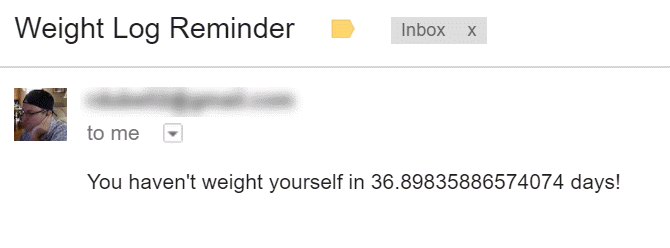
    MailApp.sendEmail("xxxxxx@gmail.com", "Weight Log Reminder", "You haven't weighed yourself in " + DateDiff.toString() + " days!");
  } 
}

function CountColA() {
  var sheet = SpreadsheetApp.getActiveSheet();
  var data = sheet.getDataRange().getValues();
  for(var i = data.length-1 ; i >=0 ; i--){
    if (data[i][0] != null && data[i][0] != ''){
      return i+1 ;
    }
  }
}

The way this code works is as follows.

  1. Uses the CountColA function to identify the last row of data in the sheet.
  2. Pulls the date value out of the last row, and subtracts it from today’s date.
  3. Converts the date difference from miliseconds to days.
  4. If more than seven days have passed since the last entry, the script will send a reminder email.

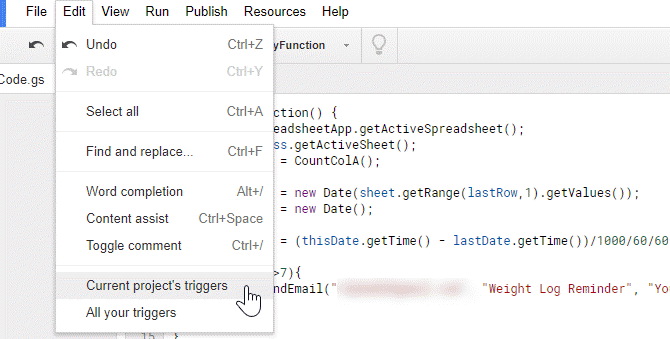
If you’re curious how sending email via Google Scripts works, we’ve covered the details in another article. Finally, you just need to configure the script to run every day. To do this, in the script editor, click on Edit, and then Current project’s triggers.

logging your daily life to google sheets automatically

Set your new function to trigger as a Time-driven event using the Day timer, and set when you want the script to run every day.

logging your daily life to google sheets automatically

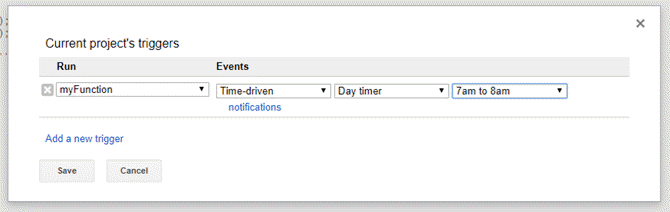
I’ve set my script to run every morning before my alarm goes off, so that I’ll see my email reminder first thing in the morning.

logging your daily life to google sheets automatically

It’s a really useful way to never forget to weigh yourself. By weighing yourself often, you’ll always be aware of where you stand health-wise.

See Who’s Wasting Energy at Home

There is nothing more frustrating for a homeowner than seeing your heating or cooling bill climbing month after month, and not having any clue as to what’s causing it.

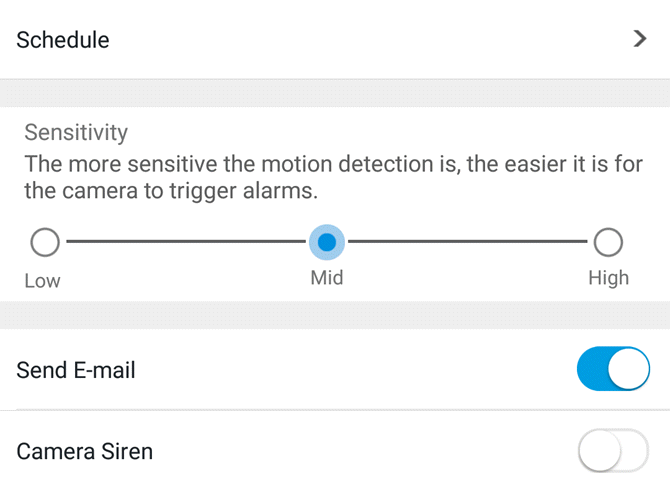
There are a lot of ways to track your home’s energy use. One great way is to track where you may be losing air (hot or cold) to the outside is by monitoring how often people open and close the front door of your house. A great gadget for this is an indoor or outdoor wireless camera pointed at the entryway.

Nearly any wireless camera you buy these days allows you to send motion notifications via email. For example, I use the ReoLink Argus 2 Indoor/Outdoor Camera, and it allows for up to three email accounts to receive notifications.

logging your daily life to google sheets automatically

These notifications arrive in the following format.

logging your daily life to google sheets automatically

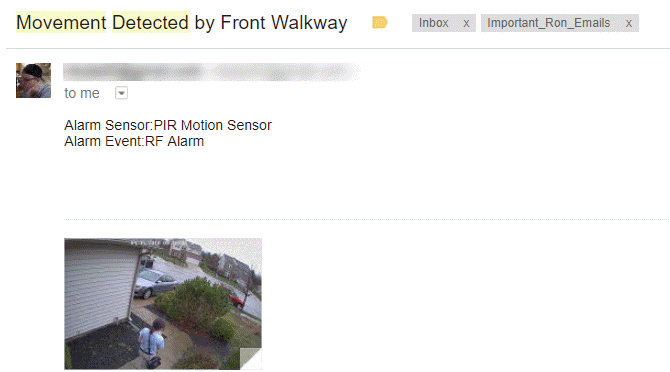
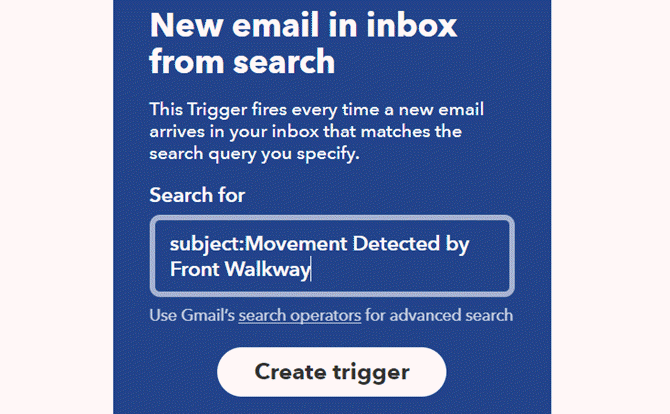
You’ll need to determine either the incoming email address or the subject line that should be used when the motion detection alerts come in.

Then you can use this in IFTTT when you configure the trigger for your applet.

logging your daily life to google sheets automatically

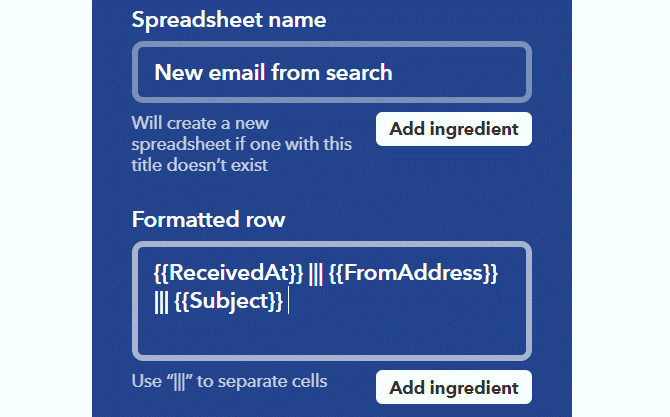
Then, set up the action in IFTTT to write a line of data that includes the date and time of the alert.

logging your daily life to google sheets automatically

Once this is set up, you’ll have a full log of all of the days and times the front door of your house was opened.

logging your daily life to google sheets automatically

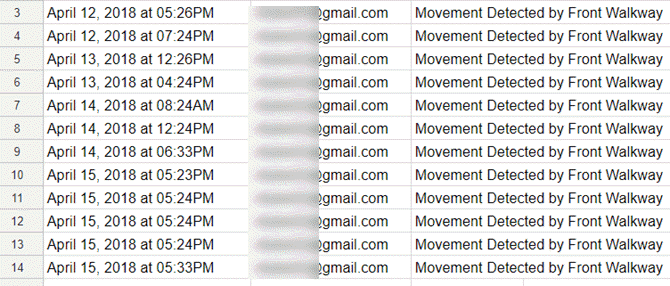
In this format, it’s easy enough see if there are any days where the front door is opening and closing excessively.

Even better, if your wireless camera is configured to send a snapshot whenever there’s motion, you could check your incoming email during those times and see who the culprit is!

Automated Gym Reminders

Another useful thing to log using Google Sheets is visits to the gym. It’s very easy to forget to go to the gym, or come up with excuses not to go. Sometimes all it takes is a little bit of encouragement.

By tracking how often you go, you’ll provide yourself with a record of your accomplishments. Go often and watch thet sheet fill up.

The best way to do this is using IFTTT. Specifically the Location trigger. Just type the address of your gym into the address field.

logging your daily life to google sheets automatically

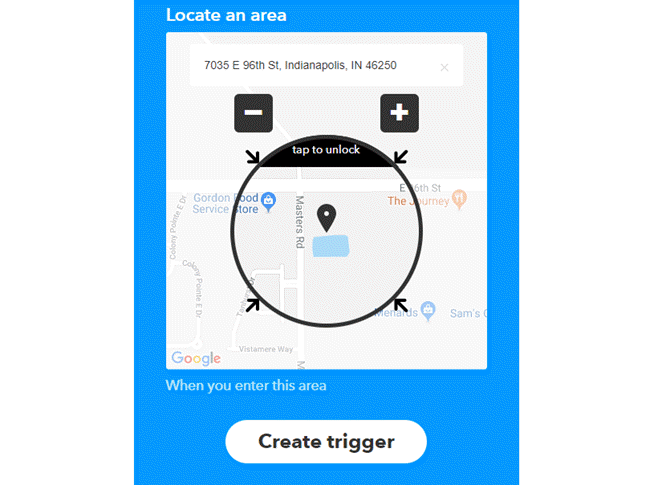
Create the trigger, and then choose Google Sheets as the action. The important data point is just the date, so make sure to leave at least the OccurredAt ingredient.

logging your daily life to google sheets automatically

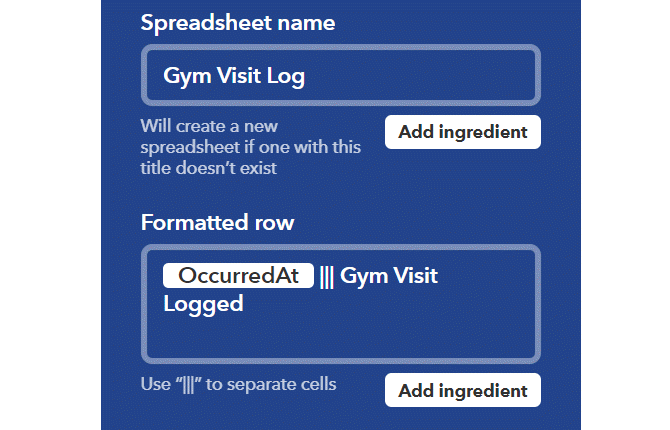
Now you’ll have a record of the day and time you’ve visited the gym each day.

A visual record of your success in going to the gym is great. But what if you just decide not to go and don’t even check the spreadsheet?

A solution for this is to trigger an automated reminder email using the same script as the weight logging one in the first section of this article.

You’ll just need to change the IF statement so the outgoing email looks something like this:

if (DateDiff>2) {
  MailApp.sendEmail("xxxxxx@gmail.com", "Exercise Reminder", "It's been " + DateDiff.toString() + " days since you've worked out. Get to the gym you sloth!");
}

Now you’ll get a gentle reminder if you go more than two days without going to the gym!

Get Better Sleep

Whether you own a Fitbit, Apple Watch, or a Samsung Smart Watch, you have a very easy eay to log how well you’re sleeping every night.

Keeping a history of that data can really help you understand different things that are hurting or helping your sleep patterns.

Not all of the solutions out there provide a way to log information to a spreadsheet. For example, Samsung Gear will log your sleep patterns to the Samsung Health app.

logging your daily life to google sheets automatically

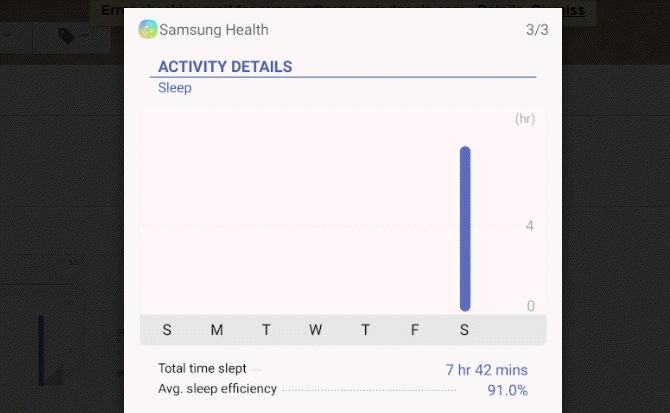
You can scroll back and forth in time in this app to see what your sleep patterns were like over time, but there’s no easy way to do a data analysis on the numbers.

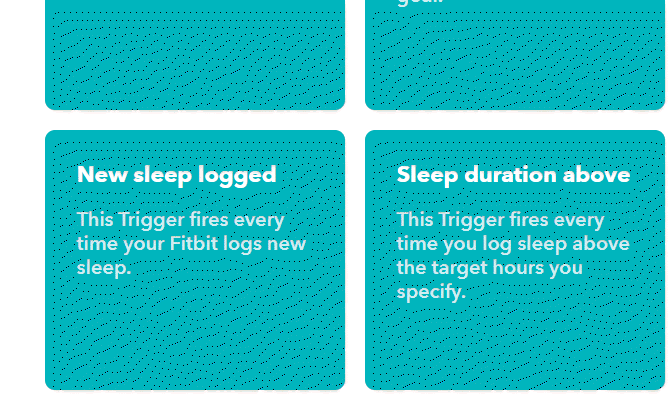
On the other hand, if you have a Fitbit, it’s a different story.

Fitbit is integrated with IFTTT, which means you can collecte data to a Google Sheet every time your Fitbit logs a new sleep event.

logging your daily life to google sheets automatically

You don’t have to own a Fitbit to get great sleep tracking. Khamosh liked the Apple Watch’s sleep tracking, and you can integrate Samsung Health with an app like Sleep as Android to achieve the same thing.

logging your daily life to google sheets automatically

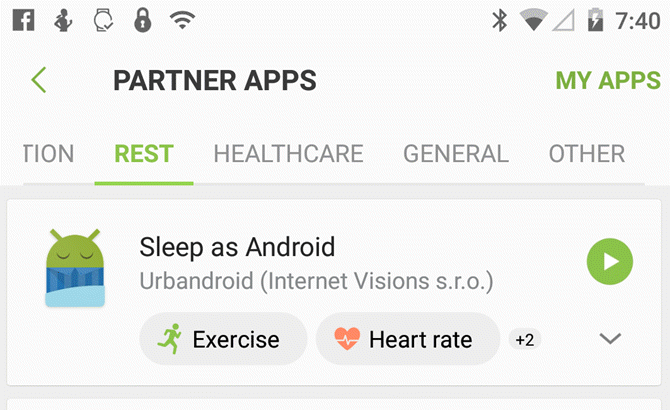
You actually don’t need to use Samsung Health at all, since Sleep as Android is capatible directly with your Samsung Gear smart watch (both S2 and S3).

Sleep as Android is compatible with IFTTT, but you need to set it up via a Webhook using the instructions in the user guide.

Once you’re logging how many hours a night you’re sleeping to Google Sheets, you can start trying to correlate that data with other events that were going on in your life during that time.

Some examples of what you can learn from this data:

  • Is your sleep quality better when you go to bed early or late?
  • Do you sleep better during certain seasons?
  • Are you sleeping better on certain days of the week?
  • Do your workout days (from your earlier log) affect your sleep quality?

By understanding what patterns lead to better sleep, you’ll have the knowledge you need to improve your odds of waking up much better-rested in the morning.

Trend SMS Activity With Spouse

Has your spouse ever claimed that you don’t give them enough attention?

Maybe you’ve been really busy lately and forgot to text them during the day like you usually do?

You can actually create a very quick Google Sheets log that’ll remind you if you’ve gone too long since sending a text to your spouse.

All you have to do is create an IFTTT recipe with Android SMS as the trigger.

logging your daily life to google sheets automatically

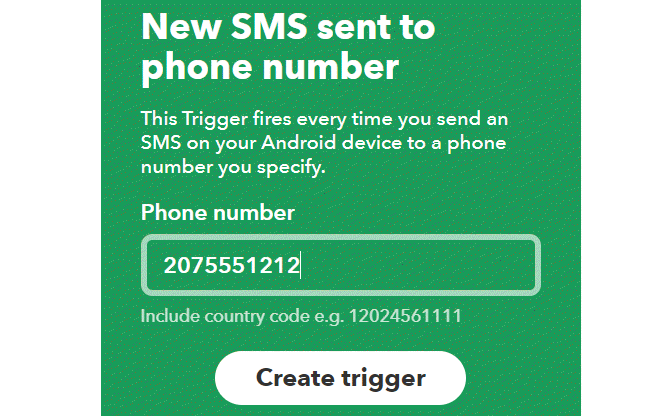
Fill in your spouse’s phone number as the “send to” phone number. This will trigger the applet every time you text your spouse.

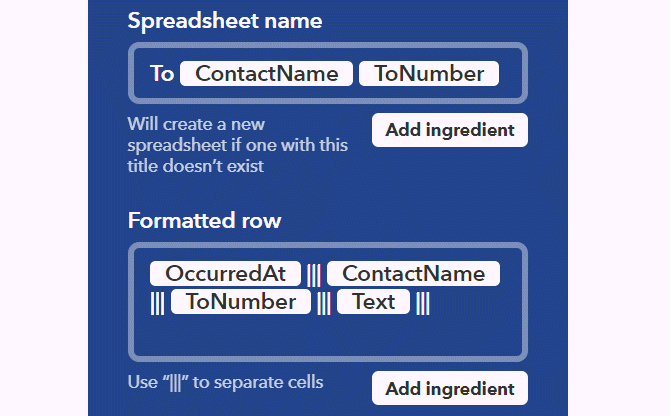
For the trigger action, choose Google Sheets Add Row to Spreadsheet.

logging your daily life to google sheets automatically

Now all you have to do is go into the Google Sheet, and create a Google Script just like in the first section of this article.

Modify the number of days when you want to alert, and edit the email send section of the code to something like this:

if (DateDiff>4) {
  MailApp.sendEmail("xxxxxx@gmail.com", "Spousal Reminder", "It's been " + DateDiff.toString() + " days since you've texted your Spouse. You're being neglectful!");
}

Yes, it’s probably sad that you need an automatic reminder to reach out to your spouse and say I love you, but it’s better than forgetting and not doing it at all, right?

Google Sheets Helps You Track Your Life

These are just a few examples of the ways you can take advantage of Google Sheets to improve your life.

It’s so easy to collect data from your life to Google Sheets. In nearly every area of your life, there’s probably a way to track and even create notifications that can help you improve in some way.

If you like what we’ve done here with scripting in Google Sheets, you’ll enjoy our more advanced article on Google Scripts that make Google Sheets more powerful.

https://ift.tt/2r2IjU3

via MakeUseOf