If there’s one thing we all thought the future would bring, it’s almost certainly shoes that lace themselves automatically. After all, just about everyone has seen Back to the Future and the iconic shoes featured within.
Still, these shoes sound like they’re packed with <a “no-callout” href=”//http://bit.ly/2TuObCJ features, and they definitely seem worth a look… Though the price might shock you a bit.
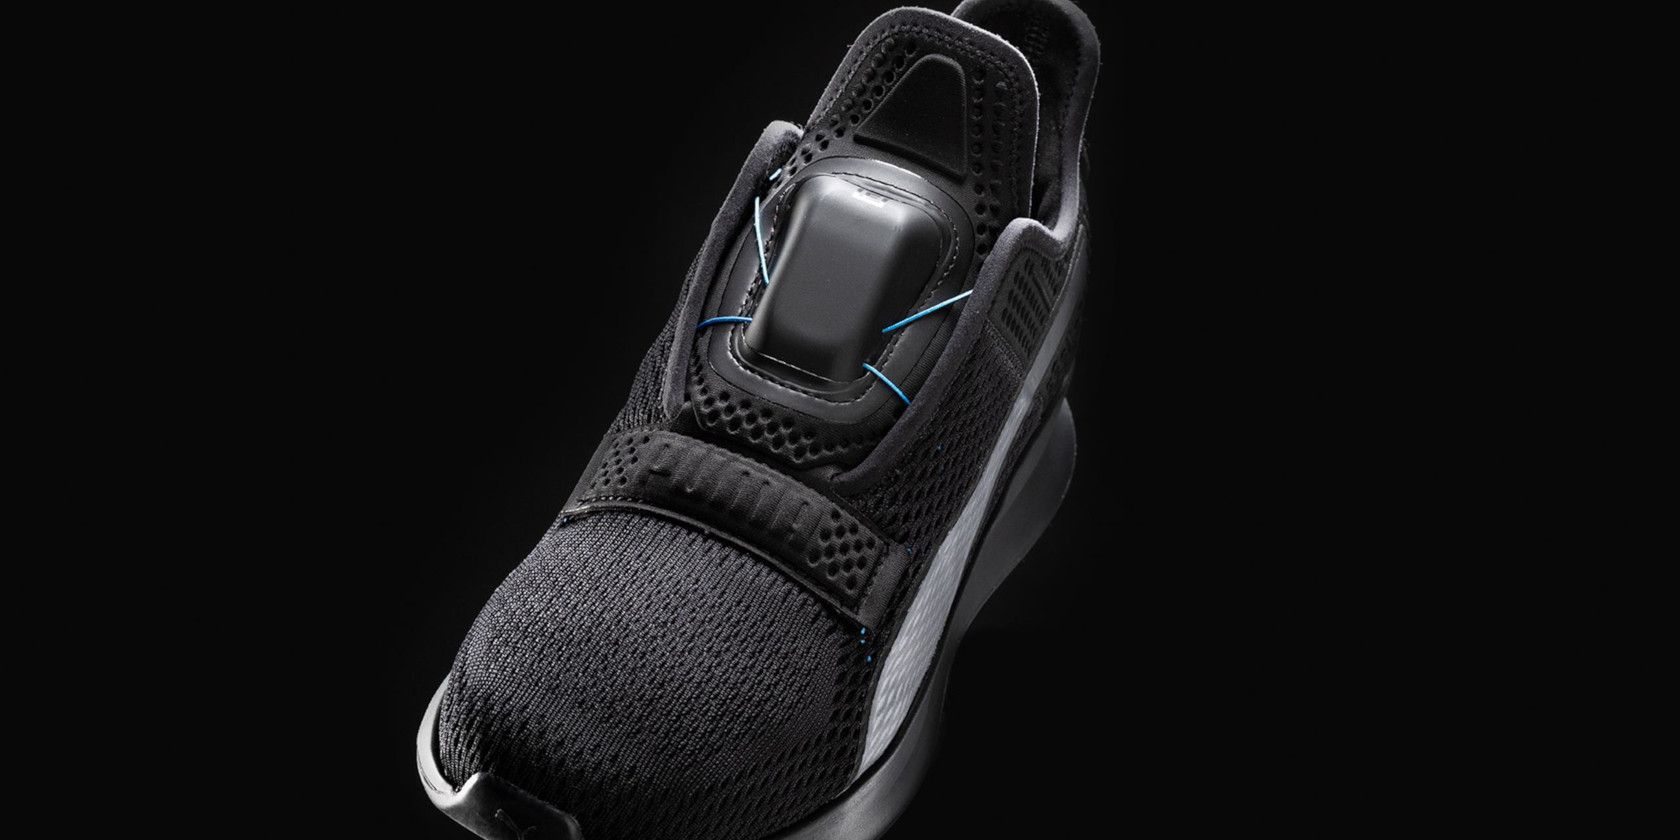
Fit Intelligence Shoe (Fi)
PUMA just unveiled these high-tech shoes today in Hong Kong, and they sound rather interesting. The main feature is the fact that the shoes don’t require you to lace them like a traditional pair of shoes would. Instead, they feature a cable that runs through the upper portion of the shoe.
Once you step into the shoe, you swipe up on the small module, and the shoes tighten around your foot.
According to PUMA, the shoe actually features a proprietary system that learns the shape of your foot and tightens accordingly. Of course, we’ll have to wait until we get to try a pair for ourselves to see how well this works and how comfortable they are, but it all sounds very promising.
You won’t need to rely strictly on the shoe’s reading of your foot, as there’s a smartphone app that lets you tune the fit to your preferences. After all, shoes are definitely not one size fits all. There will also be support for Apple Watch, which will allow mid-run adjustments without taking your phone out of your pocket.
To remove the shoe, you simply swipe down on the little module on the front, and the laces will loosen, making it easy to slide your foot out.
How Much Will the Fi Shoes Be and When Are They Out?
Unfortunately, anyone waiting for the future of footwear from PUMA is going to have to be patient, as the shoes aren’t expected to release until spring of 2020. We’re more than a year away from getting to experience the joy of never tying our shoes again.
As for the price, PUMA announced that the shoes will be available for $330 a pair, which puts them slightly ahead of Nike’s upcoming model, which will retail for $350.
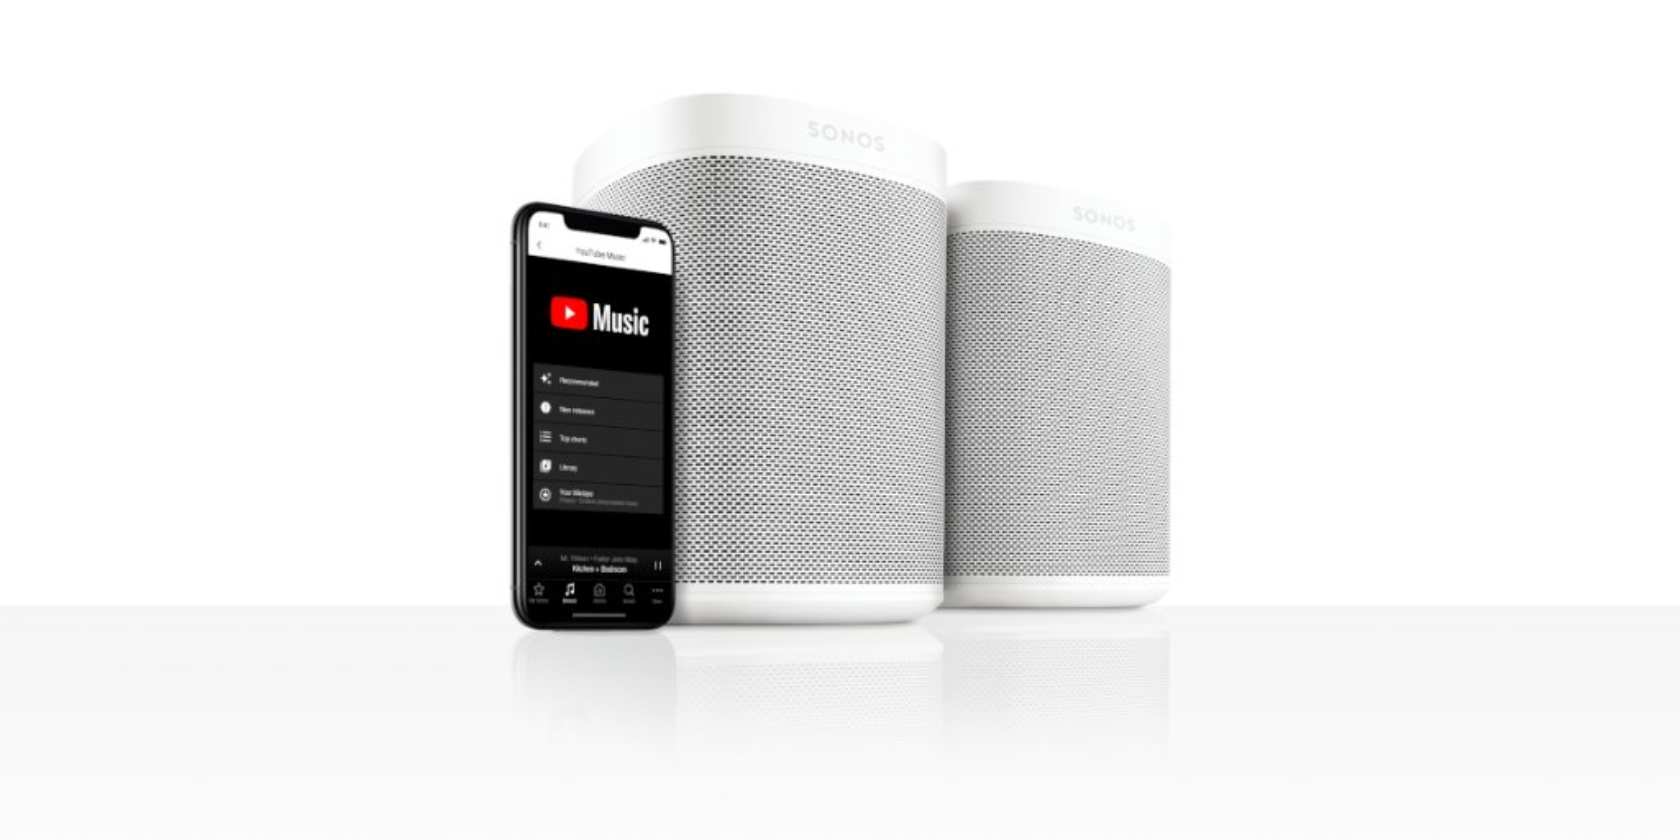
If you own a Sonos speaker you can now listen to YouTube Music through it. That is if you subscribe to either YouTube Premium or YouTube Music Premium. This gives fans of Sonos speakers yet another streaming music service to consider using.
What Is YouTube Music Anyway?
As music streaming services go, YouTube Music is the new kid on the crowded block. In May 2018, Google launched YouTube Music and YouTube Premium. The former offers YouTube-centric music streaming, with the latter replacing YouTube Red.
What differentiates YouTube Music from the competition is the onus on music videos. However, a YouTube Music Premium buys access to an audio-only mode (as well as ad-free listening and downloads). Putting it somewhat on a par with Spotify and Apple Music.
Using YouTube Music on Your Sonos Speaker
Now, as detailed on the Official YouTube Blog, YouTube Music is available on Sonos speakers. Essentially, this means anyone with a YouTube Music Premium or YouTube Premium subscription can now listen to YouTube Music through their Sonos speaker.
Today, @youtubemusic Premium is available to stream on Sonos, making it easier than ever to listen to your favorite playlists anywhere in your home. The new music streaming app. Made by @YouTube. pic.twitter.com/zMcAMkVLdW
The YouTube Music features available through the Sonos app include:
Recommended, which features “listening suggestions based on your favorites”.
New Releases, comprised of “the freshest music specifically tailored to your tastes”.
YouTube Charts, which is “the best way to see what’s hot in music right now”.
Your Mixtape, containing “your favorites and new songs we think you’ll love”.
Library containing “your saved playlists, albums, and songs”.
YouTube Music is available on Sonos in every country where YouTube Music and YouTube Premium are available. Existing subscribers should follow the instructions on this page to set up YouTube Music on the Sonos app. Everyone else can sign up for a 30-day free trial.
Helping YouTube Music Compete
YouTube Music cannot compete with Spotify and Apple Music in terms of the number of subscribers. However, with the might of Google behind it, plus the focus on videos, we wouldn’t bet against it carving out a sizeable chunk of the market.
As for Sonos, we’re big fans of the speakers, with our Sonos One review suggesting this is “the one smart speaker to rule them all”. Which, with brilliant Amazon Echo and Google Home speakers also available to buy, is a huge compliment.
Data plays a vital role in sales, finance, and countless other sectors. Yet relatively few people even know how to work with a simple spreadsheet. If you want to stand out from the crowd, the 2019 Microsoft Excel Bootcamp Bundle can help. Through five courses and over 78 hours of video tutorials, this bundle can turn anyone into a number-crunching expert. You can get the training now for just $39 at MakeUseOf Deals.
Master Microsoft Excel
If you work behind a desk, you have probably met Microsoft Excel before. But without guidance, it’s easy to miss some of the most powerful features.
This bundle helps you learn the software inside out, with hours of hands-on tutorials from expert instructors. You don’t need any prior knowledge to get started, and the courses teach you valuable workplace skills.
The first track covers all the fundamentals. You learn how to navigate Excel, create a workbook, format your data, use formulas, and design eye-catching graphs.
The Advanced course shows you a variety of time-saving techniques, along with powerful functions and macros. You can also take a deep dive into PivotTables, learn about VBA programming, and discover how Excel can provide key business insights.
You can learn at your own pace, and each course comes with a certificate of completion — a great addition to any résumé.
78 Hours of Training for $39
They’re worth $1,725, but you can grab all five courses now for only $39 with lifetime access included.
The internet and its flagship websites have come a long way. Gone are the days when Amazon only sold books and Facebook was limited to a handful of schools. In the process, most of them have also become cluttered and too cumbersome to use. But thanks to a few alternative ways to browse them, we can enjoy an uncluttered experience.
Therefore, here are eight Chrome extensions that let you fix some of the internet’s most popular websites like Amazon, Facebook, and YouTube.
1. Amazon Lite
This extension gets rid of every unnecessary element from Amazon’s desktop website and leaves you with a clean design. That includes clearing up the endless rows of recommendations, advertisements, the huge offer banners, and more.
Instead, Amazon Lite replaces it with a home page that only has a search bar at the top and a handful of links for quickly jumping over to your past orders, lists, cart items, etc.
Also, when you look up a product, Amazon Lite presents you with a clear page with all the crucial filters. There’s also an option for switching to the original Amazon website and enabling or disabling the extension on-demand.
If you’re someone who is often distracted by the rows of recommendations or finds it too difficult to focus on what you’re searching for, this extension is undoubtedly a no-brainer.
Unlike Amazon Lite, ShutUpBookingCom won’t magically revamp Booking.com. On the contrary, it mends a bunch of tiny, pushy design choices. The aggravating one is the constant alert which tells you if a particular property is in high demand. These are designed to force you into making a rushed decision.
ShutUpBookingCom is itself is a lightweight tool and won’t bog your computer down by making an already heavy website even worse.
Social Fixer is the ultimate utility for people who are fed with how Facebook has evolved. The extension allows you to customize or eliminate nearly any column or content on the website whether it’s stories or the chat window.
What’s more, Social Fixer comes with a flurry of options so that you can filter out anything you don’t like. You can do so by either setting up triggers or selecting an event from one of the predefined topics like Pokemon Go. Plus, there’s a stealth mode through which you can remove likes and comments. It’s can be the holy grail for Facebook addicts.
Our next extension on the list, appropriately titled Improve YouTube, does exactly what its name says. It features the ability to personalize every bit of the YouTube desktop website. You can move blocks around to your liking, ditch them, or tweak their various properties. For instance, the size of the player.
Moreover, Improve YouTube unlocks a vast number of features which are not even natively available. That includes tools such as a pop-up player, playlist control, options to hide moving thumbnails, and a whole lot more. You can even revert back to previous YouTube designs and configure custom shortcuts.
Shine is another free Chrome extension that tries to fix the front page of internet i.e. Reddit.
The add-on refreshes the site’s design with an aesthetic that’s easier on the eye and more intuitive to use. One of the highlights of Shine is that it has a grid view so that you can quickly scroll through posts.
Plus, you can try on a host of different themes, layouts and choose the one that suits your preferences the best. Like others, it also has all the customization tools you need to hide specific sidebars and elements.
Fix Twitter is not as powerful as other apps on the list. But it does improve the microblogging experience. It brings back a bunch of handy features Twitter decided to ax. For instance, it can show the good-ol’ replying-to indicator when you’re replying in a thread.
Furthermore, the tool replaces Twitter’s proprietary t.co links with the original address and even hides the “in case you missed it” alerts.
This little extension fills the wide void in the whole Instagram experience by delivering a proper desktop layout.
Instagram’s website essentially feels and functions like a stretched out version of the mobile web page. The add-on overcomes that by turning it into a grid so that you can utilize the entire screen real estate and view more posts in one instance.
In addition, it puts the stories and suggestions sidebar onto a scrollable pane enabling you to hide and reveal it whenever needed.
The extension offers a bunch of other options including a dark theme, the ability to set the number of rows, columns, and a photo-only mode. Additional video controls are available too which let you rewind or forward them, download the file, and tweak the volume.
Super Netflix, as the name suggests, augments your streaming experience with a couple of nifty enhancements. While it keeps most of the design intact, the extension discards a few of its annoyances. That means putting an end to auto-playing previews on the home page, blurring out descriptions to avoid potential spoilers, and automatically skipping intros.
Plus, Super Netflix adds a handful of supplementary, little tools such as the ability to change the playback pace, and upload your own subtitles. It also brings several modes to alter the video’s several qualities like brightness, contrast, and color.
There’s a certain irony to Chromebooks. On one hand, Google is hardly a company most people would associate with privacy. On the other, Chromebooks are easy to lock down. With a few tweaks, they can provide a relatively safe way to get online. And that’s without installing anything.
So how do you configure Chrome OS to guard your privacy? Here are some steps that are easy to take. These tips also apply if you’re using Google Chrome on Windows or MacOS, though the settings may vary.
1. Disable These “Privacy and Security” Settings
Google has built several features into Chrome intended to improve your web browsing experience. The catch is that these services involve sending data to the company’s servers, which it can add to your user account. Google then analyzes your data in order to sell increasingly personalized ads.
Some of these features send data to Google every time you enter a letter into the navigation bar.
This means Google gets to see everything you search for and every website you visit, whether or not you use the Google search engine, and even if you change your mind and decide not to visit a site or start a search. Are you comfortable with Google knowing that much about you?
You can disable these options by opening Chrome settings and going to the Privacy and security section.
Features to disable:
Use a prediction service to help complete searches and URLs typed in the address bar or the app launcher search box
Use a prediction service to load pages more quickly
Use a web service to help resolve navigation errors
Help improve Safe Browsing
Automatically send diagnostic and usage data to Google
Use a web service to help resolve spelling errors
2. Enable “Safe Browsing” and “Do Not Track”
Under Privacy and security, there are also a few settings you will likely want to enable.
Safe Browsing is one of them. This feature can prevent certain malicious or poorly secured sites from opening in your browser.
Do Not Track is another. Websites sometimes monitor your behavior. They may know how much time you spend on any given page and what type of information most interests you.
Sometimes they do this to provide you with a better experience, but in the process, they’re able to build a profile that you might prefer they didn’t have. With Do Not Track enabled, you’re telling websites not to track your behavior. Will all of them listen? No. But some might.
3. Disable or Encrypt Data Syncing
Web browsers may primarily serve to connect us to the web, but your bookmarks and browsing history are typically saved on your computer. You don’t have to store everything online. If you enable syncing, you’re taking data from your computer and giving it to Google. Disable syncing to keep a copy off of Google’s servers.
You can disable syncing by going to People > Sync. There you can turn off Sync everything and untoggle various categories.
If you use numerous devices and value having your browsing data synced across all of them, you can instead choose to encrypt all of your synced data with a passphrase. You can find this option underneath all of the toggles mentioned above.
Chrome will ask you to create a passphrase that you will need to enter on every device you choose to sync. To keep this data private, make sure the passphrase is not the same as the one you choose for your Google account. This way Google’s servers will store your data, but the company won’t have the passphrase needed to decrypt your files.
Warning: Be careful not to forget your passphrase. Since your passphrase is not stored online, Google cannot help you recover it. This means you will lose your synced data.
4. Disable Location Tracking
Websites can get an idea where you live from your IP address, but with location tracking, they can get your exact location. You can manage location tracking under Privacy and security > Content settings > Location.
Initially, Chrome will ask if you want to allow a site to access your location. The browser will keep a list of all the sites your permit or deny. But more often than not, you can use the web just fine by blocking this functionality entirely.
You can use Google Maps and similar sites by entering your address manually, just like in the days before our devices came with GPS built-in.
5. Don’t Save Addresses and Payment Methods
Whether you love the internet or prefer to stay offline, these days it’s hard to avoid filling out online forms. Chrome will try to make this task easier for you by remembering information you fill out often, such as your email address, your physical address, phone numbers, and credit cards.
As tempting as this may be, it means you’re creating a record of your personal information that isn’t necessary. Even if you disable syncing, someone with access to your computer can peak at this information. This could be dangerous if you leave your computer in a public place, but it can also lead to unintended consequences when sharing your device with friends or family members.
You can tell Chrome not to remember most of this information by going to People > Addresses and more.
To stop Chrome from storing your credit cards, go to People > Payment methods. Both locations allow you to delete any information that Chrome may have already stored.
6. Limit Cookies
When we talk about websites and ad networks tracking your behavior, we’re typically talking about the use of cookies. Your browser stores these files so that websites function as you would expect. Without them, you’re starting from a clean slate whenever you visit a page.
Cookies are important for sites that let you sign into an account or add items into a cart.
But sites can store whatever they want in these files. So can ad networks. That’s why it’s a good practice to limit which cookies are permitted onto your computer.
To do this, go to Privacy and security > Content settings > Cookies. Enable Block third-party cookies. To better cover your tracks, you can also enable Keep local data only until you quit your browser, but know that this means you will have to sign into sites again the next time you open Chrome.
You can see all of the cookies Chrome has saved by selecting See all cookies and site data. Here you can delete cookies one at a time or clear them all.
7. Change Default Search Engine
Chrome defaults to the Google search engine. That provides Google with every search that we enter into the navigation bar. This information is so personal, it means Google knows certain things about us that would surprise our loved ones or closest colleagues.
You can cut Google off from this information by changing your default search engine. You could try Bing, if you prefer, though that requires giving your data to Microsoft rather than Google. Alternatively, you can try a search engine that prioritizes privacy.
You can change your default search engine by going to Search and Assistant > Manage search engines. You can also get here by right-clicking the navigation bar and selecting Edit search engines… in the context menu.
Under Search and Assistant, you also have the option to change “Search engine used in the address bar.” You can also choose to disable Google Assistant, if your computer supports that feature.
Other Steps You Can Take
These tips will greatly reduce the amount of information you put online, but it won’t stop all data collection. It’s still possible for others, including your Internet Service Provider, to monitor your browsing habits.
Let’s not stop with your browser and network settings. If you own a Chromebook, then you likely have a Google account. You’ve probably already given Google quite a bit of data. Fortunately, Google is somewhat transparent about what it collects. You can take a look at your account and limit what data Google can access.
We’ve all had times when a video’s quality is not what we’d like it to be. The issue is particularly pertinent on mobile devices; a shaky hand, less-than-ideal lighting, or poor-quality hardware can ruin a recording.
If you’ve ever wondered how to improve video quality, you’re in luck. Today, we’re going to run through the best video quality enhancers.
Why Should You Use a Video Enhancer?
Video enhancers have a lot of features that can breathe new life into your footage. Naturally, not all the apps include all the features, but you can expect a selection of the following:
Upscaled resolution
Better lighting
Improved stability
Denoising
Brightness adjustments
Cropping, rotating, and flipping
Filters
Effects and animations
So, which apps are the best video quality enhancers?
1. Filmora Video Editor
Available on: Windows, Mac
If you’re looking for an affordable desktop video enhancer, Filmora is a solid choice. You can either pay $39.99/year or buy a lifetime license for $59.99.
A free version is available, but it leaves a watermark on your content and doesn’t give you access to the app’s vast library of effects through the store.
Filmora’s tools to enhance your video include stabilization, brightness, contrast, tint, and saturation controls. There are also plenty of overlays, motion graphics, and title templates.
Lastly, multiple video formats are supported. They let you export videos in an optimized format for posting on YouTube and Vimeo.
There might be times when you need a video quality enhancer while you’re on-the-go.
If you have an Android device, one of the best apps available is PowerDirector. It has over 10 million downloads and an Editor’s Choice award from the Google Play Store.
PowerDirector is almost a professional-grade app, yet it’s free to download and use.
Features include multi-track timeline editing, an effects editor, support for blue screen and green screen with chroma key editing, voiceover tools, and abundant effects.
The app also has a photo editor. If you’re already using a photo editor for Android, you might be able to delete it save some space on your device.
Avidemux is a free, open source video editing and processing app.
If you want to make your video’s quality better, you can make use of the software’s stabilization tool and its video resolution converter. You can upgrade videos regular into high definition resolution.
It’s a great app to use if you’ve got a wide variety of video formats in your library. The app supports FLV, MKV, AVI, WMV, MOV, OGM, MPEG, MP4 and more.
On the downside, Avidemux does not offer a video timeline or creative effects. Which means it might not be suitable for people who need a video enhancer for their work.
If you’re an iOS user who needs to improve a video’s quality, you should check out Pinnacle Studio Pro. The app works well for enhancing iPad videos as well as iPhone videos.
Pinnacle has been producing video editing apps for a long time. The iOS version isn’t as packed full of features as the desktop version, but you’ll still have access to speed and transitions controls, individual frame editing, effects such as picture-in-picture and pan-and-zoom, and an audio editor.
It’s also an excellent app for people who want to post enhanced videos on social media, with easy share buttons for YouTube, Facebook, Twitter, et al.
Unfortunately, unlike PowerDirector, Pinnacle Studio Pro is not free. You’ll have to pay a one-time fee of $12.99 for a license.
First and foremost, FonePaw Video Converter Ultimate is a video resolution enhancer. The app upscales video resolution, letting you convert a 480p video to 720p, 1080p, and 4K.
You can also use the app to improve dark videos by making them lighter, stabilize videos by reducing shaking, and to edit the color balance of a video by adjusting hue, saturation, and contrast.
FonePaw Video Converter Ultimate works with lots of video formats, meaning you shouldn’t need to go looking elsewhere. Supported formats include MKV, AVI, WMV, MP4, FLV, MP3, WAV, M4A, WMA, 3GP, and MJPEG.
The app is not free. You can enjoy a trial with no restrictions, but thereafter you’ll have to pay $29.95 for a lifetime license.
Videoshop is a cross-platform smartphone app that aims to bring a bit of fun into your video enhancing process.
The app takes a more light-hearted approach than some of the other options we have discussed so far, making it a perfect tool for people who want to create social media-friendly content.
For example, you can improve a video with a range of audio effects, including animal noises, farts, explosions, and laughter. There’s also a stop motion tool for short videos on Twitter, slideshow video support, and a stock music library.
Videoshop does have a serious side as well. Features such as trimming, slow motion, fast motion, voiceovers, and reverse playback are all present.
You can download and use the app for free, though there are some in-app purchases for extra tools and content.
We end with InShot. It’s another seriously popular cross-platform mobile app. The Android version alone has more than 100 million downloads.
The app is both a video editor and a video maker, meaning you have complete control over how to improve a video’s quality.
InShot includes a video trimmer, splitter, and merger, countless filters and effects, speed controls, a video format converter, and an audio editor.
Again, the app will appeal to social media junkies who want a video quality enhancer app. It has a preset list of size ratios that cover all the leading social platforms so your video will be right for every audience.
The Apple Pencil transforms the iPad from a touchscreen tablet to a computer with a precise pointing device. Add an Apple Pencil to your iPad or iPad Pro and you’ll watch it spread its wings. Tasks like editing photos, taking notes in class, drawing, and graphic design become more intuitive, faster, and easier.
Check out our list of the best Apple Pencil apps for iPad and iPad Pro.
Make a new note, then just start writing with the Apple Pencil. You can scribble, draw, or do whatever else you want. Tap on the Pencil icon at the bottom to reveal the toolbar. From here, you can switch to a pen or a marker tip and pick any color you want.
Tap on the lasso tool icon to make a section. With it, simply draw over part of the note and you’ll be able to pick it up and move it around.
The best reason to use Apple Notes as a quick note-taking app on iPad is its integration with iOS. Tap on the Lock screen with your Apple Pencil and you’ll instantly open the Notes app with either a blank note or the last note you accessed (you can specify this in the settings).
2. Notability
Notability is designed to be a multipurpose note-taking app, especially for students. When you open a note, you can choose to write with your Apple Pencil or type with the keyboard (and easily alternate between them).
Plus, you can record the audio in the background. This makes Notability the best tool for taking lecture notes. You can change the background to show graph paper and write as much as you need thanks to the infinite scrolling feature. Notability also marks page breaks, which makes it easy to export notes as PDFs or print them later.
Paper was one of the first iPad drawing apps, on the market and it’s still one of the best free options around. If you just want to doodle, or need an empty page to brainstorm with, download Paper. You’ll have access to half a dozen brushes ranging from pencil to marker—a fountain pen tip even makes an appearance.
If you opt for Paper Pro, you get access to diagram tools that convert your doodles into perfect lines and shapes. This can come in handy for storyboarding or when making mind maps.
Linea Sketch sits somewhere between Paper and more professional drawing apps like Procreate. It gives you the simplicity of doodling whatever you want, with power user tools like unlimited layers, transform tools, automatic ruler, grids, and more.
Like every other drawing app, Linea takes a canvas-based approach. Unlike Notability, you won’t find an endlessly scrolling page here. However, you can create multiple canvases and organize them in projects.
The grid tool gives you backgrounds for note-taking, drawing, and user interface design. Linea Sketch’s genius lies in its simple design. The tools are arranged in two panels on either side of the screen, letting you ignore features you don’t need.
But this is a double-edged sword, as many of Linea’s interesting features are hidden behind buttons. Once you get comfortable with the app, you should create a blank page and try all the tools at least once.
GoodNotes 5 is the modernized version of the original versatile note-taking iPad app. The first app’s premise was simple: it replicated a physical writing environment on the iPad. If you liked writing on a yellow legal pad, you could essentially get the same feeling on your iPad.
But this also meant that GoodNotes was limited in functionality. For example, it didn’t have the endless vertical scrolling we’re used to in apps like Notes and Notability. Instead, you had to flip pages every time.
GoodNotes 5 takes care of these annoyances. The continuous vertical scrolling makes note-taking much easier. And this version improves on all the aspects that make GoodNotes such a robust note-taking app. You can now nest as many folders as you want and organize them easily. Plus, the handwriting recognition works even if your handwriting is poor.
Pixelmator is known as an intuitive and simple image editor. While you can use Pixelmator to quickly edit photos, it does a lot more than that. It sits somewhere between Snapseed and Photoshop. You can create an empty canvas, add and arrange photos, create shapes, add text, and more. Each lives on its own independent layer.
The Apple Pencil adds an extra layer of creativity. Using the selection tool, you can accurately single out parts of images that you want to edit. You can also write over images freehand, or draw any shape you want. Pixelmator comes with a variety of brushes, from calligraphy to crayons.
Procreate is the ultimate Apple Pencil app. If you can dream it, and you have the skills, you can probably make it using Procreate on the iPad. In the absence of Photoshop, Procreate is rightly championed as an Adobe suite replacement.
Procreate is best suitable for drawing and painting. It’s not really designed for graphic design and vector work. For that, you should take a look at apps like Affinity Designer (see below).
If you’re a designer and primarily use Illustrator, you should consider making Illustrator Draw a part of your workflow. Illustrator Draw is a mobile version of the app. As the name suggests, it’s designed for vector drawings.
The app doesn’t do much else. But it can be a good place to start drawing projects that you then take over to your Mac. If you’re using Procreate or another raster app to draw and want to convert those to vector, you can import the image in Illustrator Draw, trace over it to create a vector drawing, and export it to Illustrator on the desktop.
Affinity Designer is the only good fully featured vector design app on the iPad. It brings almost all the features from the Mac app to the iPad, and does so in an intuitive manner.
At first glance, you might feel like there’s a lot going on as the app covers three edges of the screen with toolbars. But don’t be overwhelmed; tap on each button and you’ll see detailed options appear.
To make working easier, Affinity has created three different modes: Vector, Pixel, and Export. The Vector mode is for drawing, while Pixel mode is similar to using a raster app like Photoshop. If you’re using Designer to design graphics or user interfaces, Export mode makes it easy to export individual assets.
The app is fast and slick. Start creating points and paths, and you’re on your way to creating an illustration. The features you expect from a good vector design app (pen tool, node tool, fill tool, live shapes) are all here, and they’ve been made more intuitive for a touchscreen.
Coloring has been known to reduce stress and anxiety. The mere act of taking time out of your busy life and focusing on coloring can be meditative. And you don’t need to buy an adult coloring book or colored pencils to get started. All you need is an iPad coloring app.
Pigment has a collection of more than 4,000 coloring pages. You’ll certainly find something that strikes your fancy, from simple nature drawings to complex mandalas that you can really take your time with.
Pigment has two coloring modes. If you want, you can tap on a shape and only color in it. No matter how much you try, the color won’t bleed outside the selection. If you want a more realistic drawing experience, don’t tap on the shape before you start coloring.
As we’ve seen, the Apple Pencil is truly a remarkable tool when paired with apps designed for it. Grab some of the best apps for Apple Pencil and see what you can create.
We already knew Google+ was shutting down, but we now know exactly when and how Google+ will be disappearing from our lives. To be fair, most of us have already moved on from Google+, but this is important for the few people who still use the social network.
In October 2018, Google disclosed that Google+ had suffered a data leak. And as a result, the company announced the consumer version of Google+ is shutting down. And now we know all of the important dates, including when your Google+ account will disappear.
Download and Save Your Google+ Data ASAP
According to this Google Support page, Google+ will be shutting down on April 2, 2019. This is when “your Google+ account and any Google+ pages you created will be shut down and we will begin deleting content from consumer Google+ accounts”.
Before that, however, on February 4, 2019, you will “no longer be able to create new Google+ profiles, pages, communities or events.” This is also the date when the Google+ Sign-in button on sites and apps will start to be replaced by a Google Sign-in button.
You can, of course, download and save your Google+ content, but you’ll have to do so before April. Thankfully, you can download all of your Google+ data, “including your Google+ circles, Communities, Streams, and +1’s” at once by following these instructions.
It should be noted that all of this only applies to personal users, as the enterprise version of Google+ is sticking around. In fact, Google is planning to roll out “a new look and new features” for G Suite customers in the coming months.
A Sad End for Another Failed Social Network
This is a sad day for a social network that once boasted a passionate userbase. Unfortunately for fans of Google+, not enough people cared. So in the end, Google+ will go down in history as another in a long line of social media platforms that flopped.
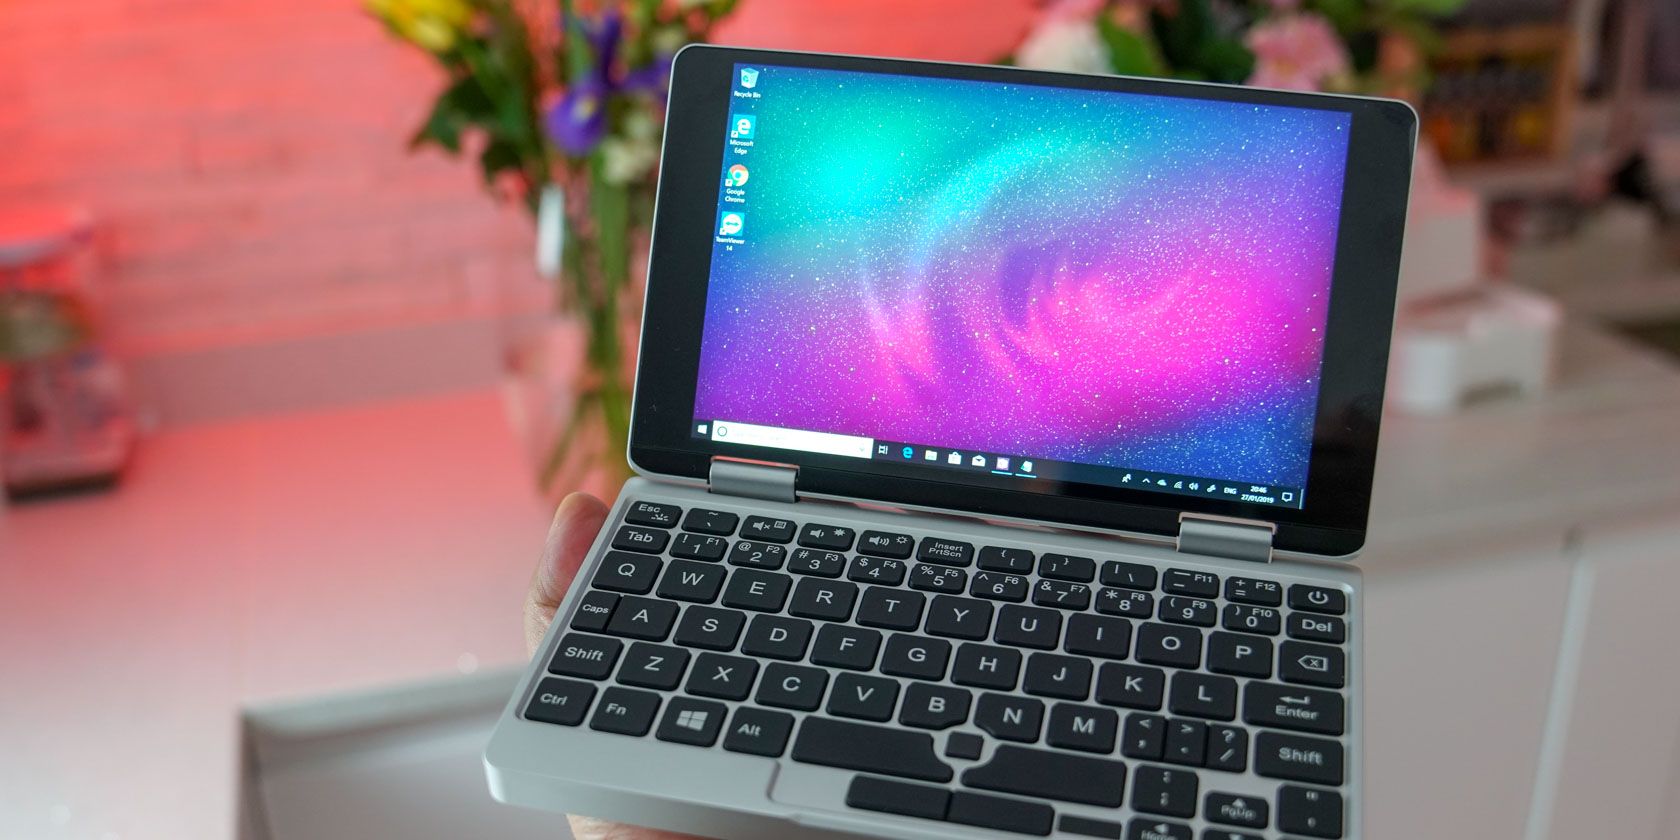
Our verdict of the One Netbook One Mix 2S:
The One Mix 2S has fantastic build quality, high specs, and is beautifully designed. Its let down only by the poor Wi-Fi and a steep learning curve keyboard.710
Recently there has been a flurry of small form factor laptops making their way to market. Is the humble netbook making a comeback? The One Mix 2S is the latest offering from One Netbook, but has it got what it takes to replace your laptop and let the netbook rise from the ashes?
Read on to find out more about the One Mix 2S, and at the end of this review, we’re giving our test model away to one lucky reader.
One Netbook One Mix 2S Specifications
CPU: Intel Core M3-8100Y, Dual Core up to 3.4GHz
GPU: Integrated Intel HD GRaphics 615
RAM: 8GB DDR3
Storage: 256GB PCIe SSD
Screen: 7″ IPS @ 1920 X 1200px, capacitive touchscreen
Battery: 6500mAh (3-4 Hours)
OS: Windows 10 Home
Wi-Fi: 2.4 + 5Ghz / 802.11a/b/g/n/ac
Bluetooth: 4.0
Ports: Headset / microSD / USB 3.0 Type-C / Micro HDMI / USB 3.0 Type-A
Weight: 1.14 pounds (520 grams)
Dimensions: 7.17 x 4.33 x 0.66 inches (182 x 110 x 17mm)
Other: Fingerprint Scanner / Stylus Support / Hinged screen for tablet mode operation
You may recall a period where companies like Acer and Asus brought the netbook to the world. You may also recall that they had both a brilliant form factor and a rather short shelf life. This came down mainly to how underpowered and awfully slow they were, as well as the advent of the iPad.
Netbooks were typically optimized for low weight and low cost, and as such omitted features like optical drives. By the end of 2012, many companies stopped producing them, and they’ve been replaced by devices such as the Chromebook.
Chromebook’s however, run the slimmed down Chrome OS. This means you can’t use applications that are designed for full-fledged Windows 10. Over the last few years, this is where the 7″ netbook space has really come to life. Hopefully, this second coming of the netbook is here to stay ,as many people prefer the form factor but aren’t willing to compromise on the spec or the OS.
Honey, I Shrunk the MacBook
The One Mix 2S is the second iteration of this product, and it was released around six months after its predecessor. This might seem quite rather soon, but there are a few improvements that make this version a little more special.
The One Mix 2S looks like someone took a shrink ray to a MacBook. This isn’t a bad thing in the slightest. Its chassis is CNC’d aluminum, and the keys are recessed perfectly to ensure they don’t leave ugly marks on the screen. Build quality is also fantastic, with the 2S feeling premium and well built.
The hinges are another indication of the excellent build quality. They’re stiff enough to keep the screen at the same angle when using the touch screen, but not so tough as to make opening and closing feel like a workout. The back features a fan vent, with a speaker grill and rubber feet on the bottom.
The port selection on the 2S is nothing short of exceptional. There’s a combination headphone jack, microSD card slot, mini HDMI and USB 3.0 Type-A. There is also a USB Type-C port which is where the One Mix 2S gets its juice, as well as being able to connect a dongle if you’d like to add more ports. I can’t fault the design or the port selection on the 2S. Full marks!
Form factor is obviously a focus here, and many will find the size of the 2S appealing. It can fit easily in a back pocket or a handbag if that’s your thing. The One Mix also has a yoga hinge, meaning it can transform from a laptop to a tablet in a matter of seconds.
One of the things that they removed from the first iteration is the backlit keyboard. It would have been better if they kept this in, but considering the upgrades, it’s a worthy trade-off.
Performance
The One Mix 2S is not just a pretty face. Spec wise it packs quite a punch for its size. Even compared to the 12″ MacBook which is near double in price! The 2S features an 8th Gen Core M processor which tops out at 3.4 GHz. There’s 8GB of DDR3 RAM and a blisteringly fast 256GB PCI Express (PCIe) SSD.
The PCIe SSD is one of the major upgrades from the previous generation. It is very important because boot up times and even just general usage are an absolute breeze for the 2S. This might sound like something mediocre, but for someone as impatient as I am, the One Mix 2S definitely has it where it counts. Machines that have even slightly delayed loading times are extremely frustrating, and there was no sign of that on the 2S.
The 7″ IPS display is pleasantly bright and sharp and has great viewing angles. Because the display is so small, you need to set the scale to at least 125% so you can comfortably see all the text on screen. Also, remember to turn on tablet mode in Windows if you’re turning the 2S into a tablet.
Another item that is lightning fast is the fingerprint sensor. It makes a huge difference to the experience that the One Mix 2S provides and in this day and age should be on every laptop!
Touch Screen
The capacitive touch screen is responsive and accurate, but the glass does feel like it has a little too much resistance. Having a touch screen on a laptop is actually very intuitive. In fact, after moving to another laptop I found that I missed having one.
As mentioned the hinge is very well built so while in laptop mode the screen’s angle doesn’t shift if you touch the screen. One Netbook also offers an optional stylus which does have different pressure levels. The stylus makes note taking on the 2S a cinch. If you’re an occasional Bob Ross, there are a few painting apps available as well.
The stylus does badly scratch the screen, however, so I highly recommend getting the optional screen protector if you’re planning on getting the stylus. This is one of the issues with the 2S which takes us neatly into the next section.
It’s Not Perfect
The One Mix 2S has got a lot going for it but there are a few issues. First and foremost, the fans can get very loud, very quickly. This is always the case for small fans and there is a workaround. Pressing the keyboard backlight key, which is an artifact from the previous model, slows down the fans. This will limit the CPU speed, but under normal workloads, you shouldn’t notice any difference.
The trackpoint touch based mouse is usable but it’s not great. If you need to scroll across the screen you need to pick your finger up and swipe a few times. The 2S also lacks a scroll button which can sometimes get a little annoying. A regular rubber trackpoint would’ve been perfect in this position.
The Wi-Fi, unfortunately, isn’t great. Both in terms of signal strength and throughput. Running a speed test on the 2S against any other machine illustrates how much room for improvement there is. Hopefully this is a simple software fix and not because the Wi-Fi antennae are of lesser quality.
The worst part of about this device though is the keyboard. Things like TAB being next to the number one, backspace being next to the letter P and the period and comma keys being half width makes the learning curve quite steep for this keyboard. I found myself making lots of errors and having to look down at the keyboard frequently. This isn’t indicative of the quality of the keyboard which is fantastic.
Verdict
It’s always good to validate when a product can be used as opposed to a hypothetical scenario. Fortunately, I had the opportunity to put the One Mix 2S to the test on site. During a relatively large Ubiquiti install, I had to work in the network cabinet on a ladder.
The form factor as well as having full Windows 10 on the One Mix 2S made this so much easier as opposed to having to carry a laptop everytime I had to move up and down the ladder. I’m sure many system administrators might appreciate this.
If you type a lot, however, the keyboard does not make for a compelling choice. Especially if you’re using this as a secondary machine, as you’d get used to one keyboard and have difficulty switching. If you’re planning on making this your daily driver I would suggest having a monitor, mouse, and keyboard to which your One Mix 2S connects.
It’s well built, quick, and is packed with features. Features that machines in a much higher price bracket just don’t include. Hopefully, the Wi-Fi issues can be fixed and there’ll be a better keyboard layout they can improve on. For now, I’ve got my eyes on what One Netbook is bringing in the future!
Use the coupon code makeuse6 to get grab the One Mix 2S for $659.99 for a limited time; or, enter our giveaway below to win one!