Saturday, March 30, 2019

Spotify Launches Premium Duo for Couples

Spotify has launched a new subscription plan called Premium Duo. As the name suggests, Premium Duo is designed for two people who live at the same address. That obviously applies to couples, but friends who live together could also make use of Premium Duo.

Spotify’s Premium Plans

Spotify has a range of plans to suit all budgets and needs. There’s Spotify Free for those who listen at home and don’t mind the occasional ad. And then there’s a range of Premium offerings, including Premium for Family and Premium for Students.

Premium for Family allows up to six people to use Spotify Premium for a fraction of the price of individual subscriptions. However, Spotify insists that everyone needs to live at the same address. And Premium Duo offers the same deal for two people.

What Is Spotify Premium Duo?

Premium Duo gives all of the benefits of Spotify Premium, but at a discounted rate. So, two people can play any track at home or mobile, listen offline, and remove the ads for €12.49/month. An individual Spotify Premium subscription costs €9.99/month.

Both Premium Duo subscribers get their own account, which means Spotify will recommend music to each person individually. However, Premium Duo subscribers will gain access to Duo Mix, a playlist which combines both individuals’ tastes in music.

The reason the pricing is in euros rather than dollars is because Premium Duo is currently only available in a handful of countries. These being Colombia, Chile, Denmark, Ireland, and Poland. It isn’t yet clear whether Spotify will launch Premium Duo elsewhere.

Spotify Caters to Couples

Spotify Premium Duo is an interesting proposition. It shows that Spotify is trying to cater to as wide a range of people as possible, including cohabiting couples. But it remains to be seen whether couples will opt for Premium Duo over sharing the same account.

If you’re new to Spotify, you should probably check out our unofficial guide to Spotify. It will help Spotify beginners get to grips with the basics, including browsing and searching for music, creating playlists, and downloading music to listen to offline.

Read the full article: Spotify Launches Premium Duo for Couples

https://ift.tt/2uDar2a

via MakeUseOf

How to Host a WordPress Site on Raspberry Pi

wordpress-host-raspberry-pi

If you want the most hassle-free WordPress experience, a managed WordPress host like WP Engine handles all the setup and support so you can focus on your content. It’s what we use to run our own sister sites.

But if you don’t have any funds, or just want to flex your DIY skills, then you can use a Raspberry Pi for your WordPress site.

Here’s how to set up Apache, MySQL, and PHP on your Raspberry Pi and host websites, both locally and on the web.

Why Use WordPress?

If you’re looking for a way to host a website with the minimum of fuss, WordPress isn’t the obvious solution. We’ve already looked at how to configure the Raspberry Pi to host a static or dynamic website (that is, one that relies on standard, prewritten pages, or a site that uses a database to populate pages).

But if you really need to use WordPress, or you’re developing a theme or plugins for a WordPress site, then having a Raspberry Pi with the blogging platform installed and ready to use is a great option.

Which Raspberry Pi Should You Use?
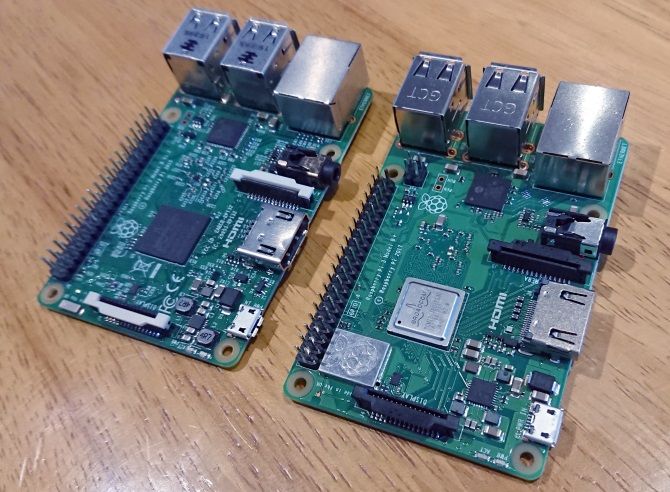
Raspberry Pi 3 and Raspberry Pi 3B+

To install WordPress on a Raspberry Pi, you’ll need to set it up as a LAMP server. With Linux, Apache, MySQL, and PHP installed, your Pi will then be able to handle WordPress (and other website software).

Several models of Raspberry Pi are available. You might have one, several, or none. But which one is the most suitable for running WordPress?

Happily, any version of the Raspberry Pi can be used to host a WordPress site. However, for the best results, we recommend you use a Raspberry Pi 2 or later. Additionally, ensure you’re using a larger SD card—at least 16GB—as storage space is a key requirement for web servers. (Also consider some external storage for the Pi!)

The rest of this tutorial assumes that your Raspberry Pi is powered on and connected to your local network. You should also have SSH configured, for remote command line access.

Step 1: Set Up Apache Web Server

Start off by installing the Apache web server. This is software that lets you serve any type of webpage to any browser. It’s all you need to serve a HTML page, static or dynamically created with PHP.

sudo apt install apache2 -y

Once installed, Apache will drop a test HTML file into the web folder on your Pi. You should test this from another computer (or smartphone) on your network. You’ll need to enter the IP address of the Pi in the address bar of your browser. If you’re using SSH, you’ll know this already; otherwise, enter:

hostname -I

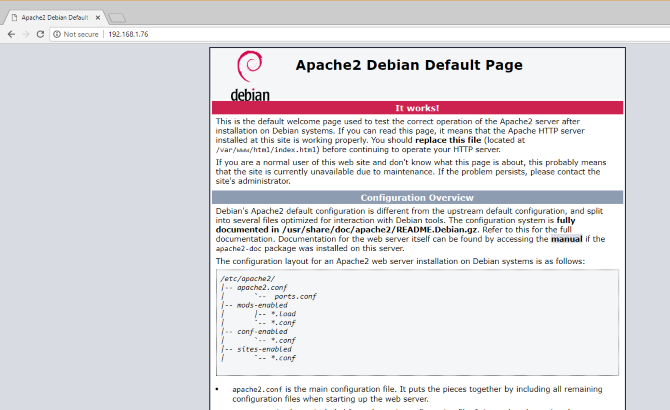
This displays the IP address of your Raspberry Pi. The page you see should be something like this:

Apache server installed on Raspberry Pi

You can also check the web page works from your Raspberry Pi using the http://localhost address.

Step 2: Install PHP on Raspberry Pi

Next, it’s time to install PHP. This is a software pre-processor that enables the serving of server-generated web pages rather than static HTML pages. While an HTML page might be written in its entirety, a PHP page will feature calls to other pages, and the database, to populate it with content.

While other server-side platforms are available (such as ASP), PHP is vital here as it is required for WordPress because WordPress itself is written in PHP.

Install with:

sudo apt install php -y

Once this is done, you should test that PHP works. Change directory to /var/www/html/ like this:

cd /var/www/html/

Here, delete the index.html file (the web page you viewed earlier):

sudo rm index.html

Next, create a new file called index.php (nano is installed by default):

sudo nano index.php

Here, add any (or all) of the following code:

<?php echo "hello world"; ?>
<?php echo date('Y-m-d H:i:s'); ?>
<?php phpinfo(); ?>

In order, these commands display:

  • The phrase “hello world”
  • The current date and time
  • PHP info for the installation

Save the file, then restart Apache:

sudo service apache2 restart

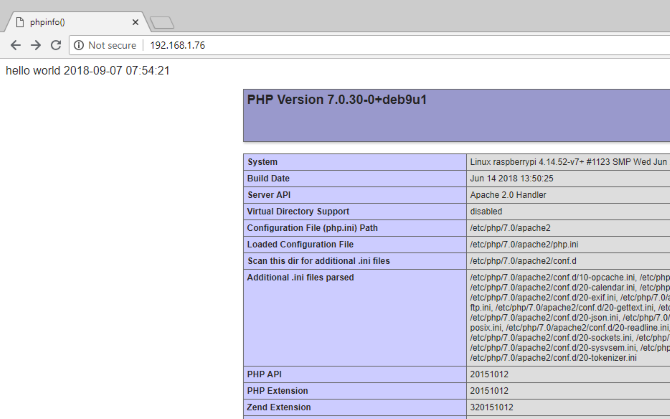
Refresh the page to see the results.

PHP installed and working on Raspberry Pi

PHP and Apache are both working. Now it’s time to install the database software, MySQL.

Step 3: Install MySQL on Raspberry Pi

WordPress (and other dynamically generated website software) requires a database in order to store the content, links to images, and manage user access (among many other things). This project uses a fork of MySQL called MariaDB:

sudo apt install mysql-server php-mysql -y

Once this is installed, you will once again need to restart Apache:

sudo service apache2 restart

As noted, other database options are available for this type of project. However, for the best results, especially if this is your first time configuring a web server, stick with MySQL.

Step 4: Install WordPress on Raspberry Pi

To install WordPress, you’ll first need to install it. Before doing this, however, delete the contents of the /html/ directory:

cd /var/www/html/
sudo rm *

The asterisk wildcard (*) deletes everything in the directory thanks to the rm (remove) command.
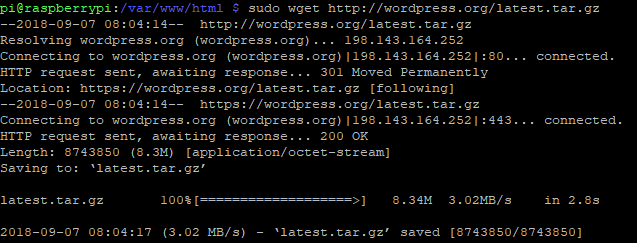
Download WordPress with wget

Next, use wget to download the latest version of WordPress:

sudo wget http://wordpress.org/latest.tar.gz

Once downloaded, extract the contents:

sudo tar xzf latest.tar.gz

The wordpress directory should be created, but you want the contents of it in html. While you might move these manually using the desktop user interface, it’s simple to do this from the command line:

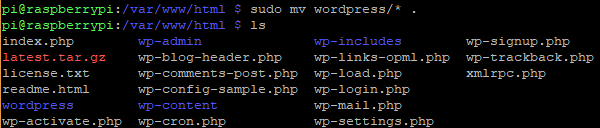
sudo mv wordpress/* .

Be sure to include the space and period at the end, which refer to the current directory!

Enter ls to confirm the directory is full of WordPress folders and PHP files:

Move the contents of the WordPress directory

Before proceeding, tidy things up a bit, discarding the downloaded file and the wordpress directory:

sudo rm -rf wordpress latest.tar.gz

Next, set the Apache user as the owner of the directory:

sudo chown -R www-data: .

Step 5: Configure MySQL

To set up the database, you’ll first need to run the installation command:

sudo mysql_secure_installation

You’ll shortly be prompted to set a root password. Follow the onscreen instructions, making sure you keep a note of the password, as it will be required later.

Once this is one, the following prompts will appear:

  • Remove anonymous users
  • Disallow root login remotely
  • Remove test database and access to it
  • Reload privilege tables now

For each of these, tap Y to confirm. When done, the “All done!” message will be displayed.

Step 6: Create the WordPress Database

To install WordPress, you’ll first need to configure the database. Begin by running the mysql command, entering the password from earlier.

sudo mysql -uroot -p

This opens the MariaDB monitor. At the prompt, create the database:

create database wordpress;

Note how all commands within the MariaDB monitor end with a “;”. Next, the root user needs database privileges. Use your own password in place of PASSWORD.

GRANT ALL PRIVILEGES ON wordpress.* TO 'root'@'localhost' IDENTIFIED BY 'PASSWORD';

Follow this by flushing previous database privileges:

FLUSH PRIVILEGES;

Exit the MariaDB database management tool with Ctrl + D.

Step 7: Install and Configure WordPress

Installing WordPress is simple; if you’ve already done it on an existing website, you should know what to do.

Open the website in your browser (as described above). You should see the WordPress Setup screen. Select your language, then Continue, and make a note of what is required: the database name, username, password, host, and the table prefix (this is for the database tables).

If you made it this far, you should have named the database “wordpress”, and have a note of the password. The Username is root, and the host localhost. The Table Prefix is wp_.

Click Submit, then Run the install, and input the Site Title, along with the Username, and Password for your administrator account. Click Install WordPress, and wait as WordPress is (quickly) set up.

To login to your WordPress installation, go to http://localhost/wp-admin.
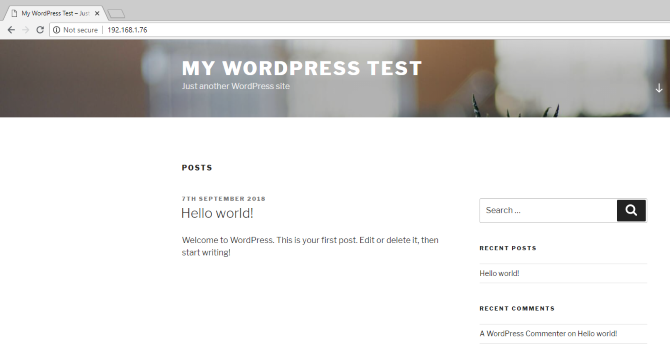
Installed WordPress site on a Raspberry Pi

At this stage, you have a site you can start using. Our guide to getting started with WordPress will help here. Don’t forget to choose a theme, and a few useful plugins. You’ll also need a method to access the site from the internet.

Access Your WordPress Site From the Internet

As things stand, you’ll probably only be able to access the site from within your home network. To change this, you’ll need a static IP address, and manage port forwarding from your router to your Raspberry Pi.

Static IP addresses are expensive, however, but you can use a dynamic DNS provider instead. This basically links a custom URL to your Raspberry Pi, although such services are often paid. Check our list of the best dynamic DNS providers for full details.

If you run into problems with blank white pages or a 500 internal server error in WordPress, take a look at our helpful guide.

Host a WordPress Site on Raspberry Pi: Success!

You’re all done now, and a WordPress site is running on your Raspberry Pi. As long as the computer remains powered up, the site will continue to be accessible. The process is straightforward too, requiring you to simply:

  • Install Apache, PHP, and MySQL
  • Download and install WordPress
  • Configure the MySQL database
  • Create your WordPress database
  • Configure WordPress
  • Launch the site and access it locally or via the web

If all of this was a bit overwhelming, we don’t blame you. That’s why we recommend using WP Engine to host WordPress sites with zero hassle. They manage all administrative issues so you can focus on your content.

Keep refining your WordPress knowledge with our guide to featured thumbnails and images sizes in WordPress.

Read the full article: How to Host a WordPress Site on Raspberry Pi

https://ift.tt/2CF1Wul

via MakeUseOf

Want to Learn Basic Coding? Try 5 Bite-Sized Coding Apps in Your Spare Time

Friday, March 29, 2019

Apple Finally Cancels AirPower Wireless Charging Mat

The Best WordPress Hosting Providers

wordpress-hosting

WordPress is the world’s most popular web-based content management system (CMS). It powers more than 30 percent of the internet’s top 10 million sites.

The WordPress software (which you shouldn’t confuse with WordPress.com hosting) is open source, incredibly easy to set up, and entirely free to use. All you need is a domain name and a web hosting plan.

Here are the best WordPress hosting providers.

1. WP Engine

If you have no web administration experience, you should look into managed WordPress Hosting rather than setting up WordPress yourself on shared web hosting.

Typically, managed WordPress hosting is more expensive than shared hosting, but it’s worth it for the extra level of support you receive. If you’re not technically inclined and would rather focus on producing content rather than managing the backend needs of a website, a managed WordPress hosting plan is right for you.

With managed WordPress hosting, the provider manages all the behind-the-scenes stuff, including security, speed optimization, updates, and backups. The security support is perhaps the most important, as it’s easy to overlook when you start a new website.

For managed WordPress hosting, we truly believe WP Engine is the best. The basic Startup plan costs $35/month for 1 site up to 25,000 monthly visits, plus included goodies like the Genesis Framework, 35+ StudioPress themes, staging environments, global CDN, free SSL certificates, and 24/7 chat support.

2. InMotion Hosting

InMotion monthly costs

Unusually, InMotion Hosting offers six dedicated WordPress hosting plans. Most companies only offer a couple.

The cheapest plan is WP-1000S. It will set you back $8.99/month and is suitable for up to 20,000 monthly visitors. It includes unlimited bandwidth, unlimited email accounts, and 40GB of SSD storage space.

At the other end of the scale is the WP-6000S plan. It costs $119.99/month and is suitable for up to 1.2 million monthly page views.

The three most expensive plans all include a dedicated IP address and a free subscription to Jetpack Professional. (Get up to 50% off using this link!)

Regardless of which plan you choose, WordPress comes preinstalled; you won’t need to fiddle with third-party installers. You can also decide whether you want to optimize your site for traffic from either the eastern or western hemisphere.

InMotion’s uptime runs at 99.97 percent. Its average load time is 752ms.

3. Bluehost

Bluehost monthly costs

Bluehost is arguably the most recognizable name in the world of WordPress web hosting; the company has been around since 1996. Indeed, WordPress actively recommends Bluehost on its site and has done since 2005. We’ve also covered how to start using Bluehost.

If you’re creating a website for the first time, you probably won’t have much traffic to start with. In that case, the company’s shared hosting plan will suffice. It offers 50GB of space, unmetered bandwidth, and five email accounts. Bluehost has an average uptime of >99.99 percent and average load times of 419ms.

The plan costs $7.99/month. However, significant discounts are available for new customers, making it one of the cheapest WordPress hosting plans. (Get up to 63% off using this link!)

If you need something with a bit more power, check out the VPS (virtual private server) plans. For $19.99/month, you get 2GB of RAM, 30GB of SSD storage, two cores, and free SSL.

4. WordPlus

WordPlus homepage

None of the big companies offer free WordPress hosting, but that doesn’t mean there aren’t free web hosting services out there.

Of course, you could just head to WordPress.com. Its servers are powerful enough to handle any traffic you throw at it. But there are some trade-offs—for example, you can only install your own plugins and run Jetpack if you pay a monthly fee. The free version is limited to 3GB of space, and you cannot display your own ads.

Instead, check out WordPlus. The free flavor gives you 128MB of SSD space, unlimited bandwidth, free SSL, free CDN, and access to cPanel. You can also use all WordPress’ best plugins.

If that doesn’t cover your needs, other popular free WordPress hosting providers include 000webhost, HostAwesome, and Byet. The four providers all have very different features and capabilities, so make sure you do your research before choosing.

5. SiteGround

SiteGround monthly costs

If you’d like a managed WordPress hosting plan that isn’t WP Engine for whatever reason, check out SiteGround. With 99.98 percent uptime and a load time of 722ms, it’s one of the best performing hosts out there.

Its cheapest managed WordPress hosting plan—called StartUp—costs $11.95/month and is suitable for 10,000 monthly visits and offers 10GB of space.

However, while SiteGround is great for small sites, you may eventually outgrow it. If you plan for your site to make it big in the future and you want to avoid the hassle of migrating, you may want to start with a more scalable hosting provider from the get-go.

6. A2 Hosting

A2 hosting monthly costs

A2 Hosting is a company I can personally vouch for. I use it to host four websites and have never had any issues.

When I first migrated to A2 Hosting from my previous provider, the company was quick to resolve technical issues that arose from the transfer, even though it later transpired that the problems were caused by the old host and were not of A2’s making.

Since then, every time I have opened a support ticket, A2 has responded quickly and accurately. I’ve lost track of the number of times the reps on the company’s 24/7 live chat have solved my issues in the middle of the night.

Regarding plans, A2 offers shared hosting, VPS hosting, and dedicated hosting. The entry-level shared hosting plan includes 25 email addresses, a 2.1 GHz core, five databases, and a server with a guaranteed 64GB of RAM. Regardless of which plan you pick, you can easily install WordPress using Softaculous.

Interestingly, A2 Hosting has compiled two of its own WordPress plugins that are worth using. A2 Fixed W3 Total Cache is a tweaked version of the popular W3 Total Cache plugin, while A2 Optimized WP offers performance improvements such as minifying files and pages, GZIP compression, image compression, and security improvements.

Finally, with an uptime of 99.90 percent and an average load time of 413ms, A2 Hosting is unquestionably one of the best WordPress hosting providers out there.

7. GoDaddy

godaddy monthly costs

Another managed WordPress hosting provider worth considering is GoDaddy.

The company is more commonly associated with domain names rather than hosting plans, but its managed plan can comfortably compete with other companies’ offerings on both price and features.

The cheapest GoDaddy WordPress hosting plan costs $8.99/month. It is suitable for up to 25,000 visitors/month. It offers 10GB of storage and 99.99 percent uptime.

Because the plan is managed, you can expect nightly backups, automatic malware scanning and removal, a staging environment to test changes, and automatic DDoS protection.

8. HostGator

Hostgator monthly costs

Our final recommendation is HostGator. Like Bluehost, it’s a well-established name in the industry and supports more than 10 million sites.

The entry-level cloud plan $9.95/month. You will get two CPU cores, 2GB of RAM, free SSL, and unlimited bandwidth and storage. It can handle 100,000 visits/month.

If you need more power, check out the Business plan instead. For $22.95/month, you will get 6GB of RAM, six CPU cores, and a dedicated IP address. You can also have an unlimited number of parked domains. It’s suitable for 500,000 visits/month.

Lastly, HostGator has some of the most impressive performance stats in this list. It boasts an uptime of 99.96 percent and a load time of 462ms.

9. Kinsta

Kinsta app dashbaord

Kinsta offers managed WordPress hosting on the Google Cloud Platform.

Some of its best features include a free content delivery network from KeyCDN, free SSL certificates through Let’s Encrypt, HTTPS support, a daily backup service, and SSH support for sysadmin tasks.

And if you’re migrating an existing site from an old provider, you don’t need to worry. Kinsta offers a free migration service for new accounts.

Several plans are available. The cheapest is the Starter package. It costs $30/month. If you need a bit more power, consider buying the Pro plan for $60/month.

We have reviewed Kinsta in detail if you would like to learn more.

Making the Right WordPress Hosting Choice

The world of WordPress hosting is a competitive place. There is not a great deal of difference between any of the mainstream providers; they all offer similar features for a similar price.

The biggest decision you need to make is whether to buy managed WordPress hosting or regular hosting. Your level of technical expertise and willingness to learn should guide your thought process.

When in doubt, managed WordPress hosting is the way to go to minimize headaches. That’s why we recommend WP Engine, which we use ourselves to run our sister sites.

Read the full article: The Best WordPress Hosting Providers

https://ift.tt/2or8KBR

via MakeUseOf

How to Manage Years of Browser Bookmarks: 5 Steps to Tidiness

If you’ve used the web for any amount of time, you’ve probably built up a huge collection of bookmarks. It’s easy to fill up your bookmarks bar with your most-visited sites, and before long you’ll have an overflowing list of favorite pages that are impossible to navigate.

Now is the time to sit down and make your bookmarks more manageable. Let’s look at a process containing tools and tips to clean up, organize, and manage your bookmarks so they’re no longer a nightmare.

Step 1: Remove Dead and Duplicate Bookmarks

There’s not much point keeping bookmarks to dead links or two links that go to the same page. Over time, pages break, get redirected, or disappear entirely. Before you worry about managing anything, first clean up the clutter.

A free tool for Windows called AM-DeadLink will help here. It scans all your bookmarks and lets you know which ones are dead, redirected, and similar. The tool is compatible with Chrome, Firefox, Opera, Vivaldi, and Internet Explorer. To check Edge or other bookmarks, you can either export them to an HTML file or import them into a supported browser.

Open the software and select your browser from the dropdown at the top-left. You’ll see a list of your bookmarks, with the total number at the bottom. Click the green Check button to scan for broken links. Because it needs to check the connection to each website, this can take a few minutes if you have thousands of bookmarks.

AM Deadlink Bookmark Checker

Once it’s done, you’ll see the Status of each bookmark. OK means it’s all-clear, while redirected, OK means the link is still alive but it’s moved. You may want to replace that bookmark link with the latest URL for optimal performance.

The error, redirected, file not found and other red fields represent dead links. For ease of checking, you can click the Sort button (next to the red Abort button) to show all broken links at the top. Next to this is a duplicate checker that will scan for duplicates.

Unfortunately, AM-DeadLink won’t delete any bookmarks for you. You’ll need to perform any needed work manually.

Finally, if you find that an important link is now broken, you can use the Wayback Machine to see what it looked like in the past. Just enter the URL and you can (hopefully) travel back in time.

Step 2: Sync Your Bookmarks

There’s no reason to rebuild your bookmarks collection from scratch on all your devices. All major browsers have built-in syncing features that let you access your favorites on other computers and your phone.

To use them, follow these basic steps for the most popular browsers:

  • Chrome: Open Chrome’s Settings and sign into your Google account using the People pane at the top of the screen if you aren’t already. Make sure you’ve chosen to sync bookmarks in the Sync menu, then sign into your Google account in Chrome on your other devices.
  • Firefox: Go to Firefox’s Options and choose Firefox Account. Sign in, make sure you’ve synced your Bookmarks, then do the same on your other devices. See our guide to Firefox Sync for more info.
  • Opera: Open Settings and browse to the Synchronization section. Here, sign in with an Opera account and choose to sync your bookmarks. Then sign in on your other devices.

Chrome Sync Overview

Step 3: Back Up and Import Bookmarks

Xmarks was a popular service for syncing your bookmarks between browsers. While it shut down in 2018, it’s not as necessary any more thanks to the syncing features mentioned above. (We have checked out Xmarks alternatives in case you still need this functionality.)

However, you can still manually export and import bookmarks to move them between browsers. Doing so also lets you back up your bookmarks to an HTML file. This is important because syncing services aren’t proper backups.

Even if you don’t want to move bookmarks to another browser, you should take a moment to export them. Keep the resulting HTML file somewhere safe so you can restore your bookmarks if something ever goes wrong.

Here’s how to export and import bookmarks in the major browsers:

  • Chrome Go to Menu > Bookmarks > Bookmark manager or use the Ctrl + Shift + O shortcut. At the top-right, click the three-dot button and choose Export bookmarks to save them as an HTML file. Import bookmarks will allow you to bring in an HTML file exported from another browser.
  • Firefox: Open Menu > Library > Bookmarks > Show all bookmarks or press Ctrl + Shift + B. Click the Important and Backup and choose Export bookmarks to HTML or Import bookmarks from HTML. The Backup and Restore options let you work with JSON files instead.
  • Opera: Click Bookmarks on the sidebar, then hit the Import/Export button. Here you can both import and export via HTML files.
  • Edge: Visit Menu > Settings and click the Import or export button.
  • Internet Explorer: Click the Star icon at the top-right to open Favorites, then click the arrow next to Add to favorites to open a dropdown menu. Here, choose Import and export and follow the steps.

Firefox Bookmarks Backup

Step 4: Put Your Favorite Icons on the Bookmarks Bar

Now that you’ve gotten rid of clutter and backed up your bookmarks, you can move onto the fun part: making them actually useful.

The bookmarks toolbar is the most convenient place for the bookmarks you use all the time, so it makes sense to optimize it. Use your browser’s bookmark manager (or drag-and-drop) to place your favorite bookmarks on the bar.

From there, you can utilize a little tip: deleting the Name field will keep only the favicon and allow you to store more icons on your bookmarks bar.

Bookmarks Toolbar Icons

If you have bookmarks to several pages on one website, you can add one letter to each to differentiate them without taking up too much space. Those who need access to even more bookmarks can create folders on the bookmarks toolbar.

Step 5: Organize and Tag the Rest of Your Bookmarks

Once you have quick access to your top sites, the rest of the work lies in organizing them. How you do this depends on what you find most useful, but in general, you should make good use of folders.

You could create a hierarchy of folders for the different kinds of sites you bookmark. Maybe you keep everything related to music in one folder, pages related to news in another folder, and similar. Don’t forget that you can nest folders inside folders, so you could divide by music genres, for example.

In Firefox, you can also use tags to further categorize your bookmarks. Because a bookmark can have multiple tags, you can easily browse the tags for all related pages. It’s a great tool if you want to get really granular.

Firefox Bookmark Tags

By the way, don’t forget that services like Pocket can be better than creating bookmarks for every site you want to check out. Use Pocket for storing interesting content for later and reserve bookmarks for sites you’ve visited and want to find again in the future.

Cleaner Bookmarks = Cleaner Browsing

We’ve gone through several practical steps to organize your browser bookmarks. After cleaning up dead links and those you no longer use, syncing them to other devices and backing them up, and organizing them, your bookmarks list will no longer be a horrific sight.

After all, the feature is all about providing easy access to the sites you love, so you should make sure your setup works for you. For an even deeper dive, check out our guide to managing bookmarks in Firefox.

Read the full article: How to Manage Years of Browser Bookmarks: 5 Steps to Tidiness

https://ift.tt/2YATO56

via MakeUseOf

Canon Reveals IVY CLIQ+ and CLIQ Instant-Print Cameras

Canon has just unveiled two new instant digital cameras, the CLIQ and CLIQ+, which goes along with the trend of instant-print digital cameras making a comeback.

The company’s take on instant cameras seems quite cool, and both models have some solid features that make them stand out in the crowded instant camera space. They also come in with very reasonable price tags, making them accessible for anyone.

The two cameras are Canon’s followup to the IVY printer, which had similar printing features but lacked the ability to take photos directly on the device.

Canon IVY CLIQ and CLIQ+ Features

Both cameras feature relatively low resolutions in terms of megapixels, which makes sense, as they’re targeted at buyers looking for quick prints, not high-resolution digital photos. The CLIQ features a five-megapixel lens, while the more expensive CLIQ+ comes with an eight-megapixel camera.

Using the Ivy application, photographers can add borders, filters, and text to their images before they print them. However, only the CLIQ+ has support for Bluetooth, so you’ll need to get the more expensive camera if you want to take advantage of this feature.

Another characteristic of the CLIQ+ is a selfie mirror with LED lights that’ll help create the best selfie photos possible. The cheaper CLIQ also features a selfie mirror, but it lacks the built-in LED lights.

Both cameras are able to print either 2×2 or 2×3 photos using ZINK Zero Ink Technology. With this type of printer, the ink is actually in the paper, meaning there’s no need to install and change ink cartridges on the camera/printer.

An important thing to note is that neither camera features a screen for reviewing images, so with the CLIQ, you’ll be printing them blindly unless you use the SD card to transfer them to a PC before printing.

Canon IVY Devices Price and Release Date

Canon intends to release both cameras sometime in April of this year. The company says the suggested retail price of the CLIQ will be $99.99, and the CLIQ+ will sell for $159.99. Both models include 10 sheets of 2×3 photo paper to get you started.

Of course, an instant camera isn’t for everyone, which is why you should check out our article on why you should go with a mirrorless camera over a DSLR.

Read the full article: Canon Reveals IVY CLIQ+ and CLIQ Instant-Print Cameras

https://ift.tt/2OzWzig

via MakeUseOf

The Best Smartphone Camera: Google Pixel, Apple iPhone, OnePlus, and More

How to Fix Windows 10 Sleep Mode Issues

check-health-windows-10

Putting your PC to sleep is a great way to save energy while still making sure you can resume without wasting power. But what can you do if your PC keeps waking up or goes to sleep automatically? With so many factors coming into play, it can be a difficult problem to diagnose.

The procedure gets complicated with different PC manufacturers. The best way to tackle this problem is to try a variety of different solutions. We’ll list out the troubleshooting steps and show you how to fix sleep mode related issues in Windows 10.

Check Your Sleep Mode Settings

When your computer doesn’t go to sleep, check all your settings and factors that prevent a sleep state. The hardware, power options, and configuration can affect the way power and sleep buttons work. If your PC has updates installed or there’s an installed app that requires a restart, then your PC may not sleep at all.

If you’re working on a shared computer or a PC that doesn’t belong to you, there’s a chance that someone else might have tweaked the power options. To access these settings, navigate to Control Panel > Power Options and click Choose when to turn off the display.

choose when to turn off the display

Just to the right side of Put the computer to sleep, check out the values and make sure to set them up properly. If your PC is going to sleep too soon, or taking too long to go to sleep, this should be your first port of call.

adjust the sleep mode settings

Disable Fast Startup for Old Machines

Windows 10 Fast Startup feature is a setting that helps your PC start up faster after shutdown. It does this by saving an image of the kernel and loaded drivers to the C:\hiberfil.sys upon shutdown. When you shut down and restart your PC, Windows loads the hibernation file into the memory to resume your PC.

If you have an old device and notice that your PC is not going to sleep, you can disable Fast Startup. Open Control Panel > Power Options and click Choose what the power buttons do.

choose what the power buttons do

Click Change settings that are currently unavailable and uncheck Turn on Fast Startup to disable this feature.

disable fast startup in windows 10

Your PC Won’t Go to Sleep

Sleep mode can save your monitor from burn-in and prevent your PC from wasting its battery life. When your PC doesn’t go to sleep, it can cause general instability, reduced power efficiency, frequent kernel hangs, and crashes.

Check Your Drivers

Check if your drivers are up-to-date. The most important ones are chipset drivers, network, audio, and BIOS drivers. It’s also a good idea to ensure that you’re running the latest version of Windows 10.

Check the version number and last modified date: Download the DriverView utility from Nirsoft. Check the version number, installation date, created or modified date, and the digital signature of the drivers.

check the driver information with driverview utility

Update Your Drivers: Windows will automatically update your drivers via Windows Update. It’s an entirely safe and reliable method because Microsoft verifies the drivers for your system and updates them when necessary.

You can also update your drivers through the Device Manager. Right-click a driver and select Update driver.

update drivers through device manager

Check the Manufacturer Website: Most PC’s will include a DVD and a support website that list all the compatible drivers with their version number. Bookmark the site and check for any driver updates periodically.

Never download third-party apps that claim to update drivers. Their sources are questionable and can make your system unstable.

Check for Power Requests

The drivers and software installed on your PC might interfere with sleep mode by sending power requests that keep the system awake. To see the log of all power requests in Windows 10, press Win + X and choose Command Prompt (Admin). Type in the following command:

powercfg -requests

This will present a list of active power requests. All categories should theoretically be empty. If they’re not, make a note of what is prompting the power request.

In the screenshot, you’ll see that a “Caller_type” with process “synergyc.exe” and “request” type as “SYSTEM” is preventing the PC from entering sleep mode.

powercfg request in elevated command prompt mode

To solve this problem, you can add a request override for this process

powercfg -requestsoverride <CALLER_TYPE>“<NAME>”<REQUEST>

For example;

powercfg -requestsoverride PROCESS “synergyc.exe” SYSTEM

Check for Last Wake Events

If your PC is waking from sleep unexpectedly and you want to know which device triggered the wake up event, then use the following command

powercfg -lastwake

To see the list of devices that wake up the system, type in

powercfg -devicequery wake_armed

In the screenshot, you’ll see that Ethernet adapter is causing the PC to wake up from sleep accidentally.

powercfg lastwake events through command prompt

Open the network adapter driver in Device Manager, right-click the driver and choose Properties.

open the device manager properties

In the Power Management tab, uncheck Allow this device to wake the computer. Optionally, you can leave this option enabled and check the option Only allow a magic packet to wake the computer to prevent everything except Wake-On-Lan packets from waking up your PC.

uncheck the options to wake your computer

Run the Power Troubleshooter

There are chances that you might tweak and customize your power plan settings for multiple tasks. It can result in various sleep-related problems.

Power troubleshooter fixes these problems by resetting the settings and suggests how to avoid them in the future.

Go to Settings > Update & Security and click Troubleshoot. Scroll down and click Power to launch Power troubleshooter.

launch the power troubleshooter in windows 10

Once the procedure is complete, you can view the detailed information of all potential issues and their solutions.

power troubleshooter report

Check the Compatibility of Attached Devices

It might also happen that some device connected to your PC isn’t compatible with the latest version of Windows 10. Some manufacturers take time to release updates before they’re compatible with the newer version of Windows. It can include printers, scanners, gaming consoles, webcam, and more.

Go to the manufacturer website and check for any compatibility issues. If there aren’t any, unplug the device and check to see if the sleep problem persists.

Restart Your PC in Safe Mode

Sleep mode problems are often caused by a complication between the hardware and software during startup. To check whether this is the case, restart your PC in Windows 10 Safe Mode and see whether it can go to sleep. If it can, you’ll need to perform a clean boot to narrow down the fault.

Press Win + S to launch Windows search. Type in System Configuration to open the app. Click the Services tab, check Hide all Microsoft services and select Disable all. This will ensure that only essential services will run.

system configuration app in windows 10

In the next step, open Task Manager and disable every app that’s set to launch at startup. Quit both System Configuration and Task Manager. Restart your PC. If your PC can enter the sleep mode, that means an app or process is causing the problem.

Your PC Goes to Sleep Without Permission

If your PC goes to sleep after a brief period of inactivity, you run the risk of losing your work in the middle of the task. This type of problems can be even more infuriating than a PC showing signs of insomnia. But it is easy to fix.

Confirm Whether Your PC Sleeps

When your PC goes to sleep randomly, ensure that the machine has entered sleep mode. Sometimes the cause of random hibernation/shutdown is overheating.

If the internal temperature reaches a level above the threshold, your PC will either enter hibernation mode or will shut down to protect the hardware components. Check out these apps on how to monitor the temperature of your PC.

Restore Plan Defaults

If you have just upgraded your PC to Windows 10 or did a major update from Windows 10 1803 to 1809, specific power-related settings might get corrupt. To fix this problem, open Settings > System and under Power & sleep settings click Additional power settings.

open additional power settings from settings app

From here, select Choose when to turn off the display. Select Restore default settings for this plan.

restore default settings for power plan

If this option is not available or doesn’t work, click Change advanced power settings. From the new window that appears, click Restore plan defaults. Repeat this step for every custom power plan.

restore power plan defaults in advanced settings

Check Screensaver Settings

A screensaver utility allows your PC to go into sleep state to preserve energy. The display gets turned off, and if you have incorrect settings configuration, your PC might go to sleep at random times.

Head to Settings > Personalization and type in screen saver in the search bar.

launch screensaver settings in windows 10

From the popup window that appears, choose None from the Screen saver dropdown menu.

screensaver settings to none

Disable Third-Party Themes

Many third-party themes are available from the Microsoft Store. It is possible that a theme can cause your PC to sleep at random times. You can disable the theme and switch back to the default theme.

Head to Settings > Personalization and click Themes. Now click the default Windows 10 theme and restart your PC.

select a default windows 10 theme

Remove the Battery

If all the above methods fail, and you’re working with your laptop, your battery might be the culprit. Shut down your PC and remove the battery. Wait for a few moments and re-insert it.

Check the Health of Your Windows PC

If your PC won’t go to sleep or just sleeps randomly, use these troubleshooting steps to fix your problem. However, you must remember that every PC manufacturer includes their custom apps and drivers. These are known to cause sleep mode issues in your Windows 10 PC.

Apart from these troubleshooting tips, you can check the health of your PC periodically to keep it in top shape. For example, you can run the SleepStudy command to assess your battery health and take care of your PC’s health.

Read the full article: How to Fix Windows 10 Sleep Mode Issues

https://ift.tt/2pzoaon

via MakeUseOf

How to Convert an Image to a Vector in Adobe Illustrator

6 Reasons You Should Avoid the Dark Web

avoid-dark-web

The dark web can be a great resource, providing access to information that you won’t find on the regular internet.

But it can also be an—excuse the pun—dark place. There’s plenty of undesirable content you need to avoid. At best, it can be offensive; at worst, it could be highly illegal.

Let’s take a closer look at some of the worst things you might find on the dark web.

1. Crypto Scams

If you’ve been following the news, you’ll know that crypto scams are already commonplace across the regular web. The problem even forced Facebook to issue a blanket ban on crypto ads in mid-2018 (though the ban has now been partially lifted).

It should probably come as no surprise, therefore, to learn that crypto scams are even more common on the dark web.

The scammers use the same techniques as on the regular web, but the lack of regulation means they are less likely to be shut down by ad networks, forums, and other places where the scams pop up.

Note: If you would like to learn more, we discussed some of the most common crypto scams on our sister site, Blocks Decoded.

2. Exit Scams

Exit scams occur when a seller stops shipping products but continues to take orders and money.

Because the items sold on the dark web are often illegal (guns, drugs, etc.) and payments are made in Bitcoin or other cryptocurrencies, the buyer has no avenues for redress or compensation.

Some of the most famous exit scams on the dark web include Olympus Market and Empire in September 2018, and the Evolution darknet market in 2015.

The owners of the Evolution market reportedly walked away with more than $12 million in Bitcoins that were in escrow.

3. Hoaxes on the Dark Web

isis red room dark web

The dark web is full of hoaxes—almost all of which want you to part with your money in exchange for nothing in return.

Understandably, the hoaxes come in many forms; people are creative.

Some of the hoaxes are on the sickening end of the spectrum. Probably the most well-known example is that of “red rooms.” The rooms purport to show live torture of animals and humans, as well as live rape and even murder.

We’re not saying they are all fake—we have no desire to do the required research, but the received wisdom among regular dark web users is that that they are at best staged and at worst a money-grabbing scam.

One particular incident in August 2015 promised the torture of seven ISIS prisoners, even claiming that the viewers could direct the action via an interactive chat. There was quite a buzz around the event on Reddit and 4chan.

Then, three minutes before the action was due to begin, the site went down. Half an hour later it was back, thanking people for taking part. When the “source footage” was eventually uploaded, the camera froze every time the torture was about to start.

A suspiciously fake-looking FBI seizure notice popped up a few days later.

Other hoaxes take advantage of people who want to use illegal services (like hitmen, often referred to as the Nigerian princes of the dark web) and buy illegal products. If you ever try to procure these services and products, you’ll almost always end up out of pocket.

4. Terrorism

Anti-terrorism authorities have uncovered multiple instances of terrorist groups using the dark web to coordinate their actions.

In early 2015, it was discovered that the Al-Hayat Media Center, which is affiliated with ISIS, launched a new dark web site to disseminate information. Its regular web site even had explicit instructions on how to access the dark web content.

Rawti Shax (an offshoot of the Kurdish jihadist group Ansar al-Islam) was also found to have a dark web presence in October 2015.

After the 2015 Paris attacks, the Anonymous hacktivist group managed to gain control of one such ISIS-sympathizing site and replace it with a Prozac advert.

5. Illegal Pornography

Illegal pornography is rife on the dark web. The biggest issue is arguably that of child pornography and its associated pedophile rings.

In 2015, the FBI famously busted a massive child porn site on the dark web by using malware, exploits in Adobe Flash, and other hacking tricks. The authorities gained control of the North Carolina server and let it run for two weeks before shutting it down.

Here’s how the court filing explained the FBI’s approach:

Pursuant to that authorization, on or about and between February 20, 2015, and March 4, 2015, each time any user or administrator logged into Website A by entering a username and password, the FBI was authorized to deploy the Network Investigative Tool (NIT) which would send one or more communications to the user’s computer. Those communications were designed to cause the receiving computer to deliver to a computer known to or controlled by the government data that would help identify the computer, its location, other information about the computer, and the user of the computer accessing Website A. That data included: the computer’s actual IP address, and the date and time that the NIT determined what that IP address was; a unique identifier generated by the NIT a series of numbers, letters, and/or special characters) to distinguish the data from that of other computers; the type of operating system running on the computer, including type (e.g., Windows), version (e.g., Windows 7), and architecture (e.g., x86); information about whether the NIT had already been delivered to the computer; the computer’s Host Name; the computer’s active operating system username; and the computer’s MAC address.

In the end, the FBI compromised more than 1,000 computers, and it arrested three men.

And child pornography isn’t the only problem. Content that lies in a legal grey area—such as revenge porn—is also a massive problem that the authorities are struggling to grapple with.

6. Phishing Scams

We’re all familiar with how phishing scams work on the regular web. And if you’re semi-computer-literate, you probably back yourself not to get caught out.

On the dark web, it’s much easier to fall victim due to the way web addresses are presented. For instance, take the 2016 example of a DuckDuckGo phishing attempt.

Here’s how the site’s .onion domain should look:

  • https://ift.tt/LgwySj

And here’s how the phishing domain looked:

  • https://ift.tt/1LFHLbt

Are you confident that you’d spot the differences while browsing at speed?

Worse still, in some instances, the fake sites aren’t just duplicating their intended targets—they been proven to be proxies for the real sites. In practice, that means they can perform man-in-the-middle attacks and either steal or modify data as it passes through the fake site.

The Dark Web Isn’t All Bad

Look, the dark web has a terrible reputation, both for the things we have discussed in this article and a lot more besides.

But there is some good stuff out there if you know where to look. To find fun places on the dark web, why not read our articles on the best dark web sites that you won’t find on Google and the best dark web browsers for your devices.

Read the full article: 6 Reasons You Should Avoid the Dark Web

https://ift.tt/2JOG0As

via MakeUseOf

Reolink C2 Pro 5MP: Crystal Clear Indoor Security Camera (Review and Giveaway!)

How to Get the Linux Bash Shell on Windows 10

linux-bash-shell-windows

Want quick and easy access to Linux on your Windows PC? The best option is to use the Windows Subsystem for Linux.

This gives you a Linux bash shell, a terminal window running in Windows. But how do you get this on Windows 10?

What Is the Windows Subsystem for Linux?

First included with the 2018 Windows 10 Anniversary Update and rolled out to all users in the Fall Creators Update, Windows Subsystem for Linux basically lets you run Linux software in Windows 10.

This is a feature that has been built into Windows. Unlike installing Linux in a virtual machine, the Windows Subsystem for Linux can be instantly called from the Start menu.

For this to work, however, you first need to enable the feature.

Once the Windows Subsystem for Linux is installed on Windows 10, you can run Linux in command line mode. This gives you access to the bash shell on your Windows PC!

Linux Bash Shell: For 64-Bit Windows 10 Only

Before you get started, make sure you’re running a 64-bit version of Windows 10. Sadly, the Windows Subsystem for Linux will not work on 32-bit systems. Check if your computer is running a 32-bit or a 64-bit version of Windows.

To check your computer for 64-bit compatibility, press WIN + I to open Settings, then System > About. Under “Device specifications” you’ll see the System type listed; for Windows Subsystem for Linux, this should read 64-bit operating system.

Is your Windows system 64-bit?

If not, you’ll need to upgrade your Windows 10 system from 32-bit to 64-bit. However, this will only work if you have 64-bit hardware.

How to Install Linux Bash Shell on Windows 10

Ready to install Bash on Windows? Start by clicking Start and entering “turn windows”. The Turn Windows Features on or off item should be displayed, so click this to open. Wait while the list is populated, then scroll down to Windows Subsystem for Linux.

This box should be checked. If it isn’t, add a check, then click OK to confirm.

Enable Windows Subsystem for Linux

You’ll be prompted to restart Windows, so follow this instruction. Upon restarting, open Start > Windows Store. Use the search tool to find entries relating to “Linux” and select the first option, Run Windows on Linux.

Choose a Linux version to install in Windows 10

Select your preferred Linux version to install. Whichever one you choose will determine the Bash experience. For example, if you select Kali Linux, you’ll be able to use commands specific to that operating system.

Install the Linux operating system, then wait. Once complete, click Launch from within the Windows Store or open it from the Start menu. On the first run, you’ll be prompted to input a username and password to create a user account.

Other methods are available to launch your chosen Linux environment. From the Start menu, you can enter:

  • bash
  • wsl

Both will display as a “Run command” that can be selected to instantly open Bash shell. The difference with using either of these methods is that they open in the /mnt/c/Windows/System32 directory. This means you can browse the System32 subdirectory in Windows 10.

Browse Windows system folders in Bash

Note that it is not possible to damage Windows 10 using the Linux environment. Any commands you input will damage only the Windows Subsystem for Linux and the chosen operating system. Windows 10 will remain safe and secure.

Also, you no longer need to enable the Windows 10 Developer Mode in Settings to run Bash.

How Does Bash Shell Terminal Differ from the Windows PowerShell?

With the Linux Bash shell running in Windows 10, you can input a variety of command line instructions.

But how does this differ from just using the Windows command prompt or PowerShell?

Well, naturally, both systems are quite different. With the PowerShell or command prompt, you’re limited to commands that are particular to Windows. This means, for example, using the dir command to view the contents of a directory; in Linux, the equivalent is ls.

Basically, the differences between Windows and Linux are what sets these two text environments apart. The advantage of having the Bash shell in Windows 10 is that you can easily access Linux within Windows. This saves time to setting up a virtual machine or rebooting into a dual boot installation of Linux.

What Can You Do With Bash in Windows 10?

With the Bash shell set up on Windows 10, you can use it as you would on a Linux PC.

Standard commands like help will show you how to use the preinstalled apps and tools. For example, apt help will demonstrate the usage of the package manager. You can use sudo apt update to get the latest packages, as you would on a Linux PC.

Built in help will guide you through using the Bash shell

Similarly, the sudo apt upgrade command upgrades Linux to the latest version of the OS.

Meanwhile, other standard commands are available. You can check your network connectivity with ifconfig, check the current directory with pwd, and change to a different directory with cd.

You can also get a quick list of the last 10 inputs with the history command.

In short, it’s just like using Linux within the Windows 10 operating system.

Windows 10 and Linux: Working Together

Setting up the Windows Subsystem for Linux and accessing the Bash shell is easy. It’s also quicker than running a virtual machine, and far less complicated than relying on a dual boot.

To recap, all you need to do to run the Linux Bash shell on Windows 10 is:

  1. Check you’re using 64-bit Windows 10.
  2. Enable Windows Subsystem for Linux in the Windows Features screen.
  3. Install your chosen Linux environment from the Windows Store.
  4. Run Linux from the Start menu.

Meanwhile, almost all Linux commands can be used in the Bash shell on Windows. Bit rusty, or need some help? Check our downloadable guide to Linux command line tricks.

Read the full article: How to Get the Linux Bash Shell on Windows 10

https://ift.tt/2JQ1PQb

via MakeUseOf