Power banks are an incredible invention. They make it so we can keep our devices running for substantially longer than their built-in batteries.
They’re not without flaws, though. Part of the reason a device like a smartphone is so useful is that it’s easy to carry around. It fits right into your pocket. Most power banks, however, aren’t so portable.
Portal Cord is setting out to solve that problem by tucking the power bank right inside of the cord.
Portal Cord Features
The way the Portal Cord is able to contain the power within the cord is by having multiple batteries lining the length of the device. While a traditional power bank features one large battery, this one uses a bunch of smaller ones.
Obviously, even by having multiple batteries along the cable, there’s just no way to fit a huge amount of juice. As such, the Portal Cord features 1,800 mAh of charging power. To put that into perspective, an iPhone XS Max features a 3,174 mAh battery, while a Pixel 3 features a 2900 mAh battery. Basically, you won’t get a full charge for your devices out of this power bank, but thanks to Quick Charge technology, you’ll get a decent amount of juice rather quickly.
The Portal Cord is available in USB-C, Lightning, and micro USB, so it’ll work with a wide range of devices including newer iPhones and most Android devices.
For length, the Portal Cord measures three feet, which is pretty standard for power cables. Not going with an incredibly long cable allows the device to remain portable. The cable and attached batteries are pretty light, coming with a weight of only 4.24 ounces.
Portal Cord Availability
Portal Power is seeking funding for Portal Cord on Kickstarter right now. The project is tracking to meet is $20,000 funding goal with around $15K as of this writing. Backers who would like to order a device can do so for $55 while the early special lasts. After that, the price goes up by $10. The company plans to ship the power banks to backers in October 2019.
Facebook is currently hosting F8, its annual conference for developers. The first day of F8 was filled with announcements covering Facebook, Messenger, Instagram, WhatsApp, and Oculus. And the headline has to be Facebook’s new redesign for 2019.
Facebook Changes Things Up for 2019
Facebook has redesigned the Facebook website and app. Visually, Facebook is being bleached, with the blue almost all gone, and a simpler, cleaner, and very white palette used instead. This makeover makes Facebook look more like Instagram.
Content-wise, the new Facebook is being built around two core components: Groups and Events. Groups is at the heart of the new Facebook, and represents Facebook trying to move away from the News Feed and make Facebook more about communities.
Facebook Wants You to Join New Groups
On the Facebook Newsroom, Facebook explains that while people use “Facebook to connect with friends and family […] it’s also a place to connect with people who share your interests and passions.” Which is why it’s putting Groups first.
There’s also a privacy element involved. While many people make their Facebook posts viewable to all and sundry, groups are more private. And with Mark Zuckerberg claiming Facebook is becoming a “more privacy-focused social platform” this is a crucial move.
Facebook is launching a redesigned Groups tab to help you find new groups. It will also plant group recommendations across other parts of the app. And introduce new features for specific types of group such as Job groups and Health Support groups.
Events is getting a new tab too. This will let you “see what’s happening around you, get recommendations, discover local businesses, and coordinate with friends to make plans to get together.” Which Facebook sees as another way of fostering communities.
Facebook Wants You to Meet New Friends
Facebook is also testing a new feature called Meet New Friends. This will “help people start friendships with new people from their shared communities like a school, workplace or city.” Meet New Friends is opt-in only and still a work in progress.
Facebook is rolling out the redesigned app for Android and iOS right now. The new desktop site will follow “in the next few months”. Which gives you time to check out the top social media apps you could (and probably should) be using instead of Facebook.
Anyone eagerly anticipating the final details of Valve’s Index virtual reality headset can relax, as the company has revealed all of the details, including how much it’ll cost, when it’ll ship, and when you can throw down your hard-earned cash on a preorder.
Valve Index Details and Specs
We’ve seen quite a few companies moving in the direction of computer-free virtual reality, including HTC with the Vive Focus Plus. This isn’t one of those, as Valve is pushing the limits with a very high-end headset that’ll keep hardcore virtual reality fans quite happy.
The screens on the new Index are 1440×1600 RGB LCDs, which Valve says allows for sharper visuals than OLEDs with the same amount of rendering power. The screens are also faster than others on the VR market, coming with a 120Hz refresh rate with full back-compatibility to 90Hz. There’s also an experimental 144Hz mode. According to Valve, “higher framerates improve realism and optical comfort, allowing longer and more comfortable play sessions,” which sounds like exactly what VR fans are looking for.
Another key aspect of the Index is the low persistence of 0.330ms to 0.530ms. This allows images to remain sharp when you move your head around, which is key to creating an immersive VR experience.
The headset will also feature off-ear sound built-in, which makes it easy to hear the VR experiences with as much comfort as possible.
Outside of the headset, there’s a full VR kit which includes new controllers and base stations. Thankfully, the Valve Index Base stations are compatible with 2.0 tracking-capable hardware, which is the same that comes with the Vive Pro, so buyers will be able to keep the base stations they already have.
Speaking of those controllers, Valve says they were “designed from the ground up to enable natural interactions, high-fidelity hand presence, and long-term comfort.” They promise natural, direct inputs that’ll help keep immersion during gameplay. There’s a total of 87 sensors in each controller that’ll track everything including hand position, finger position, motion, and pressure. Valve specifically called out the amount of time it spent developing controllers that allow natural and accurate open-handed throwing, which these will.
Valve Index Preorder, Release Date, and Price
Obviously, the key information about the Valve Index is the cost. For the full kit, which includes the headset, controllers, and base stations, the price is $999. The headset and controllers together sell for $749. On their own, the headset is $499, the controllers are $279, and the base stations are $149.
Obviously, those prices don’t include the computer required to run virtual reality experiences. Valve suggests at least 8GB RAM, an NVIDIA GeForce GTX 970+ or AMD RX480+ GPU, a dual-core processor with hyperthreading, and USB 3.0.
Preorders on all of the parts of the Valve Index open tomorrow, May 1. Valve says the hardware will ship by June 28, 2019, so anyone who drops the money on a preorder won’t have to wait too long to get their hands (and eyes) on a kit.
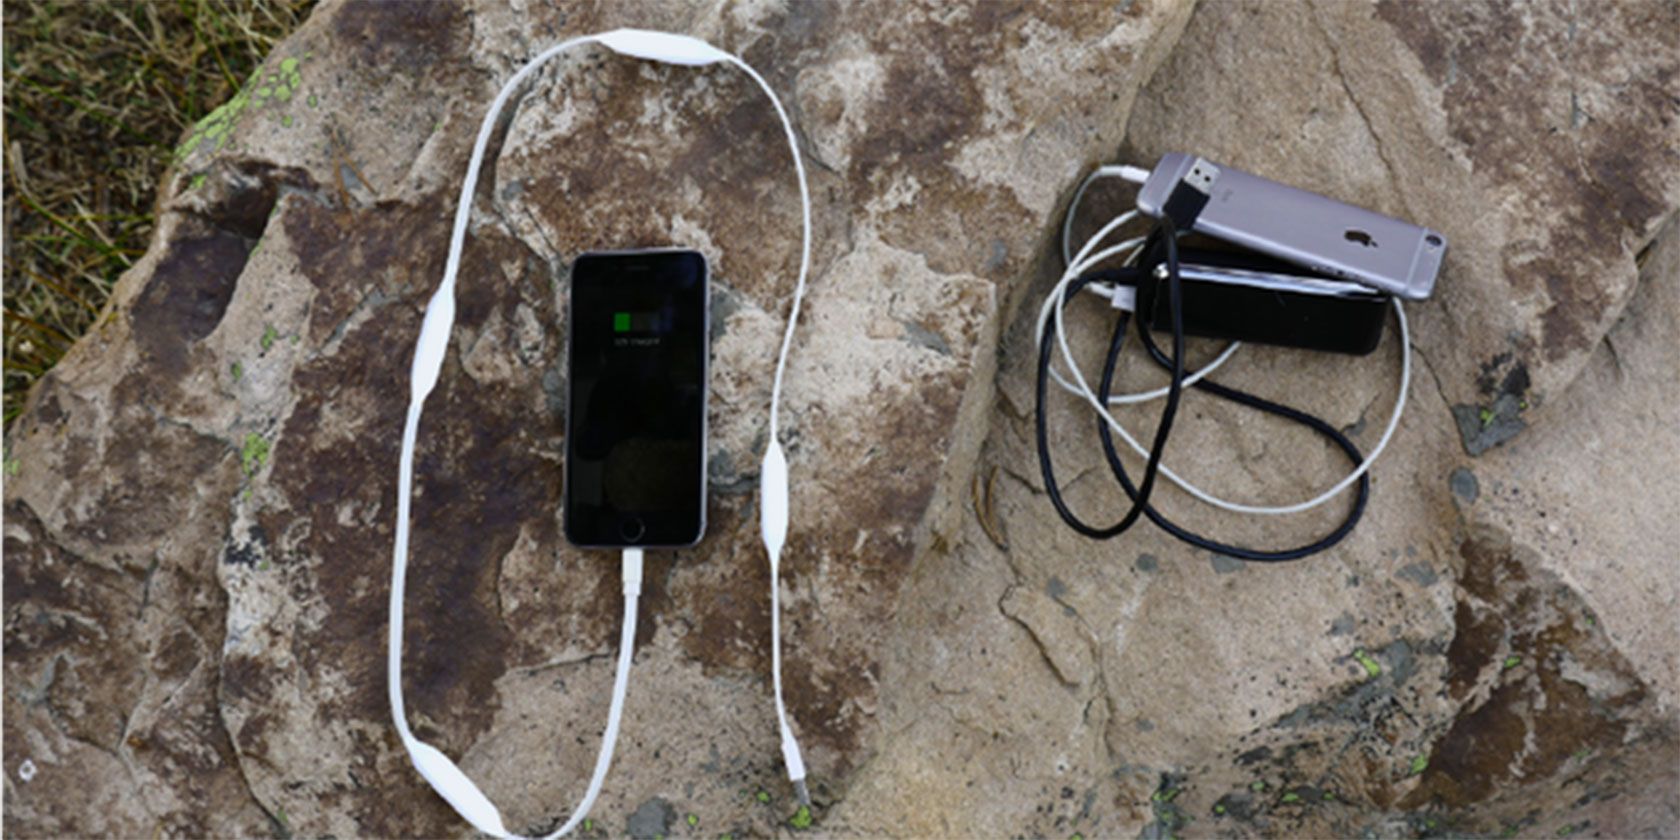
As mobile phone displays are much tougher than they used to be, it seems like they’re indestructible. Sadly, they’re not. Dropping your phone can often break the display. Your phone can no longer be considered useful.
Want to replace a damaged smartphone display? It’s a relatively cheap and straightforward process. Here’s how to do it.
The Costs of Replacing Your Phone Screen
Cracked your mobile phone display? Dropped it in the street, or crushed it playing football? Sat on it, even? You know by now that you’ve given yourself a headache. Can the phone be repaired, and if so, what are the costs?
Many services available online and locally will repair your mobile phone, for a price. But if you have access to the parts and they’re inexpensive, why not perform the procedure yourself?
You should also consider the non-monetary costs: time spent without a phone, data that needs archiving from the device. Hopefully your mobile platform’s cloud service can help here, or perhaps a desktop utility can check the phone’s contents.
Fitting a new display that costs the same as a replacement phone is pointless. However, if replacing the mobile phone screen is closer to $15, it makes sense to have a go yourself.
Where to Find a Replacement Phone Screen
The most obvious location for a replacement display is eBay. Simply searching for the mobile phone model and the word display will turn up the required parts. Just remember to shop safely when using eBay.
In my case, “nexus 5 display” returned a wealth of accurate (and, sadly, slightly inaccurate) results. Take the time to check that the component you choose is genuinely for your device. Often, components may appear in the results thanks to a poorly written listing.
Amazon is also a resource for replacement screens, but you should also consider a general Google search as this will turn up specialist suppliers who might be able to provide a lower price.
Note that you may find listings that offer just the display, versus listings with half the phone’s chassis. Which one you buy depends on how complicated you want things to get. For example, just the display means melting the adhesive using a heatgun or hairdryer.
Alternatively, a replacement display kit that includes half the phone’s body will require components being transferred from the old body into the replacement.
The Tools for Replacing Your Phone Screen
Often, replacement displays ship with the tools included. Typically, you’ll receive:
Mini screwdrivers
Mini Torx drivers
Plastic tweezers
Plastic wedges
A guitar pick/plectrum
You should also have:
Curved tweezers
Precision knife or craft scalpel
Hairdryer or heat gun
These tools are included to remove the case and unscrew any components that obstruct replacing the display. For example, a mobile phone will have Torx screws under the battery cover that will need removing before you gently prize the case apart.
Note that spending money on these tools isn’t totally necessary. Sanding off the ends of a couple of plastic bicycle wheel levers will produce usable alternatives—otherwise, they can be sourced relatively cheaply.
The Basics of Replacing a Phone Screen
There are so many different mobile phone models on the market (either new or used) that providing a standardized guide is next to impossible. Additionally, some models cannot be repaired without sending them back to the manufacturer.
Head to YouTube to check how your particular phone’s display can be replaced. You’ll find many detailed device-specific guides on the procedure.
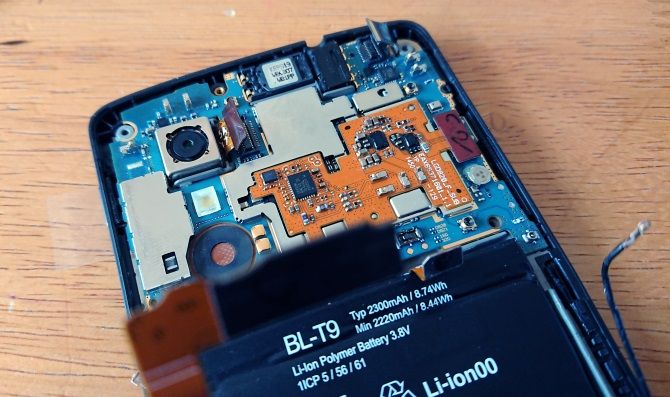
Most smartphones are essentially made up of several layers of components. Each layer must be carefully detached for the glass display to be replaced.
These guides typically follow this procedure for replacing your smartphone display:
Open the phone
Remove the display
Replace the adhesive
Fit the new display
Ensure correct cable connection
Read on to learn how to fit a replacement smartphone display.
Step 1: Open the Phone
To begin, remove (where possible) the rear cover, battery and identify where the Torx (or standard) screws might be hidden. Look under labels and beside USB ports. You might find screws in the battery cavity if you have a device with a removable cell.
Prize the phone apart using the levers and plectrum; additional screws will need removing, too.
Watch out for ribbon cables, which require careful unlatching from their connectors. Use a flat plastic blade or plectrum for this.
These are often threaded through the different layers of hardware within the phone. Ribbon cables are delicate; easily broken, take care as damage to these could change the dynamic of the repair considerably.
Step 2: Remove the Screen
By now you should have the front of the phone in your hand, empty, with the glass display ready to remove. Soften the adhesive with the heat gun.
Alternatively, you can leave the phone in a warm place (such as on a radiator) for a while.
Persuading your phone’s display to part with the body isn’t usually difficult. Pushing through the camera hole against the glass to begin with, slowly prize the glass display away from the body.
As noted, some replacements are basically half a phone.
In this case, you won’t need to remove the display, but you will need to remove components (and even the motherboard) from the damaged device into the new body.
Step 3: Replace the Adhesive
Narrow rolls of replacement adhesive can be bought online. Have some double-sided sticky tape laying around? Cut this into narrow 1 mm slivers, then apply the adhesive to the phone’s frame, rather than the glass.
Step 4: Install the New Screen
Once the adhesive is in place remove the protective strips on the adhesive and push the glass into place.
Apply light pressure where the display meets the adhesive. Take care not to put pressure on the middle of the glass display. Excessive force can break even the strongest Gorilla glass.
Step 5: Ensure Correct Cable Connections
It’s now time to put the phone back together.
Reconnect the relevant cables, locking them down where necessary. Place the components back in the case with care, checking that there are no cables or screws left over. Test the phone to check that it works.
You should be able to switch the phone on without securing the final screws in order to check functionality.
Planning to use a video guide? Review it before you start to familiarize yourself with the steps.
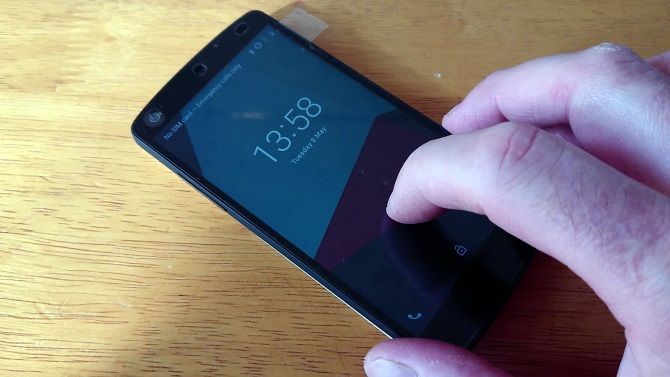
Does the New Phone Screen Work?
The moment of truth: does the new screen work? Remember, a touchscreen display has two purposes: touch interaction, and displaying the phone’s operating system.
A successful replacement will give your phone a fresh “almost new” look, and if the touchscreen works, well done.
However, it isn’t always plain sailing. I’ve fitted a replacement display that caused the phone to overheat. Therefore, it is important to buy components from reputable sellers, and ensure you’re buying the right parts for your phone.
DIY Smartphone Repair, Success!
Confident? Replacing a mobile phone screen isn’t simple, but it is something that you should certainly consider if the price is right.
While there are no hard-and-fast rules—devices differ from manufacturer to manufacturer—the steps provided should illustrate what is entailed.
Most importantly, don’t walk into performing such a repair without some device-specific research first. Video guides are particularly useful; once you’re ready, get hold of the right tools and surprise yourself!
Here’s another tech problem you can solve yourself with a bit of time and effort: phone display flickering.
Spanish speakers in the United States will soon be able to interact with Amazon Alexa in their native language. And it’s about time too. The US has a high number of Spanish speakers, and yet Amazon has taken its time teaching Alexa to speak Spanish.
Catering to More Than English Speakers
To those of us whose first (and probably only) language is English, interacting with digital assistants is a breeze. However, native speakers of other languages are stuck having to speak English while they wait for the technology to start catering to them.
Things have been improving. In June 2018, Google Home learned to speak Spanish. Google is also leading the way with other languages in other countries, utilizing its previous work on Google Translate. But Amazon has taken longer to include other languages.
Amazon Alexa Learns to Speak Spanish
As announced on the Alexa Blog, developers can now use the Alexa Skills Kit (ASK) to “start building skills for Spanish-speaking customers in the US […] with the new Spanish for US voice model.”
Once these skills have been certified for publication they will become available first to participants in the Alexa Preview program. They will then become available to everyone “when Alexa launches in the US with Spanish language support later this year.”
This means Spanish speakers in the US will be able to interact with Alexa through their Amazon Echo device. Alexa Built-In devices from Sony, Bose, and Facebook, and Works With Alexa devices from Philips, TP Link, and Honeywell Home will also be compatible.
Is It Time to Learn to Speak Spanish?
It’s important to note than the US has the second highest concentration of Spanish speakers in the world after Mexico. Reports suggest there are more than 50 million people able to speak Spanish in the US, so this is long overdue from Amazon.
This is obviously good news if you are a native Spanish speaker who owns an Alexa-compatible device. But if you don’t speak Spanish there’s no need to feel left out. With that in mind, here are the best apps to learn Spanish fast.
There’s one thing every job seeker can do to improve their chances of landing a job—use multiple resources in their job hunting efforts. This means posting your resume online and using social networks. However, the core of your efforts should be focused on job search websites that bring all of the world’s jobs to your desktop.
To help you begin or continue your hunt for a new position or career, these are the best job search websites.
This site is quite a job search engine indeed! The site has climbed to the top of the popularity list with over 250 million unique visitors per month. And it’s with good reason that the site is well-known. Just pop in a keyword, select a location and find tons of available jobs.
You can upload your resume, find salaries, read company reviews, and apply on either the hiring company’s site or directly through Indeed. The site also offers a nice area for your profile where you can save jobs and then review them and then move them to Applied or Interviewing. If you’re just starting your job search, global websites like Indeed are a terrific place to start.
Whenever anyone needs access to job markets across the world, Monster is an obvious place to start. Monster has grown into one of the largest job search sites on the internet and serves just about every community across the world.
What makes the Monster of job search sites so useful is the international search. Select a country and then search for or browse opportunities. The site lets you post your resume, apply for positions directly, use an advanced job search, and access career resources to help you research every step of the job hunting process.
ZipRecruiter not only gives you easy-to-use job search tools, but lets you quickly see suggested jobs, applied jobs, saved jobs, alerts, and a message center. You can also receive text alerts, which is handy for keeping up with new jobs available when you’re on-the-go.
You can narrow down your search results with filters for when posted, distance, salary, employment type, title, or company. Plus, as you apply a filter, you’ll see the number of positions available using that filter. A standout feature ZipRecruiter is its 1-Click Apply. Find a job you like, click that button, and that’s it!
If you’re looking for job search sites like Monster, that offer career resource tools, then head to Glassdoor. While they may be different than Monster’s tools, they’re certainly helpful. Read company reviews, search interview questions, find jobs by salary, and use the convenient salary calculator.
You’ll need to create a free account to start using Glassdoor, but that’s when that door opens for all of the site’s useful tools. You can set up job alerts, follow specific companies, upload your resume, and save jobs you like to review later. Don’t pass this job search site by, Glassdoor is worth your time.
Most people know that LinkedIn is the tops when it comes to professional networking. So, why wouldn’t there be a LinkedIn Jobs site? Enter a job title, location, and hit the search button. You’ll see results with filters for date posted, job type, experience level, and more.
If you’re a LinkedIn user, you can apply for jobs with a single click using your LinkedIn details. While the LinkedIn Jobs site may not have all of those extra features, like career resource tools, it doesn’t need them because you can find those on the LinkedIn site itself. If you already have a LinkedIn account and profile set up, then this job search site is a no-brainer.
There’s little question that CareerBuilder is another in the list of best job search websites. If you’re looking for sites like Indeed, this is a good one. You can post your resume, find jobs by company or industry, and save your job searches to receive regular alerts via email.
Similar to Monster, you can use career resources which include who’s currently hiring, jobs on the rise you should consider, recommended positions for you, and helpful tips for your job search. CareerBuilder is a definite job search site to bookmark.
Simply Hired is a great job search website, mostly because of its little extras. Of course, you can search for a job by keyword and location as well as upload your resume. But this job site offers a bit more.
You can view the top cities and companies along with positions earning the highest salaries. Then, head over to the salary estimator section for even more details on what jobs are paying. That area lets you browse jobs by salary or pop in a position and location to retrieve salary data. If this is something that would help you in your job search, then search with Simply Hired.
NetTemps is a good site for job hunters to find jobs worldwide. A great feature is the filter options you get. You can refine your search results by job type, salary or rate, distance, industry, and job age. And you can view your recent searches with a click and without registering.
With NetTemps, you can also apply for a job that interests you without registering for an account. This is wonderful if you don’t want to keep updating your resume on all of the job sites you join. Just click to apply, enter your email address, and attach your resume to the message. For quick and easy searching and applying, check out NetTemps.
One of the world’s wealthiest countries in the world is also one of the world’s largest employers. The U.S. Federal government has its own giant online job database that lets you search for whatever industry or discipline you’re interested in.
These jobs are worldwide, and the site isn’t shy about listing the actual salary ranges right there in the listing. You can use filters to narrow down your search by hiring path, security clearance, travel percentage, and more. If you’re thinking that a government job is for you, then you should take a look at USAJOBS.
Over the years, employers got into the habit of going to college career centers to advertise their entry level positions. In fact, sometimes those are the only places they’ll advertise their openings.
The College Recruiter job site helps you find these entry level, part-time, seasonal, and internship jobs. And when you want to get your foot in the door, these types of positions are often the best way to go. The site provides helpful tools like articles, videos, job search advice, and conference details, so you can search for a job and get help doing it.
Good Luck on Your Job Search!
Make sure that you’re prepared to meet your potential employer after using one of these job search sites to apply for a position. with these mock interview websites.
Our verdict of the Kugoo S1:
If you are keen to get in on the electric scooter trend, the Kugoo S1 is fun, compact, fast, and has a good battery–just don't expect a smooth ride!810
Electric scooters are gaining popularity, and there are options at the budget end of the market worth considering. Many are advertised as transport for the last mile, or urban commuting vehicles. All of them are way too much fun.
Today we are looking at the Kugoo S1, a low price electric scooter that promises 30km (18 miles) of range and speeds of up to 30km/h (18mph).
Join us as we take a look at these claims, and work out if budget electric scooters are the future of urban transport, or just an expensive toy! As always, we have a Kugoo S1 to give away at the end of the article, courtesy of GeekBuying.
Getting Started
The S1 is available for $339.99 from GeekBuying, which puts it at the budget end of the price range. Not much comes in the box. Alongside the scooter, you get the 42V 1.5A charging pack, and a comprehensive but straightforward manual.
The manual suffers a little from translation but covers everything needed to get started. The scooter charges via a connector next to the primary hinge and a red/green LED indicator on the charge pack shows when charging finishes. Charge time is around 4 hours from empty to full.
Whenever you receive anything you plan to ride on or in, the first thing to do is check it for safety. I found the S1 to be put together well. Nothing needs tightening, and the build feels solid. Before finding out just how terrifying 30km/h on a scooter is, let’s look at the specs.
Kugoo S1: In Numbers
Range: 30km (18 miles)
Max Speed: 30km/h (18mph)
Brakes: Front regenerative magnetic brake, back stomp brake
Charge Time: 4 hours
Battery Power: 36v 8.8AH Li-Ion 18650
Motor Power: 350W
Max Weight: 120KG
Max Torque: 13.3N.M
Climbing Gradient: 15°
Wheels: 8.5 inch non-pneumatic non-slip
Weight: 11 Kg
Display: 7 x 4cm (2.8 X 1.5 Inch) OLED color display
A couple of things jump out immediately from these specs.
Kugoo has priced the S1 a little cheaper than the Xiaomi M365, the most obvious competitor. The differences don’t stop there either.
The 350W motor is more powerful than the M365 and many others at this price. It weighs less, but can take more weight, and has a faster claimed top speed.
One notable difference is the inclusion of allegedly “Military Grade” non-pneumatic wheels made seemingly from some kind of hardened rubber. The S1 does, however, have shocks front and back to compensate for the lack of air in the tires.
Also missing here is a rear disc brake. The S1 uses a front mounted regenerative magnet brake and a rear stomp brake which is confusingly listed as an emergency brake in the manual.
On paper, the S1 looks good. Does the experience match up to the numbers?
Setting Off
Unfolding the S1 is intuitive. The back brake doubles as a catch to hold the folded scooter together. The main hinge clicks into place easily, and the adjustable height bars are held in place with a quick release clamp. The bars clip into the main display and feel surprisingly robust given their design.
The S1 turns on using one of 5 buttons mounted to the OLED display. The color display is easy to see even in bright conditions and displays your current speed, speed setting from one to three, battery level, and a choice between total distance traveled, current trip travel and elapsed time.
Two thumb paddles control acceleration and braking. Setting off was smooth, and acceleration is constant. The scooter defaults to speed 1 which presumably is the speed that the 30KM range is based on.
The Speed
Before trying the S1, I assumed Kugoo would have added the lowest speed setting as a way of claiming massive range, and it would be too slow to actually be useful or fun. I was surprised to find that even the lowest speed settings were more than fast enough for moving around a smooth surfaced urban environment.
Practicality aside, I was expecting to have to crank up the speed to have fun, and I was wrong. The speedometer measured 17km/h (10mph) maximum for speed setting 1, and if I were trying to conserve battery life, I’d be perfectly happy traveling this fast.
That said, speed settings 2 and 3 topped out at 22 and 28km/h (14 and 17mph), and felt significantly faster. I weigh 80KG, so the claimed top speed of 30km/h is certainly possible.
Just to make sure that the onboard display was accurate I set up a rudimentary speed test to measure distance traveled per elapsed camera frame. I found the speedometer to be accurate.
Personal experiences will of course vary, but I found the top speed of this scooter to be in that sweet spot where fun meets certain injury if something goes wrong.
In other words—if you want speed at a low budget you will not be disappointed. Just don’t come to us if you break a collarbone or two.
The Brakes
My first experience with the left thumb-activated brake was… interesting. Having read up on the Kugoo S1 before starting, I was assuming to find the braking force underwhelming. I found the opposite to be true, and the regenerative magnetic brake took a large chunk off my speed instantly, causing me almost to jump over the front bars.
After adjusting to this, I found it to be relatively easy to judge when to start braking, and as my time with the S1 continued I found that the brake mellowed out somewhat.
While the stopping power of the brake is okay for usage in a controlled environment, the claimed stopping distance of 4 meters seems to only apply to the lowest speed setting.
The rear foot brake also triggers the front brake, and according to the manual is only for emergencies. Anyone coming from a non-electric scooter will find this a strange adjustment.
I’m not entirely convinced that the back brake did trigger the front either. I noticed a marked difference when using the thumb trigger in conjunction with the stomp brake, despite the manual warning me not to, and the combination of both brought the stopping distance down significantly.
I don’t quite understand the omission of a disc brake on the back wheel of the S1. Perhaps it was a price saving measure, or they just thought it wasn’t needed, but I feel it could have added an extra level of stopping power.
Nevertheless, at no point did I feel out of control with the Kugoo S1, though I can imagine those less experienced with scooters falling foul of the odd brake setup. Also, be wary of the potential savage first few hours of brake use!
The Ride
Riding the Kugoo S1 is as smooth as the surface you choose to ride on. As predicted, the lack of air in the tires does make a difference. While it is an advantage on smooth ground and contributes to the feeling of speed, as soon as you move off the smooth ground you are going to feel it!
The front and rear shocks likely contribute to a slightly more comfortable ride, but I found my wrists and feet to be aching after my first day riding. I spent a lot more time on the S1 than most people would on their commute, so this might not be a big deal for some people. If comfort is an issue, you may want to look for something with pneumatic tires.
Portability
When folded, the S1 measures 95 x 34 x 18.5 cm (37 x 13 x 7 Inches) and will fit in any car boot. This is mostly due to the way the bars fold down. The design of these bars is one of the coolest features of the Kugoo S1. Folding them out locks them into place, and two thumb buttons release them.
When unfolded, the handlebars can operate at three heights. I measure 180cm and found the second and third settings to be equally comfortable, though I can imagine taller folks being glad of the highest setting.
Folding the S1 requires a combination of pressing down on the release catch and jerking forward the handlebars. This movement is easier to learn with the front wheel up against a wall, but without following a video on how to fold it I wouldn’t have worked it out.
The catch is so stiff that you will feel like you are doing something wrong, and I was close to breaking out the hammer when I finally worked it out. This makes sense, as you don’t want this thing folding by accident on you at 30 km/h!
The Weight
At 24 pounds, The Kugoo S1 is a little lighter than the Xiaomi M365, but this isn’t enough of a difference to matter. The technology that powers electric scooters is heavy, and there is no easy way to get around it. Premium scooters employ carbon fiber bodies to save weight, but ultimately big battery packs are heavy components.
Depending on the user, the S1 can be carried in one hand, but the weight combined with the center of balance makes it unwieldy at best. If you plan to keep this scooter in the garage and just move it into your car boot, it’s not a problem, but if you need to carry it up a set of stairs every day be prepared for a workout.
The Battery
The stated battery range of 30km will be a big draw for many people. Once again, this figure is highly dependent on the weight of the user, along with the environmental temperature, with colder temperatures resulting in less range. The weather was generally good throughout my testing. The battery drained thoroughly twice during testing. Once at 22km, and once at 15km.
Bear in mind this was using multiple speed settings interchangeably and over many different surfaces. Given its performance over my usage, I have no reason to believe that the 30km isn’t attainable on the lowest speed setting. This battery life should be more than adequate for commuting between a car or train and workplace, or for having fun on a day out.
Everything Else
The S1 has 26 front mounted LEDs as a headlight, and a small red LED backlight. Both work fine for visibility, and the front mounted LEDs are bright enough for some evening use. I wouldn’t want to be going full speed in the dark relying solely on them, but they’re fine otherwise.
The kickstand works, and the scooter can be left standing upright. You really don’t want to forget to put it up before you set off though or you may catapult yourself.
Unfortunately, it is attached to the bottom of the scooter in such a way that the scooter can never lie flat on the floor. Not only this, but the metal kickstand edge when folded will scratch your floor. This was clearly an afterthought to an otherwise well-designed scooter.
The Kugoo S1 has no smartphone app, though its large display up front makes one somewhat unnecessary, and the need for a dedicated app for your scooter is dubious at best anyway.
Should You Buy One?
The Kugoo S1 is a tremendous amount of fun, at times the kind of fun that may land you in an ambulance, though that would be no fault of the scooter! Its only main downfall is the lack of air in the tires and the lack of a rear disc brake, but neither of these things are problematic enough to cause any problems.
Before you purchase, you should check local laws. Riding an electric scooter or Segway on a public road or path is illegal in the UK, which makes this decidedly less useful there.
There are other scooters close to this price that may give a more comfortable ride, but the S1 delivers on the three main things it promises. It has a great range, it’s fast, and it folds down to a small size.
You probably know that Google Calendar has tons of great features that help you manage your wild schedule. But did you know that it also offers sharable calendars? These let you import all sorts of events onto your calendar without doing any of the work of setting them up.
Let’s take a look at some of the most useful public (or at least, free) calendars you can add to your Google Calendar. With them, you can keep track of nearly anything.
1. Holidays
Google Calendar has built-in support for all sorts of holidays. To access them, click the Gear icon above your calendar and choose Settings. On the left side, expand the Add calendar section and choose Browse calendars of interest.
Here you’ll see holidays broken down by religion, such as Christian Holidays and Muslim Holidays. You can also expand Regional holidays to add calendars for public holidays in a huge list of countries.
Simply check the box for any holiday calendar you’d like to add, and you’ll see it appear in your list of Other calendars. If you’d like to get an idea of what holidays a calendar contains, click the Preview icon (which looks like an eye) to check it out first.
2. Sports Schedules
The next integrated option Google Calendar offers lets you keep track of your favorite sports teams. On the same Browse calendars of interest page as described above, you can browse by sport such as Baseball, Football, and Hockey.
From there, select a league and you can check the boxes for your team. Now you’ll always know when to cheer them on to victory.
3. Phases of the Moon
Our last stop on Google’s calendars of interest is the lunar cycle. If you’re interested in astronomy, or just want a bit more content to flesh out your lonely calendar, adding this will let you know when the moon changes phases.
Like all calendars, you’ll find it at the bottom-right corner of your Google Calendar page. You can click the three-dot Menu button to change the calendar color, hide it from the list, or change other settings.
4. Esports Schedules
Let’s break away from options built into Google Calendar and check out some public calendars from around the web next.
Maybe you’re not interested in sports, but enjoy esports (video game competitions). In that case, you’ll be happy to know you can add esports schedules into Google Calendar too.
You’ll need to find a link for your league of choice. Two popular games to get you started are Rocket League Esports calendar and Overwatch League calendar. Both of these let you add them to your Google Calendar in one click.
Note that these aren’t official, so they may not receive updates for future seasons.
5. Weather
Google Calendar used to offer weather integration by default, but this is no longer the case. But don’t despair; you can still add the weather to your calendar pretty easily.
On your Google Calendar, click the Plus button next to Other calendars and choose From URL. On the resulting page, paste the following Weather Underground URL:
https://ical.wunderground.com/auto/ical/12345.ics
Replace the “12345” with your five-digit ZIP code, then click the Add calendar button. After a moment, you’ll see a new event at the top of every day with the conditions, plus the high and low temperature.
6. TV Shows
If you like to watch new episodes of your favorite shows as soon as they air, it can be tough keeping track of when they all come on. Thankfully, you can use some handy websites to add them all to your calendar.
Head to pogdesign.co.uk/cat/ and you’ll see a calendar with the entire month’s schedule for shows. You’ll need to create an account in order to save your favorites.
Once you’ve made an account, you’ll also want to tweak the Settings to your liking. Make sure you’ve selected the correct time zone; you can adjust preferences like whether to show the episode name as well.
From there, you can browse the schedule or search for your favorite shows using the bar at the top-right. When you find a show you want to track, click the Add to Favorites button on its profile page.
Importing to Google Calendar
Repeat this for all shows you want to track, then hover over the Account button and click the .iCal entry.
This will download a file that provides a “limited 2 week overview” of your chosen shows. Thus it’s not a long-term solution but can help in the season when lots of new shows are starting.
You can add this file to your Google Calendar by clicking the Plus next to Other Calendars and choosing Import. Browse to the file on your computer and select it to import. Instead of adding a new calendar, this will simply add the events to the calendar you select. Thus, you may want to create a dedicated calendar for TV shows if you don’t want to clutter your main one.
It’s easy to lose track of what’s in theaters at the moment. FirstShowing.net has you covered with a schedule of every movie planned for release this year.
Click the 20XX Schedule tab at the top and you can browse the list of movies for that year. At the top of the current year, you’ll see a Google Calendar button. Clicking this provides a preview of the calendar; hit the Plus button at the bottom-right to add it to your own calendar. Find the 2019 movie calendar here.
You’ll need to repeat the process for next year’s calendar when it becomes available. While the website’s list includes limited-release movies as well as wide-release films, the Google Calendar only shows those showing nationwide.
One of the most popular subreddits on Reddit is /r/AMA, which stands for Ask Me Anything. These are essentially open question-and-answer sessions held with notable figures.
If you’re a huge AMA fan and want an easy way to keep track of what’s coming up, this calendar is for you. Even if you’re not big into them, you might enjoy looking through the calendar to see if anyone you’re interested in is doing an AMA.
Nothing is worse than realizing one of your favorite bands played a concert in your city… last week. JamBase helps you avoid this plight by helping you track your favorite bands and those who are coming to your area.
Once you’ve signed up for an account, check out shows in your area or look for your favorite bands. After adding upcoming shows to your JamBase calendar, click the My JamBase button in the top-right and choose Calendar.
Here you can click Add to Google Calendar. Now all your planned concerts are easy to track, and you won’t miss the show of a lifetime ever again.
So you have Father’s Day and Christmas on your calendar, but what about Gondorian New Year from Lord of the Rings? Can you recall when Harry Potter’s birthday is? Are you ready for this year’s Festivus celebration?
If you aren’t up on these holidays, this calendar from Atlas Obscura can help. It details over 75 fictional holidays, mostly from movies and TV shows, that you can celebrate alongside real ones.
More Useful Calendars to Choose From
If there’s a calendar you were hoping to find but didn’t see here, there’s a lot more where these came from. Check out the site iCalShare, which is chock-full of public calendars you can add to yours.
There’s a fair amount of garbage on the site, but if you look past that, you’ll find some neat calendars. The Best of iCalShare section includes calendars for Lesser Known Holidays and the NASA Launch Schedule, among others.
Dress Up Your Google Calendar
We’ve looked at some great options to flesh out your Google Calendar a bit. Not everyone will appreciate every option, but there are definitely some useful choices here.
Having all your scheduled events in one place reduces the likelihood of double-scheduling, which is never fun. For even more efficiency, check out some Google Calendar tips for better time management.