Tuesday, March 31, 2020

Remove Video Background Automatically for Free

While we have seen many services and tools to remove the background from images and make it transparent, there are no such options available for videos. For removing video background, the general option is to take the video in green background and then edit it. But if you feel this is a hectic task, then here is a simple online tool called Unscreen, which allows you to remove video background automatically for free without any editing required.

Remove Video Background

UnScreen has a very simple interface, you can upload any video or GIF file to remove the background. The video file supported are .mp4, .webm, .ogg, .mov, .gif. Once you select the file, it starts to process it automatically and shows you the video without a background. In case you want to upload a video from a URL, this is also possible on the service. You can specify the link where the video is available.

Once the video is processed you can see different options available at the bottom.

Remove Video Background

You can see that the video processing is almost perfect and it does an impressive job here. Below the video, you can add your own background to the new video. It can be from an existing collection of backgrounds available, or you can go with solid colors or it can be any image you select. Once you have set the options, you can see the option to download the video. It can also be downloaded in high resolution.

imageimage

The above image shows the video with and without background and it works really well. The only downside of the service is that right now only 5 second clip is available for removal. The full version of this service, which is Pro service is coming up soon.

Meanwhile you can try out this service to see if it works for you.

The post Remove Video Background Automatically for Free appeared first on .


Via Nirmaltv

10 Useful Tips for When Your VPN Speed Is Slow

vpn-slow-speed

Using a subscription VPN service to enhance your inline privacy is a smart idea. However, while they’re great for avoiding region blocking, censorship, and might even save you money, VPNs can cause problems.

The main one: a slow internet speed while the VPN is running. But what can you do about this?

If your VPN seems slow, here’s why, and a few suggestions on how to fix it.

1. Pick the Right Server Location

Fix issues with slow VPNs by choosing the right server

This is perhaps the most important thing to keep in mind, and it has to do with how VPNs work.

Let’s say you’re using VPN to get around certain routing-related issues that are reducing latency in online games. Connecting to a VPN changes how your data is routed across the internet, thus bypassing problems like intermediary network outages.

Suppose you’re in New York and you’re playing a game whose server is also located in New York. Normally your data travels to the server using the fastest path, then returns to you on the fastest path. Latency is maybe 20 milliseconds (ms).

But now suppose you’re connected to a VPN server in France. Your data first travel to France, to the server in New York, back to France, then back to your device.

You can see the problem—that extra distance might mean your latency is now 250 milliseconds.

For speed, always pick the VPN location that’s closest to the destination if you can. This is particularly smart if you’re using a VPN to browse an overseas Netflix library. For online gaming, view the server list before starting the game, so you’re connected to a nearby VPN server.

Note that this doesn’t really matter for things that aren’t latency-dependent (like browsing the web).

2. Update Your VPN Client

One of the key reasons your VPN might be slower than you expect could be client. The software you install on your computer, phone, tablet, or TV box manages your connection to the VPN server. It also oversees the encryption of your internet connection.

From time to time, bugs and other issues can lead to problems including slow internet. When these are identified and fixed, the VPN provider rolls out an update. Your client should inform you when an update is available—be sure to download and install it straight away.

3. Forget Wi-Fi—Use Ethernet to Improve VPN Speed

Use Ethernet to improve VPN speeds over your wireless network

Almost all domestic internet issues can be traced (at least in part) to wireless networking speeds.

The solution is simple: use Ethernet.

Of course, this isn’t going to be possible in many cases. Laptop computers often don’t even have an Ethernet port. Mobile devices don’t have Ethernet.

However, PCs, games consoles, TV boxes, and Smart TVs often all have Ethernet ports. Hooking these devices directly to your router with a good quality Ethernet cable will improve speed considerably.

If your computer isn’t close enough to your router, consider powerline adaptors to route data through your home’s electric wiring.

4. Reduce the Encryption Level to Fix a Slow VPN

VPNs can use different security protocols for encrypting the data that passes through. Not all VPN services support all protocols, but many of the standard ones are supported widely.

The thing about encryption is that it can be computationally expensive. Every single bit of data that leaves your device must be encrypted; every single bit of data received must be decrypted. The stronger the encryption, the more computational power you’ll need.

A slow CPU can cause slow VPN performance on your computer. Even if your internet can handle 100Mbps, that won’t matter if your encryption is too strong for the CPU. It might only process data at a rate of 10Mbps, becoming a bottleneck in how quickly data is processed.

Theoretically, the speed hierarchy from fastest to slowest is PPTP > L2TP/IPSec > OpenVPN > SSTP > IKEv2/IPSec. Step down one at a time if your device doesn’t have enough computational power. Change these in your VPN client’s settings, referring to the provider’s support pages for assistance.

Note that this is only advisable if you don’t need maximum security for whatever activities you’re doing through VPN. If you’re using a VPN to access region-locked content, for example, then this is fine.

5. Don’t Set Up a VPN on Your Router

Setting up a VPN on your router can slow things down

As a VPN user, you have two choices for setting up a VPN.

  1. Set up the VPN on your router or
  2. set up VPN on each individual device that you’re using (e.g. computer, smartphone, tablet, etc).

Always go with the latter option.

One reason why routers are so affordable is that they don’t need next-gen CPUs to be effective. Unfortunately, this means that even last year’s smartphone is faster than today’s router. and this will bottleneck your data speeds for the encryption-related reasons above.

A standard router will have difficulty handling a VPN while serving multiple devices.

If you really want to set up a VPN on your router, buy a dedicated VPN router.

6. Try Both TCP and UDP Protocols

UDP is much faster than TCP.

TCP needs to establish a connection between two endpoints (e.g. you and a website) and confirm all data was successfully received at the destination. UDP just sends data across the internet without any checks.

This extra bit of TCP overhead is slower because multiple acknowledgments occur between you and the destination when sending data. The result: essentially the VPN is slowing down your internet. As such, using VPN over UDP can be much faster.

Check your VPN settings to see if manual switching is supported. The process may differ from service to service.

Also note that your ISP might detect and throttle TCP traffic over VPN. This is more common than you might think because a lot of people use VPNs for media streaming and torrenting. Both typically use TCP. Switching to UDP might help with speed but could result in a more unstable connection. Experiment and see for yourself.

7. VPN Slowing Your internet? Try Split Tunneling

Use split tunneling to prioritise private connections over other activities

When you use a VPN client on your PC, it encrypts every bit of data that leaves your system. Sometimes, this isn’t necessary. For example, if you’re circumventing geoblocking or censorship while simultaneously accessing a network drive, you’ll find access isn’t possible.

Split tunneling is the solution. This ensures a specified app connects through the VPN while other data travels to and from its destination without encryption. Reducing the encryption load on your processor can improve speeds.

Various VPN services support split tunneling. Check your provider’s feature list or settings page to enable the option.

8. Upgrade Your ISP or VPN Plans

Under current technology, a VPN will never be able to increase your internet speed beyond what your ISP provides. If your VPN speed is slow because your base internet speed is slow, then you have no choice but to upgrade your internet plan to a faster tier.

Switching from Wi-Fi to wired might help with speeds in some cases.

Note that certain VPN providers might throttle your speed as well, especially if you’re using a free VPN service. You’ll also want to keep an eye out for new VPN technologies.

9. Maybe Your VPN Is Slow—Switch!

Don't suffer with a slow VPN - change providers

Often a slow internet connection can be the cause of a slow VPN. But sometimes it’s not the ISP that is at fault—it’s the actual VPN service.

It doesn’t matter which server you connect to, or other tweaks you’ve tried above, the result is always the same. A good, fast VPN should be something like 2Mbps slower than your unencrypted connection.

Less than this over a prolonged period suggests the VPN is at fault. Confirm this by comparing the speed on your mobile VPN client with the results on your desktop computer. If it’s slow across the board, switch.

Looking for a new VPN provider? Here are the best VPNs recommended by Reddit users and here’s a list of exclusive VPN deals.

10. Don’t Use a Free VPN

The idea of a VPN service that you don’t have to pay for is great. But in the world of free VPNs, you’re not a customer, you’re the commodity.

Free VPN providers have shown themselves to be unscrupulous, unprincipled, and disdainful of their users. Not only is your personal data and activity up for grabs to the highest bidder (defeating the point of using a VPN) your traffic is low priority.

A free VPN will almost certainly slow your internet. After all, they want to tempt you with their free service to encourage you to subscribe. In almost all cases you should avoid this. Free VPN providers are the used car salesmen of online privacy. Instead, opt for a fast, paid VPN solution—MakeUseOf readers can save 49% on our recommended VPN, ExpressVPN.

Here are more reasons why you should avoid free VPNs.

Now You Know Why Your VPN Is Slow

As we’ve seen, internet access over a VPN will probably never be the exact same speed as your ISP’s baseline. But you have several options to ensure that the VPN isn’t too slow:

  1. Pick the right server
  2. Keep your VPN client up to date
  3. Use Ethernet rather than Wi-Fi
  4. Reduce the encryption level where suitable
  5. Don’t set up a VPN on your router
  6. Try TCP and UDP protocols
  7. Use split tunneling
  8. Upgrade your ISP plan
  9. Switch to a new VPN
  10. Avoid free VPNs

So long as your internet provider is fast, your VPN should be fast and fit for purpose.

Looking for a VPN? Check our list of the best VPN services to find a fast, reliable, and private VPN.

Read the full article: 10 Useful Tips for When Your VPN Speed Is Slow

https://ift.tt/2Uybxu4

via MakeUseOf

The Top 10 Highest-Rated Reddit Posts of All Time

highest-rated-reddit

Hundreds of posts make it onto the front page of Reddit every day, but few will ever rise high enough to sit amongst Reddit’s all-time highest-rated posts. Only the very best earn that honor.

So, in this article we list some of the highest-rated Reddit posts of all time. Naturally, some subreddits are more popular than others, so we’re limiting this list to one post per subreddit.

10. Brave Soldier Buried Amongst His Devoted Troops (/r/todayilearned)

Robert Gould Shaw
Image Credit: Whipple Studio/Wikimedia Commons

Wikipedia is a source for the weird and wonderful. This Reddit post was submitted to /r/todayilearned, a subreddit all about sharing new information with others, and links to a Wikipedia article about Robert Gould Shaw.

This man led black troops in battle. When he died, Confederates buried him in a mass grave as an intended insult. Troops tried to recover his body, but his father sent them a letter to say: “We would not have his body removed from where it lies surrounded by his brave and devoted soldiers.”

9. Deangelo Juggles Balls for Real (/r/DunderMifflin)

Deangelo juggling

The Office was best when Steve Carell was the star, but the popular American sitcom still had its moments afterwards. One of those highlights was a scene with Will Ferrell, as the character Deangelo Vickers, when he pretends to juggle.

This Reddit post has 160,000 upvotes and was suitably posted in The Office’s subreddit, named after the fictional company featured in the show. The post is of that juggling scene, but edited so that he actually is chucking balls—complete with over-the-top music.

8. Battle for Net Neutrality (/r/books)

Net Neutrality

The fight for net neutrality was one that was popular in many subreddits, but this post in /r/books received 179,000 upvotes. Net neutrality is the principle that internet service providers must treat everyone and everything equally and not impose charges or blocks.

Unfortunately, this is at risk in the United States, and so this Reddit post was encouraging people to contact their local government to try to stop any bills passing.

7. Barack Obama’s AMA (/r/IAmA)

Reddit has a liberal leaning in general, so it makes sense that an interview (or in Reddit terms, an Ask Me Anything) with the then-President of the United States would gain 216,000 upvotes.

Thousands of users threw their questions into the mix and the President did quite well answering as many of them as he could. And while many expected the President to do nothing but dodge questions and self-promote, it was surprising to see him actually engage with some harder topics.

6. A Pooping Pun for the New Year (/r/AskReddit)

Toilet sign
Image Credit: Hafidz Alifuddin/Pexels

The /r/AskReddit subreddit describes itself as “the place to ask and answer thought-provoking questions.” This post with 221,000 upvotes might disagree with that.

It’s simply a joke that involves a bodily function and the switch to the new year of 2019. Of course, you can simply change the year and the joke will be timeless. We won’t ruin the punchline, so go to the post to enjoy the joke for yourself. As you might expect, none of the comments in response are serious.

It’s perhaps a contender for one of the most unbelievably popular Reddit posts.

5. A VPN Provider Calls Out Senators (/r/pics)

VPN provider calls out the Senate
Image Credit: pdmcmahon/Reddit

The users of Reddit obviously care about the neutrality of the internet and the right to remain relatively anonymous when online. That’s why this post received 258,000 upvotes.

This post is a photo of an advert by Private Internet Access, a VPN provider, in The New York Times. The company took out the advert to highlight the 50 US senators who voted to monitor citizen’s internet activity for financial gain.

4. Showing a Game You Mastered to Someone You Care About (/r/gaming)

Mastered game comic
Image Credit: SrGrafo/Reddit

It’s a wonderful thing to be able to share your passions with family and friends. When it comes to video games, that can be tricky if you’ve been playing the game for years, have mastered everything about it, and thus have a different perspective.

This comic, upvoted 268,000 times, represents that charmingly. The experienced player is shielding the younger one from enemy fire while they learn the controls.

If you’ve ever taught someone the ropes on games like World of Warcraft or Fortnite, you should relate to this comic.

3. All News Anchors Say the Same Thing (/r/videos)

“This is extremely dangerous to our democracy.”

Those words are repeated ad nauseam in this video that shows what happens when one company owns lots of local news stations. You might think it’s ironic that all of these Fox stations are worried about biased reporting when they’re all saying the same thing.

Indeed, over 280,000 Reddit users agreed when they upvoted this post, with one commenter noting how Orwellian the situation was.

2. NYC Taxi Drivers Calendar (/r/funny)

NYC Taxi Drivers calendar
Image Credit: the_Diva/Reddit

You might not expect this post to have 307,000 upvotes based on the picture alone, but this is a classic example of Reddit running with something silly.

The person who posted this was in a cab when the driver excitedly showed them that they were on the front of the New York City Taxi Drivers calendar for 2018.

In the comments, the original poster reveals that this taxi driver also had the honor of being Mr. December.

1. The Senate (/r/movies)

 Chancellor Palpatine

The highest rated post in Reddit history is this meme which gained a whopping 350,000 upvotes. It instructs users to upvote the post so that the image of Chancellor Palpatine from Star Wars appears whenever anyone searches Google for “The Senate.”

Surprisingly, the post is on /r/movies, rather than the more suitable /r/PrequelMemes (where people post memes about the Star Wars prequels.)

As any Star Wars fan will know, Chancellor Palpatine didn’t have the best intentions, so this post is poking fun at the United States Senate. Sadly, the image doesn’t actually appear when you search Google. So the ruse failed.

The Most Downvoted Reddit Comments

This has been a round-up of the most-popular Reddit posts of all time. Of course, it’s an ever-changing list, so this is merely a snapshot in time.

However, that’s enough positivity for one day, so here are the most-downvoted Reddit comments of all time.

Image Credit: Podium/Shutterstock

Read the full article: The Top 10 Highest-Rated Reddit Posts of All Time

https://ift.tt/2WWoVtl

via MakeUseOf

How to Use PlayStation 2 Devices on Your Computer

What do PlayStation 2 controllers, Rock Band guitars, the EyeToy, and the PS2 DVD remote all have in common? They’ve all been in your closet for gathering dust. However, you can still put these devices to use by connecting them to your computer.

It’s understandable that you don’t get much use out of your PlayStation 2 anymore. It’s now a retro gaming console, with several generations of hardware succeeding it. However, while the console itself may not be of much use, its peripherals can still come in handy.

Use Your PlayStation Controllers With Your PC

Yes, you can use your PlayStation controllers on your PC. No, it’s not free.

You’re going to need to purchase a PlayStation to USB dongle. Don’t panic, though; these are affordable. Google Shopping lists many such devices for under $10, much cheaper than buying a USB joystick for your computer.

If you’re wondering how to use your PS2 controller on your PC, all it takes is plugging it in with the adapter. Once you have the device you’ve got one of the best PC joysticks money can buy.

PlayStation 2 controllers still hold up quite well, and you’ll feel right at home using them in a wide variety of games. They work perfectly for playing old-school console games on your computer, or with any game that supports the joystick natively.

DualShock 2

Of course, these controllers aren’t as well-supported as a PlayStation 4, Xbox 360, or Xbox One controller is on a modern PC. In the case of the Xbox controllers, you’ll find them natively supported in most recent PC games, while some support the PS4 controller as well. That said, if you just love the feel of the DualShock 2, it’s nice to be able to use it.

Despite PlayStation 2 controllers working well on PC with a dongle, this doesn’t work for anything that plugs into a PS2 controller port. For example, you can find multiple reports across the internet of PS2 owners trying to get their arcade sticks working with no success. You might luck out, but don’t expect your arcade stick or driving wheel to work without problems.

This may be true for third-party PS2 controllers on PC as well. Some will work while others may not. This is hard to test due to the sheer number of third-party PS2 controllers.

Retrieve Your PS2 Saves From Old Memory Cards

Even if you don’t use your old PlayStation 2, you may want access to your save data. Since these saves aren’t doing you any good sitting on an old memory card in your closet, you might as well move them from your PS2 to your PC. Whether you’re playing your old games on your PC or you simply want to back them up, it can be nice to have them around.

As with using PS2 controllers on PC, this requires a piece of hardware. Unfortunately, this hardware isn’t especially cheap. There are a number of different devices you can use but one popular option is the PlayStation 2 Action Replay. At the time of writing this article, this sells for $279, so you would need to be pretty serious about your saved PS2 games to purchase one.

Datel Max Playstation 2 Action Replay

That said, this isn’t the only thing this device can do. You can also download completed save files for games, or even manipulated saves that give you a maxed-out character or all the weapons in the game, for example. If you’re looking for a way to breathe some life into old PS2 games, this is one way to do it.

Use the PlayStation 2 EyeToy on Your PC

EyeToy for PlayStation 2

The EyeToy was an early, clunky version of Microsoft’s Kinect, and like that device, the EyeToy never really took off. Few games made use of the peripheral, and those that did were clunky and difficult to use. The EyeToy developed a bad reputation straight out of the gate and was quickly forgotten.

Fortunately, you can use the EyeToy as a webcam on your Windows, macOS, or Linux PC. It uses a standard USB port, so you won’t need to buy any new hardware in order to get it to work.

If you’re using a Linux distribution like Ubuntu, the EyeToy should be supported out of the box. Simply plug it into a free USB port and it should be ready to use. This may differ from distribution to distribution, but with a little searching, you should be able to get it working.

For macOS users, you don’t get EyeToy support built into macOS, but getting the EyeToy working is simple. Support comes courtesy of the macam project, which lists the EyeToy as fully supported on its camera support page.

For Windows, things are slightly more up in the air. You can find Windows drivers for the EyeToy from the EyeToy on Computer project. The problem is that this project appears to be gone. While you can still find the drivers to download, there are no instructions on using them.

Even if you do get it working, the EyeToy is pretty dated by modern camera standards. If you’re just trying to get it working to say you did or because you don’t want to shell out money for a webcam, feel free to try. For a much nicer experience, try taking a look at our guide to the best budget webcams.

Use the PS2 DVD Remote With Your Computer

PS2 DVD remote

Part of the reason the PlayStation 2 sold so well is that it doubled as a DVD player. Sony capitalized on this functionality, selling a PS2 DVD remote that let you just the console to watch movies without needing to pick up the controller. If you still have the controller and the dongle that plugged into the PS2, you can easily use them with your PC.

You’ll need the same PlayStation 2 to USB dongle that you need to plug in a controller. Simply plug the dongle into the adapter, plug that into your PC, and you’ll be able to use the remote with your PC. If your PS2 DVD remote is otherwise going to waste, this is a nice way to make use of it.

We haven’t tested this, but the DVD remote might even function as a remote for using Kodi from your couch.

Use Your Old Guitar Hero/Rock Band Guitars

Even if you don’t have some plastic instruments lurking somewhere in your closet, the chances are you know someone who does. While the glory days of the Guitar Hero and Rock Band franchises is long gone, that doesn’t mean those plastic guitars are useless. For proof, look no further than Frets on Fire.

An open source clone of the Guitar Hero and Rock Band games, Frets on Fire is available for Windows, macOS, and Linux. It supports a wide range of plastic instruments, including your old PS2 plastic guitars. Even better, it can rip songs from Guitar Hero and Guitar Hero 2. All you need to do is insert the game DVDs and let Frets on Fire do the rest.

Frets on Fire screenshot

Using your old PlayStation 2 guitars works just the same as how you use your PS2 controller on PC. Just plug them into the PlayStation 2 to USB adapter and plug that into the computer. Once you’ve done this, you’re ready to rock.

And if you’re the hacking type, know that there are many mods out there capable of making Frets on Fire even better. Check them out!

Don’t Forget About Your Old PlayStation 2 Games

Yes, the hardware might be dated but there are plenty of great games for the PlayStation 2.

If you have a PlayStation 2 or PlayStation 3, you could pay for them again to play them on your new console, but that’s not your only option. You could buy an expensive upscaler like a Framemeister to plug your PS2 into your TV, or you could play those games on your PC.

While the link with video game piracy makes people think that playing games via emulators is illegal, that isn’t the case. As long as you actually own the games, you’re free to use emulators and ROMs.

If you feel like firing up your old games again with a shiny higher resolution, we have a guide explaining how to play PS2 games on your computer. It’s easier than you may think.

Image Credit: kolidzeitattoo/Depositphotos

Read the full article: How to Use PlayStation 2 Devices on Your Computer

https://ift.tt/2QLCJBt

via MakeUseOf

The 10 Best Video Editors for Chromebooks

chromebook-video-editing

Chromebooks are more than glorified web browsers; they can perform many of the same tasks as Windows and macOS. Including video editing.

But what’s the best video editor for Chromebooks? In this article, we list the best video editing software for your Chromebook…

Unlock the "Chrome OS Keyboard Shortcuts" cheat sheet now!

This will sign you up to our newsletter

Enter your Email

1. WeVideo

The popular web-based video editor WeVideo has an official app in the Chrome Web Store. It is arguably our favorite video editor for Chromebook.

The app earns plaudits for its ease-of-use. Video editing can be complicated for beginners, but WeVideo’s accessible interface means even total novices can create respectable footage. Another feature that makes the app shine is the presence of a vast library of sound effects, transitions, and video effects. They are all free to use.

You can use WeVideo to edit photos on your device’s hard drive or in real-time from your device’s camera. Custom text, transitions, voiceover recording, and slow-motion are all supported.

The only downside of the free version of the app is the presence of a watermark on your video. If you plan on using the video in a professional setting, you’ll need to upgrade to one of the four paid plans.

Because WeVideo is web-based, you will need an internet connection to use the service.

Download: WeVideo (Free, premium version available)

2. PowerDirector

All new Chromebooks—as well as some older ones—can install the Google Play Store and run Android apps. As such, users have far more video editing options available to them than they did when Google first launched Chrome OS.

If your Chromebook supports Android apps, you need to check out PowerDirector. It’s one of the best video editors for Android. Admittedly, the Android version of PowerDirector isn’t as full-featured as the desktop edition of the app, but it still has more than enough functionality for the vast majority of users.

The app deploys a timeline editor that lets you easily add effects, create slow-motion sequences, and insert sound and voiceovers. PowerDirector also supports other common video editing tools like fading, transparencies, and blue/green screen.

PowerDirector is free to use, but you’ll need to pay to unlock all the features.

Download: PowerDirector (Free, in-app purchases available)

3. Google Photos

google photos web video editor

Not everyone needs a feature-laden editing suite. If you just want to do some simple video editing on a Chromebook, the Google Photos movie editor may meet your needs. The app offers video stabilization and cutting. You can also flip the saved version of the video between landscape and portrait.

Since late 2019, Google Photos’ movie editing features are available on the web version of the app, meaning you no longer need to run the Android version if you want to edit your footage. Unfortunately, the rollout has been slow; at the time of writing, the feature is still not available worldwide.

Download: Google Photos (Free)

4. OpenShot

openshot video editor

If you’re a Linux user, you will have heard of OpenShot. It’s one of the best video editors for Linux. It’s also one of the best video editors for Chromebook.

The editor itself boasts an impressively long feature list. You can resize, scale, trim, snap, rotate, and cut your videos, use image overlays and watermarks, create transition lumas and masks, and add scrolling motion picture credits.

OpenShot also supports many video and audio codecs, including WebM (VP9), AVCHD (libx264), HEVC (libx265), LAME, and AAC.

The app is free to use.

Download: OpenShot (Free)

5. Magisto

Magisto is well-established as one of the best video editing apps on Android; it’s been featured as a Google Play “Editor’s Choice” app many times. Therefore, if you own a Chromebook that supports Android apps, you should give it a try.

The app is squarely aimed at social media users who want to post their exploits to the various networks and who aren’t skilled video editors in the traditional sense. Using a smart AI, Magisto can create professional-looking videos from the videos, pictures, and music on your device. You can also add your own text and effects.

Because it’s predominantly designed for social networks, Magisto lets you easily share your creations from directly within the app. Facebook, Instagram, YouTube, Twitter, WhatsApp, and Vimeo are all supported.

Download: Magisto (Free, in-app purchases available)

6. KineMaster

Another app that brings the best of Android to Chrome OS is KineMaster. It’s a professional video editing suite.

The app support multi-layer videos and offers frame-by-frame trimming, hue, brightness and saturation controls, audio filters, royalty-free music, color LUT filters, and 3D transitions.

The free version of Kinemaster is available to everyone, but like WeVideo, it will place a watermark in the corner of your creations. You can upgrade to the pro version from within the app. It removes the watermark and adds access to the KineMaster Asset Store. It’s a vast repository of visual effects, overlays, music, and more.

Download: Kinemaster (Free, in-app purchases available)

7. VivaVideo

VivaVideo used to be available in the Chrome Web Store, but like many of the best video editing apps for Chromebook, it decided to limit itself to the Google Play Store after Chromebooks started supporting Android apps.

The app manages to walk a fine line between fun and professional. For example, you can add stickers, GIFs, funny sound effects, and other social media-friendly gimmicks, but can simultaneously trim, edit, and enhance your video using VivaVideo’s wide range of tools. It also supports edits such as transitions, adding text, merging and splitting videos, changing the speed, and reverse playback.

Download: VivaVideo (Free, in-app purchases available)

8. YouTube Studio

youtube studio trimming

Users often overlook YouTube’s video editing tool. It’s part of YouTube Studio and lets you edit videos on your Chromebook without needing to worry about installing extensions or running Android apps.

The app is fairly basic. You can use it to trim your videos, cut your videos, and blur out faces, names, and other identifiable information. In the past, YouTube Studio offered more advanced tools, including filters, text, music, lighting, and transitions, but Google has discontinued them.

To use YouTube Studio, you will need a Google account.

9. Hippo Video

Hippo Video is one of the few video editors for Chromebook that still has a listing in the Chrome Web Store.

It’s a two-in-one tool; you can use it for video marketing and for video editing.

There is a free version and a paid version. The free version lets you trim, crop, add text, and tweak other basic parameters. If you need more power from your video editing app, you need to upgrade to the paid version.

Download: Hippo Video (Free, premium version available)

10. Kapwing

kapwing video editor

Kapwing is a surprisingly full-featured Chromebook video editor. It is accessible via any web browser, including Google Chrome.

You can use the tool to add text, combine videos, add subtitles, add audio, resize your video, remove backgrounds, and trim your video. The app also lets you either upload a video to edit directly from your hard drive or paste the URL of an online video (for example, from YouTube) and edit it directly in the app.

You can even customize your video’s output ratio. 1:1, 9:16, 16:9, 4:5, and 5:4 are available. As such, the app is perfect for anyone who needs to create social media content.

What’s the Best Video Editor for Chromebook?

These video editors for Chromebook target a diverse spectrum of users. If you’re a novice video editor, perhaps it’s time you picked up some video editing skills. While apps like Magisto are fun, your creations will be infinitely more impressive if you can use one of the more professional apps recommended above.

If you’d like to learn more about editing videos, whether on your Chromebook or not, be sure to read our article explaining how to edit videos like a pro.

Read the full article: The 10 Best Video Editors for Chromebooks

https://ift.tt/2pdo4T5

via MakeUseOf

Running Linux From a USB Drive: Are You Doing It Right?

linux-usb

You’ve probably heard about previewing and installing Linux from USB drives, but did you know that you can also save your data between uses or even run a full permanent Linux installation on a USB stick? This can have massive benefits for your productivity, especially if you’re a remote worker, or cannot afford your own PC.

In short, we’re talking about turning Linux into the ultimate ultra-portable platform: running Linux from a USB flash device. Here are your three options for carrying Linux in your pocket. Find out which method is best for you.

Choose the Right USB Stick

Before you get started, it’s worth considering buying a new USB stick. Older USB sticks have already had their lifespan reduced considerably, and as flash has a finite number of read/write cycles, a fresh stick of flash makes sense. Something affordable with a handy amount of storage space would be the best flash drive for a bootable version of Linux.

SanDisk Ultra 32GB USB 3.0 Flash Drive SanDisk Ultra 32GB USB 3.0 Flash Drive Buy Now On Amazon $8.99

Also, you should consider the hardware you’ll be connecting the USB flash drive to. Does it support USB 3.0? If so, you’ll enjoy considerable speed (and other) advantages over old-fashioned USB 2.0.

To check if the destination computer has USB 3.0, look at its USB ports. If they have blue plastic in them rather than black, that’s a good visual clue. Not all USB 3.0 ports use this shorthand, however, so look up the specs of the PC. On Windows, you can check the Device Manager.

Write a Live ISO to USB

balenaEtcher tool for flashing ISO to a flash drive

It has become really easy to take an ISO image of your favorite Linux distribution and write it to any appropriately sized USB drive. From there, you can boot up a Linux system on any computer that supports booting from USB media. There are plenty of tools that can burn an ISO for you, and this method is compatible with virtually every Linux distribution out there.

One option is balenaEtcher, a free and open source tool available for Linux, macOS, and Windows. While burning an ISO isn’t as complicated as it sounds, Etcher is about as simple as it gets.

However, the downside to this approach is that you’ll lose all of your data as soon as you shut down or restart the computer you’re working on. As a Live environment, all data is kept in RAM and none of it is written to the USB drive; therefore, none of it is saved when the system turns off.

If you’d like to keep a customized Linux environment in your pocket, this isn’t what you want. However, if you’re wanting to use the drive as a way to perform secure communications (think banking, or any activities that require the use of TOR) and ensure that no sensitive information is stored anywhere, this is definitely the way to go.

Download: balenaEtcher

Enable Persistent Data

mkusb tool to create boot drives from ISO files

Depending on your distro, you may have the option to enable persistent data on your USB drive. This is great: it lets you write a relatively compact ISO file to boot from, and you can actually keep your extra installed applications and saved documents.

To make this work, you will need a compatible program to perform the installation. One option is Rufus, a Windows app that supports creating live Linux USB sticks with persistent storage. If you’re already on Linux, you might try mkusb instead. The tool will run on Ubuntu and Debian-based distros, plus some others.

Having persistent data is ideal if you use a large variety of systems with the USB drive, as the live environment will detect what hardware is available every time it boots. So the advantage in this scenario is that you can save your stuff, use up less drive space, and have maximum support for whatever hardware you plug into.

The downsides: you automatically boot into the live user account, which isn’t password protected. Also, you have to be careful with software updates, as newer kernels could break the bootloader.

Download: Rufus for Windows

Download: mkusb for Linux

Do A Full Install to USB

Ubuntu installer

Lastly, you can choose to do a full install onto the USB drive. You’ll have to use a disc or another USB drive for the installation media, but this method literally lets you have a full Linux system in your pocket—one that is as flexible as any other traditional installation.

The advantages are pretty obvious: you get your own system setup just the way you like it, right in your pocket. But there are still a few downsides.

First, you’ll need a larger USB drive for this type of installation. Granted, that’s not as much of an issue as it used to be. If your only option is an old drive lying around, 8GB is feasible. But with 128GB and 256GB drives having drastically dropped in price, you don’t need to spend a lot of money to run Linux on a flash drive comparable in size to an SSD.

Second, as the system thinks it’s installed normally, it will tend to make changes that are ideal for the hardware you’re currently working with, but not necessarily hardware you’ll encounter in the future.

This primarily concerns the use of proprietary drivers. For maximum compatibility, don’t use them. The open drivers are plenty good for most uses.

Linux Loves USB

Surprised? You shouldn’t be! Linux has always been very flexible, so that it can meet all sorts of needs. And the fact that there are no licenses involved means that running Linux on a USB stick is rather simple to do, unlike Windows and macOS.

Now that you know what your options are, it should be very easy to decide which solution is best for your needs. Or, now that you’re aware of your options, maybe it’s not so easy.

To help you with your choice of distro, we have rounded up the best Linux distros to install on a USB stick. By the way, you can also run Chrome OS from a USB drive!

Read the full article: Running Linux From a USB Drive: Are You Doing It Right?

https://ift.tt/2UVyxSu

via MakeUseOf

How Do Fitness Apps Count Calories?

fitness-apps-calorie-counter

Whether you want to get more exercise, lose some weight, or build some muscle, mobile fitness apps are ideal. Some of the most popular apps offer a whole range of functions, such as tracking your workouts and even what you eat.

If you want to lose fat, you need to reduce calorie intake; to build muscle and you’ve been training for a while, increase calorie intake.

But how do fitness apps calculate the calories you consume? And how does that help with your fitness goals?

How Apps Calculate the Calories You Take In

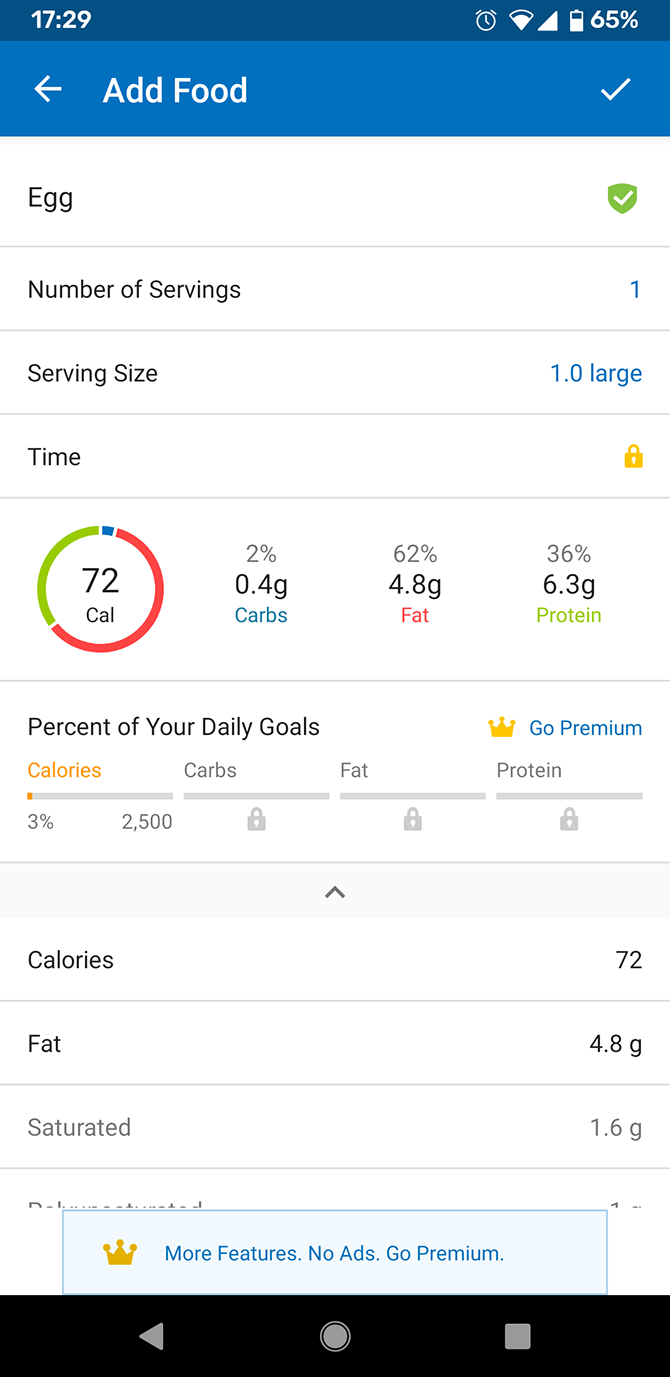
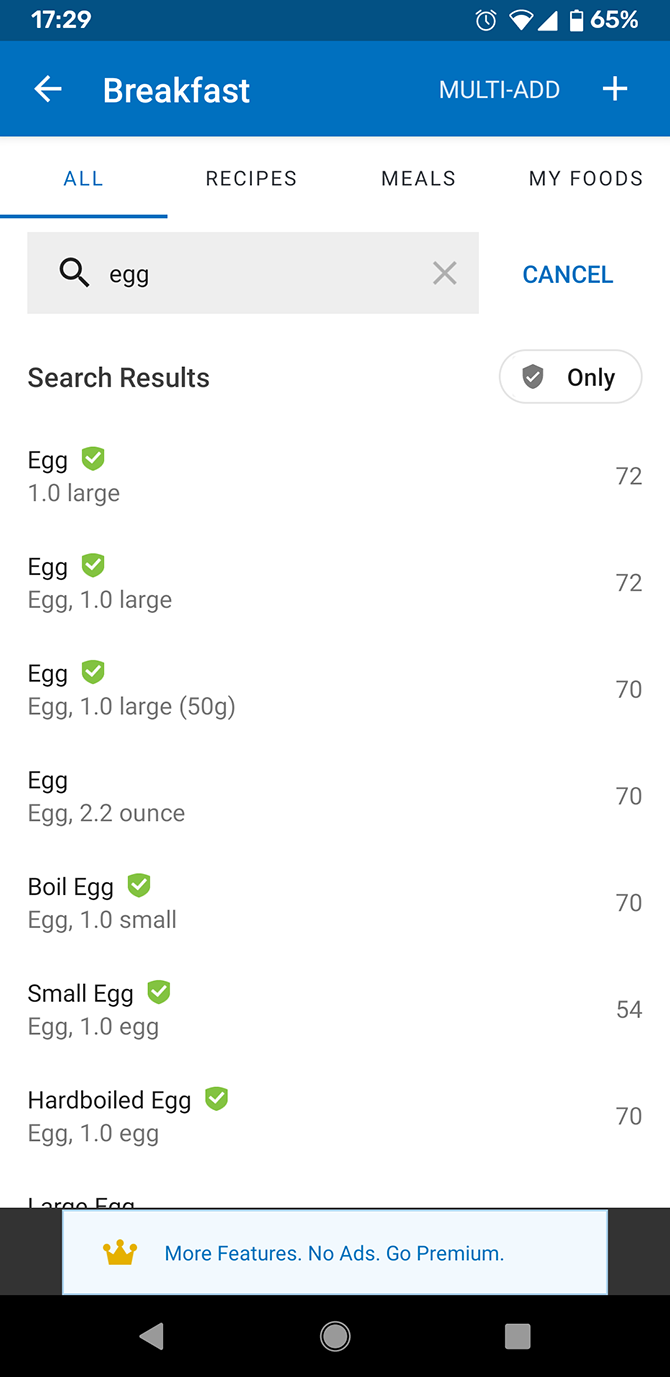
You might wonder how fitness apps calculate the calories you take in. All packaged foods come with a nutrition label that contains relevant information; the number of total calories; the amount of fat, protein, and carbohydrate; fiber content; and so on.

Much of this data is stored online, so when you run a search or scan a barcode, the app hits a database to find that information. It then pulls it into your food log and adds the number of calories to your intake.

While many fresh foods don’t come with nutrition labels, information on caloric and nutrient content has been measured and is also available online, so that can be pulled into the app, too.

Have you ever wondered how companies figure out how many calories their food products have?

How Many Calories Are in Different Foods?

Because calories are a measurement of energy (the amount of energy available to your body after digesting them), the old-fashioned way was to burn the food in a device called a bomb calorimeter and see how much energy was released.

Starting in 1990, however, a different system was put into place. The Atwater system, as it’s known, is used to estimate the number of calories in a particular sample of food by multiplying the amount of macronutrients (carbohydrates, proteins, and fats) by known constants.

Every gram of carbohydrate in food, for example, is worth four calories. Protein is also worth four per gram. Fats have nine calories per gram, and alcohol has seven. Because fiber isn’t very digestible, it’s counted as zero calories per gram.

If you know how much of each macronutrient is present in a particular food, you can estimate pretty well how many calories that food had. Although the Atwater system is only capable of estimating the number of calories in a particular food, it’s generally considered to be accurate enough.

Figuring Out How Much of Each Macronutrient Is in a Food

There are chemical processes that allow scientists to measure each of them. They’re a bit complicated, but you can read more about them in this fantastic explanation on Reddit.

In short, food is weighed, chemicals are added that eliminate a particular macronutrient, and the food is weighed again. The difference in weight indicates how much of that nutrient was present.

How Apps Calculate the Calories You Burn

How Fitness Apps Count Calories - met table

The calculating of the calories you take in is fairly simple, as long as you accurately weigh and record your food. But most apps also offer measurements of how many calories you burn when you do exercise. You can see here how fitness apps calculate calories burned. You should take these calculations with a grain of salt, however. They are often not very accurate.

To understand how calories burned are calculated, you need to know about metabolic equivalents, or METs. These figures measure the number of calories burned compared to your resting metabolic rate (RMR), or the number of calories you burn while you’re just sitting down, doing nothing.

If you’re doing an activity that requires three METs, you’re burning three times as many calories per minute as you would by just sitting. There are published tables that assign MET values to different activities—for example, walking at 2.5mph requires about 2.9METs. Riding a bike at under 10mph is close to 4METs. And so on. The scale goes up to 23, which you’ll hit if you’re running a 4:17 mile.

Various MET tables include a wide range of things, from housework to taking classes to real estate services to bowling. If you want to find the metabolic equivalent for a specific activity, you just need to run a search online.

Finding Your Resting Metabolic Rate

How Fitness Apps Count Calories - bmr formula

So, we now know that every activity has a MET value. This serves as a multiplier for your resting metabolic rate. This is the number of calories you burn at rest. When you enter an activity into your fitness app, it multiplies the MET value by your RMR. Pretty simple. But how does it know your RMR?

As you might have guessed, it uses another estimation equation. Finding your exact resting metabolic rate is possible, but it requires a trained professional and some time. By estimating using a well-researched equation, your fitness app will get decently close.

The equation takes into account your height, weight, and age. It then gives you a rough estimate of the number of calories you burn just to stay alive.

Now, whenever you tell the app or device that you completed a certain activity, it multiplies that number by the MET value, and you have an estimation of your calorie burn. Because these calculations involve a number of estimates, there’s necessarily going to be some level of error.

Your resting metabolic rate could be higher or lower than the estimate. You could be more or less efficient in completing an activity. And so on.

These equations are generally considered to be as accurate as possible without providing further information, like heart rate, power output, and other more complicated measurements, but there’s a definite possibility that the estimates could be off.

Averaging out over time, however, they’ll get you the numbers you need.

How to Calculate Calories You Need Each Day

healthy-food-apps
The final calculation your fitness device will make is the number of calories you need to consume each day to meet your fitness goal, whether that’s maintaining, losing, or gaining weight.

All of these calculations start with an estimation of the number of calories you burn each day, which—like exercise—is calculated as a function of your resting metabolic rate. There are a number of different ways to estimate this, and it’s likely that different apps use different methods.

If your fitness app asked you what your general rate of activity is (the options are usually something like “sedentary,” “lightly active,” “moderately active,” and “highly active”), your daily calorie expenditure is probably what it’s trying to figure out. This is where many people make a mistake.

If you work an office job, sitting at a chair all day, and you go to the gym once or twice a week, you are not moderately or highly active. You are lightly active. If you go to the gym or take other exercise three or four times a week, you may be moderately active.

You should only count yourself as highly active if you have a physical job, such as working in construction or landscaping, and you also work out.

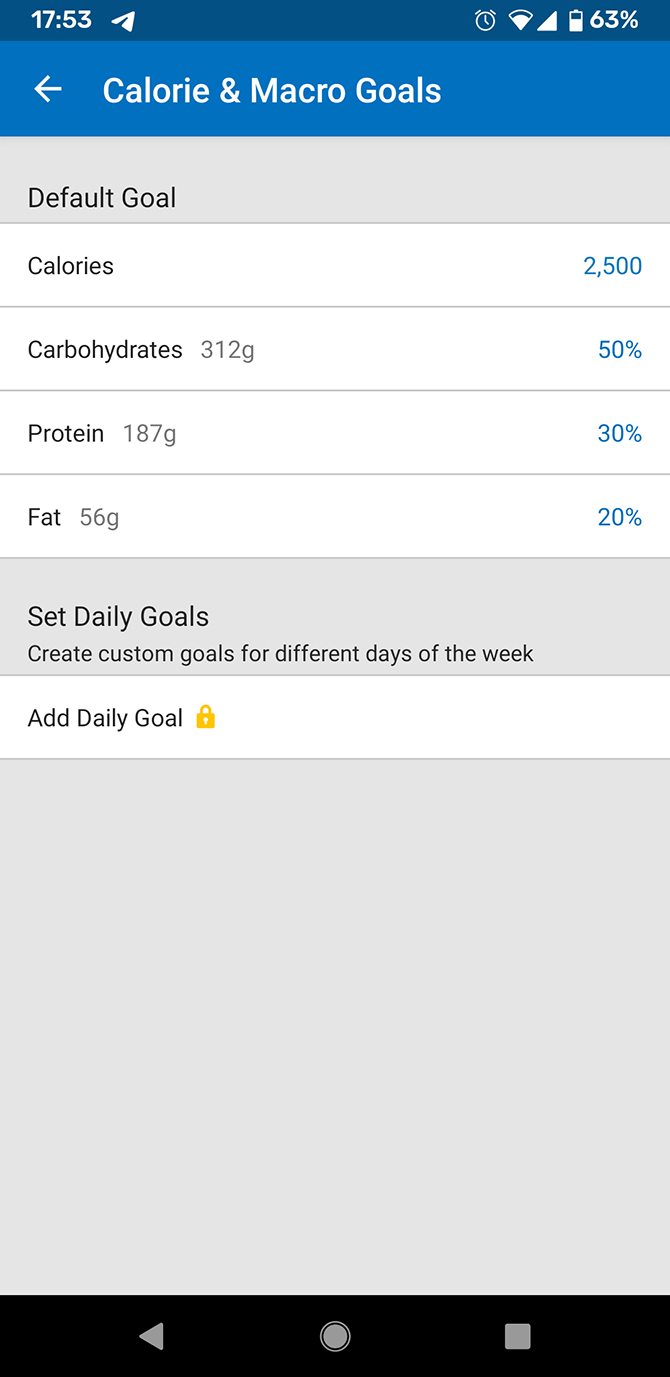
Calculating Your Maintenance Calories

The amount of calories you need to neither gain nor lose weight is called your maintenance calories. You need to know this number to plan how you will gain or lose weight. However, everyone’s maintenance calories are different.

You could be the same height, weight, and activity level as someone else, but have different maintenance levels. This is due to differences in your metabolism. So don’t just trust what an app tells you your maintenance is.

The best way to find your maintenance is to experiment and record your findings. Pick a calorie target and eat that for several weeks. Weigh yourself during this time. If you maintain your weight, you have the correct maintenance calories. But if you lose weight, you need more calories. If you gain weight, you need fewer.

Also, remember that maintenance can be a range, not a single figure. If you raise or lower your calories, you may find that your body unconsciously moves more or less—that you’ll fidget more, or get up less often. This is called non-exercise activity thermogenesis (NEAT) and it can affect your maintenance calories as well.

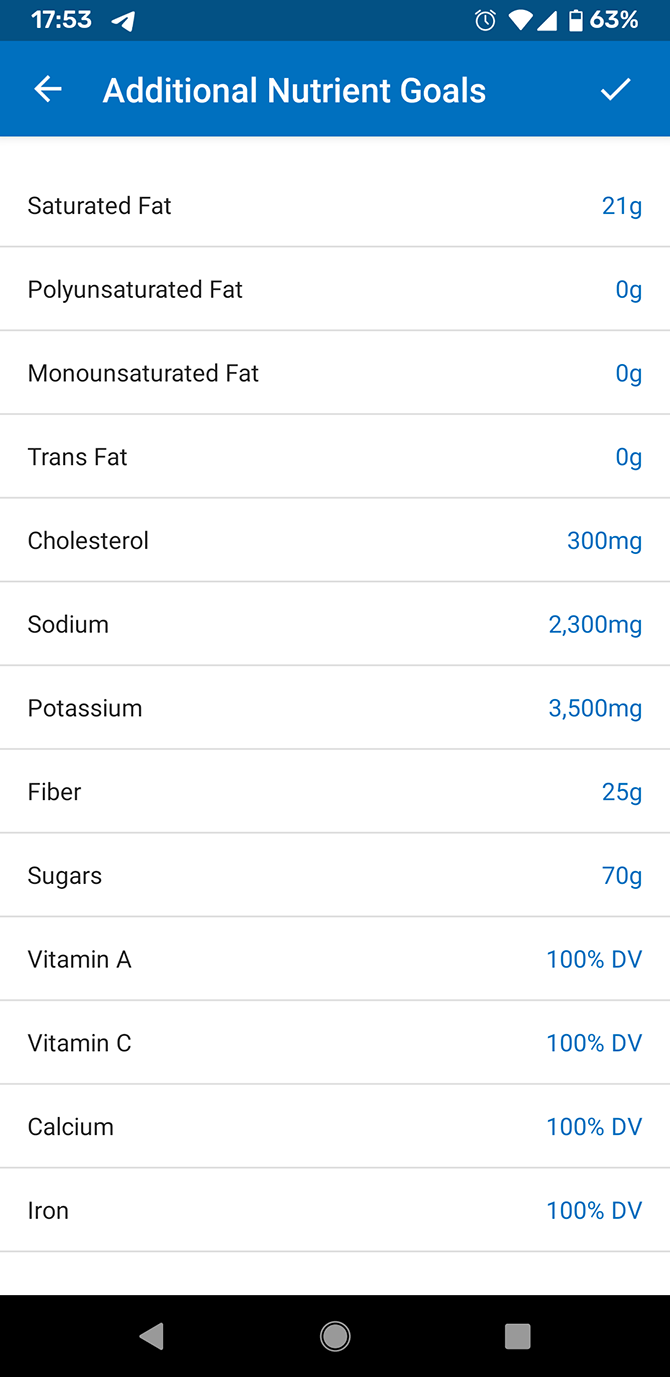
How to Calculate Your Macronutrients

Another function that many apps offer is the ability to calculate what macronutrients you need each day. However, it is not a good idea to rely on apps for this. The most popular food tracking app, MyFitnessPal, is famously terrible at calculating macronutrients.

There are many macronutrient (or macro) calculators online. But as a rough guideline, most people who are aiming to get fit should eat around 1 gram of protein per pound of bodyweight per day. That’s a lot! But protein is extremely important for building muscle. It also fills you up more than carbohydrates or fats, so it’s equally important for weight loss.

You may want to try eating around 25-35 percent of your calories from protein, a further 25-35 percent of your calories from fat, and the remainder from carbohydrates. Some people feel better and fuller when they have more carbs or more fat, so experiment and see what works for you.

Once you have worked out your macronutrient goals, you can enter these into your app manually.

Using Fitness Apps to Meet Your Goals

By using a fitness app, you can track how many calories you eat each day. The app will calculate this based on the nutritional information provided on the labels of foodstuffs. And by measuring how much of each macronutrient is in a food, you can work out its total calories.

Remember that for tracking to work, you need to be honest. You need to track absolutely everything you eat and drink. This includes things like oil used in cooking, and sauces or condiments you have on food. And you can’t forget drinks, which often have higher calories than you think. You also need to weigh your portions accurately.

If you follow these directions and work out your maintenance calories, then you can control your weight. Eat above maintenance to put on weight and build muscle. Eat below maintenance to lose weight and lose fat.

For more apps which can help you get fit, see our list of best workout apps to get in shape.

Read the full article: How Do Fitness Apps Count Calories?

https://ift.tt/341pWSH

via MakeUseOf

Spotify Kids Is a Music Streaming Service for Children

Spotify has launched Spotify Kids, a standalone app designed for “the next generation of listeners”. This is a version of Spotify for kids. And it features a child-friendly UI and a collection of songs (and more) curated for even the youngest music lovers.

In October 2019, Spotify launched Spotify Kids in beta in the Republic of Ireland. The streaming service then rolled the app out to other countries, gaining insights as it went. In March 2020, Spotify launched Spotify Kids in the US and Canada.

What Is Spotify Kids?

Spotify Kids is an app designed for kids aged 3+. There are thousands of songs available, all hand-picked by a team of editors. Younger children get Disney soundtracks and the like. While older kids can listen to pop songs from the likes of Ariana Grande and Taylor Swift.

A huge variety of genres are covered, and Spotify is adding new songs all the time. Spotify Kids also boasts audiobooks for the more literary children. And there are bedtime stories, lullabies, and calming sounds designed to make night time more enjoyable.

The Spotify Kids app looks and feels different than the regular Spotify app. With a bright and colorful UI, and a cast of characters to choose from. The look varies by age group too, so the Spotify Kids app can evolve as kids grow up listening to Spotify.

Spotify Kids is exclusively available to Premium Family subscribers. Mainly because it’s completely free of ads. Spotify Kids is available in the US, Canada, France, Ireland, Sweden, Denmark, the UK, Australia, New Zealand, Mexico, Argentina, and Brazil.

Download: Spotify Kids on Android | iOS (Only available to Premium Family subscribers)

Spotify Wants Kids to Start Streaming

With the streaming wars starting to heat up, appealing to the next generation of subscribers could be the key to the longterm future of Spotify et al. If children associate a certain company with music, they’re more likely to stick with them as adults.

While Spotify Kids is likely to keep the kids entertained, what about the adults in the family? If you consider listening to music as an activity to share with other people, here’s how to listen to music with friends far away. It’s easier than you may think!

Read the full article: Spotify Kids Is a Music Streaming Service for Children

https://ift.tt/2UUXo9j

via MakeUseOf

The 10 Best Reverse Image Search Apps for iPhone and Android

reverse-image-search

Search engines make it easy to find information or buy products, but what if you want to identify a picture you have? In these cases, reverse image search comes to the rescue.

This powerful feature allows you to upload an image to search instead of entering text. Let’s take a look at the best reverse image search tools available on your iPhone or Android device.

1. CamFind

CamFind is a basic yet functional reverse image search tool. The next time you want to search for an image, just open up CamFind and take a picture. Once the picture uploads, the app matches it against others on the internet and identifies the object.

After this, have a look at the available results. You can look for related images, shop for the item, watch related videos, search on the web, or go through related posts. Even better, you can set a visual reminder and share your finds with others.

Download: CamFind for iOS | Android (Free)

2. Google Lens

Google Lens initially arrived as a Pixel exclusive; the company later integrated the feature into Google Photos. Now both iOS and Android users can use Google Lens to reverse search images.

On Android, Google Lens is available as a standalone app. iOS users can access Lens within the Google Photos app. Open an image that you’ve taken and tap the Lens icon (second from the right, next to the trash icon).

Google’s visual search engine will analyze the image; the results include a link to the Google image search page.

Download: Google Photos for iOS (Free)
Download: Google Lens for Android (Free)

3. Veracity

Veracity is an intuitive visual search engine app. It lets you choose images from your Camera Roll or Photo Library, plus it can link to your Dropbox account. Veracity offers a basic image editor, but you have to pay to unlock it.

Another downside is that Veracity doesn’t come with an option to share results with others.

Download: Veracity for iOS (Free, premium version available)

4. Reverse Image Search App

Reverse Image Search App provides another minimalist reverse search engine experience. Take images from your Camera Roll or Photo Library to reverse image search via Google Image Search, Yandex Image Search, and Bing Image Search.

You can also crop, rotate images, and save them to your device for free. However, removing ads from Reverse Image Search App requires a small fee.

While this app isn’t available on Android, check out the similar Reverse Image Search for a close experience.

Download: Reverse Image Search App for iOS (Free, premium version available)
Download: Reverse Image Search for Android (Free)

5. Direct Image Search on Google

You can use Google’s direct image search in Safari or Chrome, but it’s a bit complicated. You have to request the desktop site to proceed with the search.

Follow these steps to use Google’s reverse image search function on mobile devices:

  1. Open the Google Images site in your browser.
  2. For Safari on iOS, tap on the aA button at the top-left. Choose Request Desktop Website from the menu.
    1. If you’re using Chrome on iOS, tap the Share icon at the top-right of the screen and scroll down to Request Desktop Site in the list.
  3. For Chrome on Android, tap the three-dot Menu button at the top-right and check the Desktop site box.
  4. Tap the camera icon that appears on the page.
  5. Now you can choose to either upload an image or paste a URL, just like you would on your desktop.

Check out these nifty Google Image Search tricks to master the tool.

Visit: Google Images

6. Photo Sherlock

Photo Sherlock comes with a simplified user interface. The app allows you to reverse search an image directly using your camera. If you prefer, you can also use your Camera Roll to upload pictures.

Once uploaded, you can choose to crop the image to focus on the main element. The app then fetches an image search result from Google.

Download: Photo Sherlock for iOS | Android (Free)

7. TinEye Reverse Image Search

If you don’t want to download a dedicated app, many online tools offer a reverse image search in a mobile-friendly format. TinEye is one such service that lets you search an image by URL or by sharing a file. Once uploaded, the tool crawls the web and adds images to its index.

TinEye lets you sort the results by Best Match, Most Changed, Biggest Image, Newest, and Oldest. Further, you can filter the result across top domains and collections.

Visit: TinEye

8. Reverse Photos Image Search

Reverse Photos Search is another reverse image search web tool. Like others, this one is basic and allows you to upload images from your camera, Photo Library, or other folders.

Once uploaded, the tool will hand your image off to Google Images, where it tries to find a match. This is a simple tool if you don’t want to bother with requesting the desktop Google Images site on your mobile device, but the intrusive ads are unsightly.

Visit: Reverse Photos Search

9. Baidu Image Search

As you may know, Google services are not available in China. Thus, Chinese search engine Baidu takes up the mantle in that region.

If you are in China or want to search for an image that is relevant to China, Baidu’s image search is one of the best options. As you’d expect, the website lets you take a photo or upload it from your library. Baidu also allows you to crop the image before searching.

Visit: Baidu Images

10. Yandex

Yandex is a popular search engine in Russia. Like Google, it offers an image search feature. Upload an image by tapping the camera icon on the search bar. You can also use your camera and search for an image without saving the photo to your library.

Your search results will attempt to identify text in your image and show you similar images.

Visit: Yandex Images

The Importance of Reverse Image Search

Reverse image searching is hugely helpful when you need to look up something you’ve seen but don’t know much about.

Apart from shopping and product discovery, reverse image search has many other uses. You can use it to see if photos are authentic and snuff out fake news. For more like this, we’ve also looked at some apps that help you find clothes by a picture.

Read the full article: The 10 Best Reverse Image Search Apps for iPhone and Android

https://ift.tt/2rtpyK4

via MakeUseOf