Saturday, September 29, 2018

The 7 Best Risk-Free Cryptocurrency Trading Simulators

Bitcoin Trading Simulators

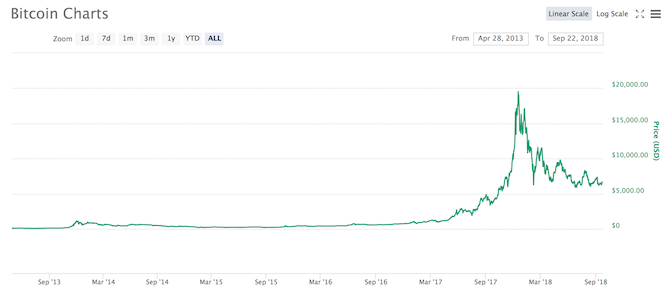
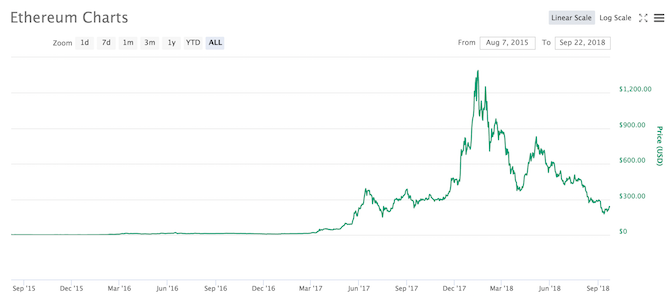
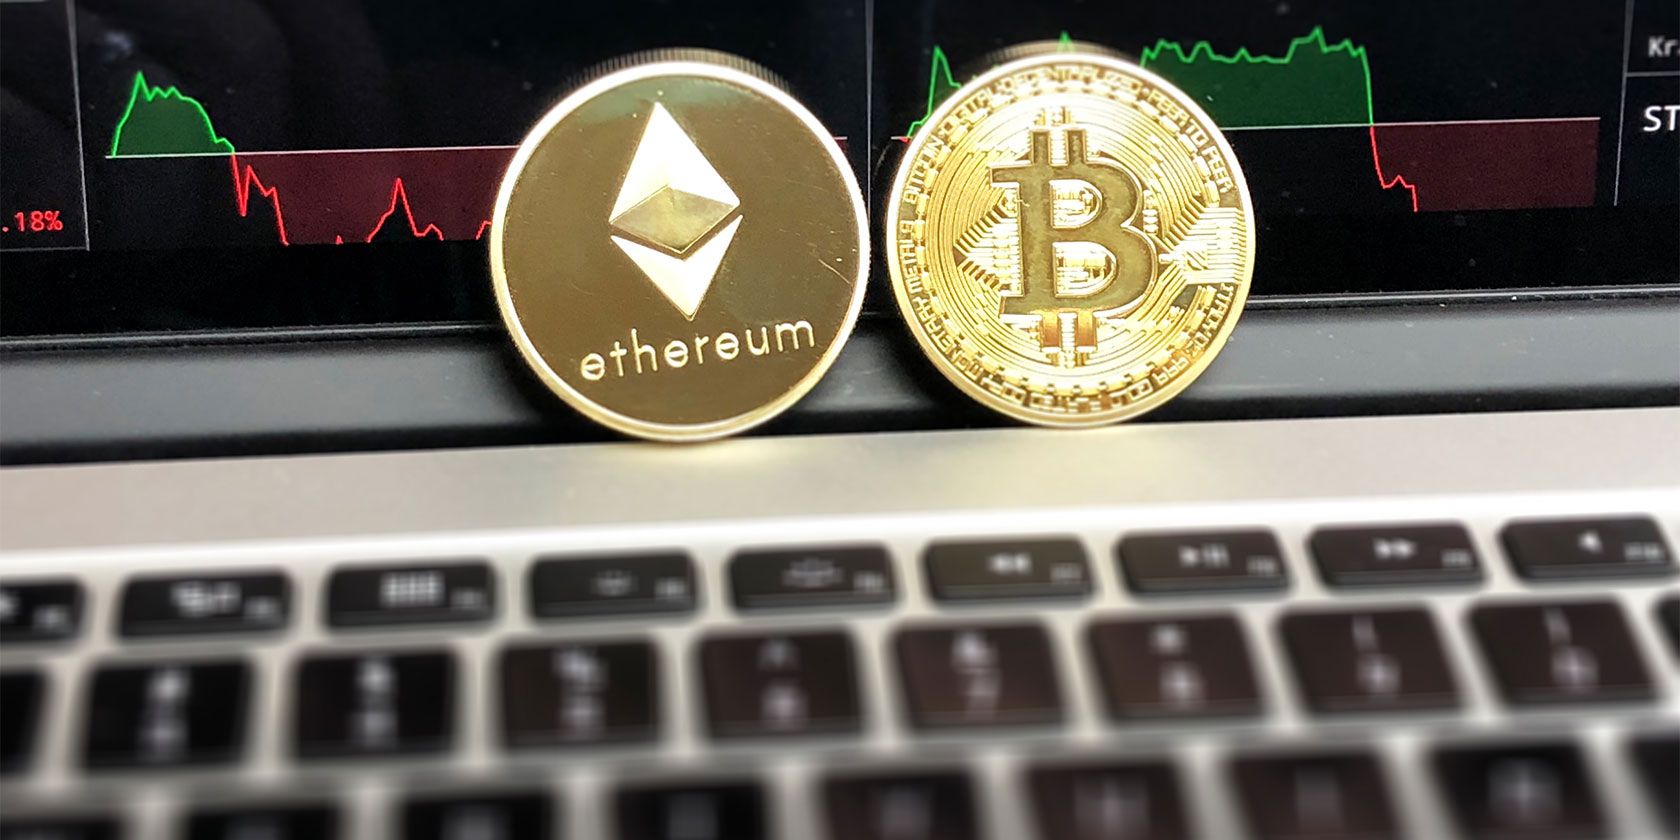
Did you ride the peaks of the bitcoin wave, or did you wait for the trough to hit the shore? When bitcoin was touching $20,000 per coin, everyone was an expert or potential investor. Prices are now more unpredictable, making it harder for would-be investors to make a profit.

Given cryptocurrencies straddle the median between currency and commodity, there is money to be made—but only if you know what you are doing. Check out these risk-free cryptocurrency market simulators before splashing your cash on the real deal.

1. Bitcoin Mining Profit Calculator

bitcoin mining profit calculator practice trading crypto

The Bitcoin Mining Profit Calculator (BMPC) is a great starting point if you are completely new to bitcoin and cryptocurrency. It’s a lot more than a simple trading simulator since it includes a full introduction to bitcoin too.

The website works like an interactive fiction-come-idle clicker game. BMPC updates with new tabs and explanations as you click different prompts on the screen, thus making different choices. Don’t worry, you won’t miss out on any pertinent information, but it will make you aware of the kind of news that affects bitcoin’s prices as well as the inner workings of the bitcoin community.

BMPC is nothing great to look at and plays like a text adventure, but there’s nothing wrong with that. This is meant to be an educational game rather than an entertaining one.

2. Bitcoin Hero

bitcoin cryptocurrency trading simulators

For those who don’t need a tutorial in what cryptocurrency is and want to jump right in, Bitcoin Hero is excellent. The web app works fine on mobile screens as well, so you can enjoy the game without ever installing it, but there is an Android app.

While it isn’t necessary to install Bitcoin Hero, you’ll want to create an account to track your progress over multiple sessions. You start with $10,000 in your wallet, and you can buy and sell four cryptocurrencies: Bitcoin, Ethereum, Litecoin, and Dash. The cryptocurrency prices come straight from the real world, so its akin to the real thing.

3. Altcoin Fantasy

altcoin fantasy dashboard crypto trading practice

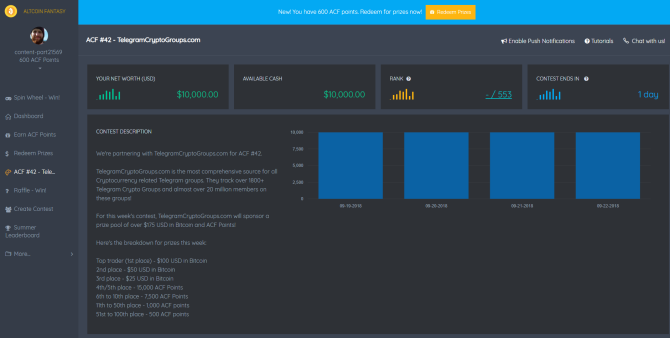
Altcoin Fantasy (ACF) steps up where Bitcoin Hero ends. Unlike Bitcoin Hero, Altcoin Fantasy lets you trade against other people, in competition, for a range of real-life prizes. For instance, a prize in a recent ACF contest was $100 worth of Bitcoin!

Competing also earns in-game currency, ACF Points, which you can trade in for real-life prizes, like a CryptoKitty or a 12-month subscription to TradingView. There’s also a daily sign-in bonus and a free spin-wheel for more points!

ACF ramps up the realism by using real-world market from a range of exchanges, differing between competitions. There’s usually a healthy amount of competition too, so you will need to sharpen your crypto market analysis skills to hit the head of the pack. Starting out with $10,000, you have a decent bank account to make a profit from.

Another thing I like about Altcoin Fantasy is its Private Contest mode. You can set up a 14-day contest for you and your buddies to see who has the best crypto-trading chops—and then brag about it when you win, of course. You can even set an entry fee.

4. eToro

eToro crypto trading list

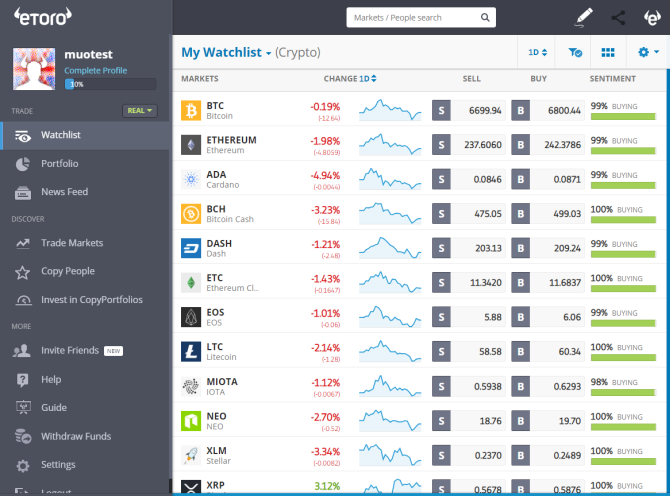
eToro is a social trading app that has captured the imagination of regular investors and professionals alike. You find profitable investors that match your level of risk, and then copy their trades as they execute them. There are thousands of profitable traders and decent money to be made.

However, if you don’t want to risk your money and want to learn before opening your wallet, sign up for an eToro practice account here. Your free account comes with up to $100,000 for trading so you can really go to town with your practice trades.

5. CoinMarketGame

bitcoin cryptocurrency trading simulators

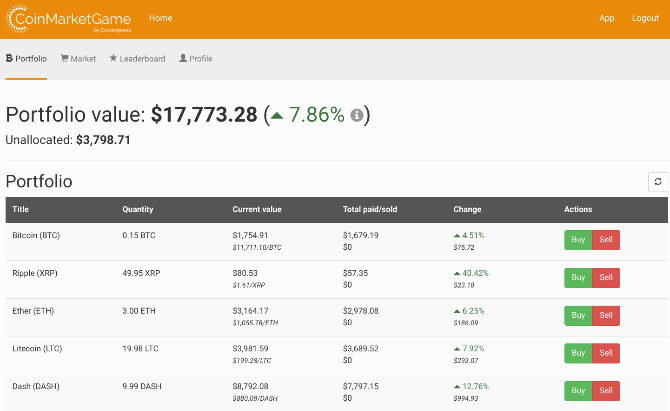
For a full-fledged simulator consisting of all major cryptocurrencies, you can’t do much better than CoinMarketGame. It does all the basics right to deliver an accurate experience of what it’s like to be a trader in this market.

Sign up for an account to receive a $20,000 starting pot. Spend it wisely by building a diverse portfolio, investing in both popular and less-known altcoins with high growth potential. You can check the leaderboard out and see what your competitors are trading, then head back to the markets to see how they maximize their crypto trading profits.

6. Spark Profit

bitcoin cryptocurrency trading simulators

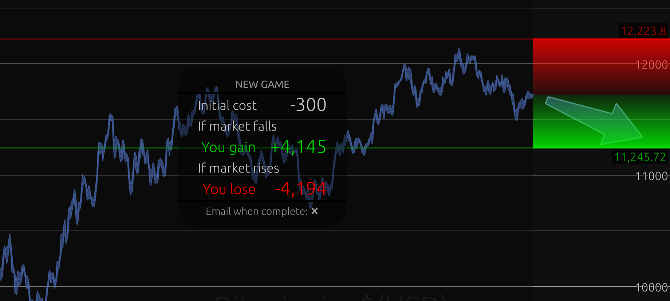
Spark Profit is a crypto prediction game for Android, iOS, and your browser. You use historical crypto data to predict the position of Bitcoin, Ethereum, and Litecoin, as well as several international stock markets.  Spark Profit is basically about taking a long or short position on the future of the market. Your goal is to win points with accurate predictions. If the market touches your profit price, you win points. If it hits your loss point, you lose them. Simple, right?

Your goal is to win points. Estimate and set a profit price that you think the market will hit. Also, set a loss price while you’re at it. If the market touches the profit price, you will win points, but touching the loss price will make you lose points. Simple, right?

Spark Profit is a lot tougher than it sounds, and the much-needed reality check that early investors need. Before you invest a single dollar in cryptocurrencies, play this game and see how well you do. If you end up bankrupt, you’re better off putting your money back in your wallet.

7. Bitmex

bitmex testnet crypto leverage site free account

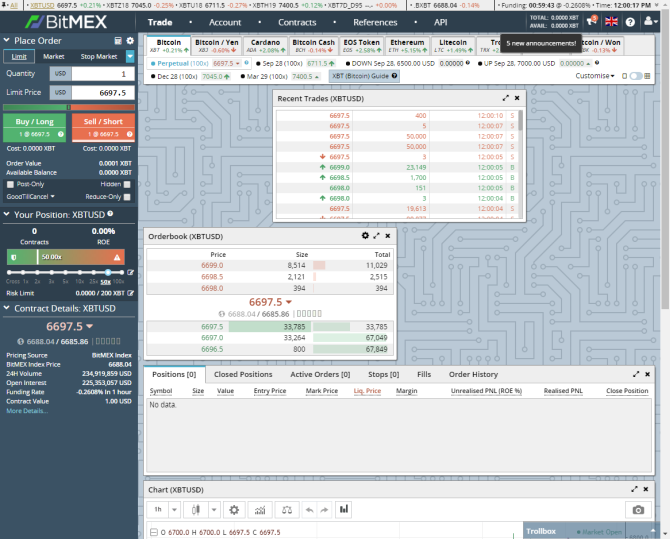
Think you’re getting the hang of Spark Profit? Why not step up to the next level with a Bitmex Testnet account? Bitmex is one of the most popular crypto exchanges. Here, you take a long or short position on where one of the listed cryptocurrencies will be in a certain time frame. Then, you apply leverage. Leverage can boost your potential profits (or losses) by up to 100 percent.

You will need to grab some Testnet Bitcoin from a faucet (follow the Bitmex tutorial to find out how), but then you can begin trading using the Bitmex Testnet. It’s valuable education before attempting to trade crypto futures!

What’s the Best Bitcoin Beginner’s Tip?

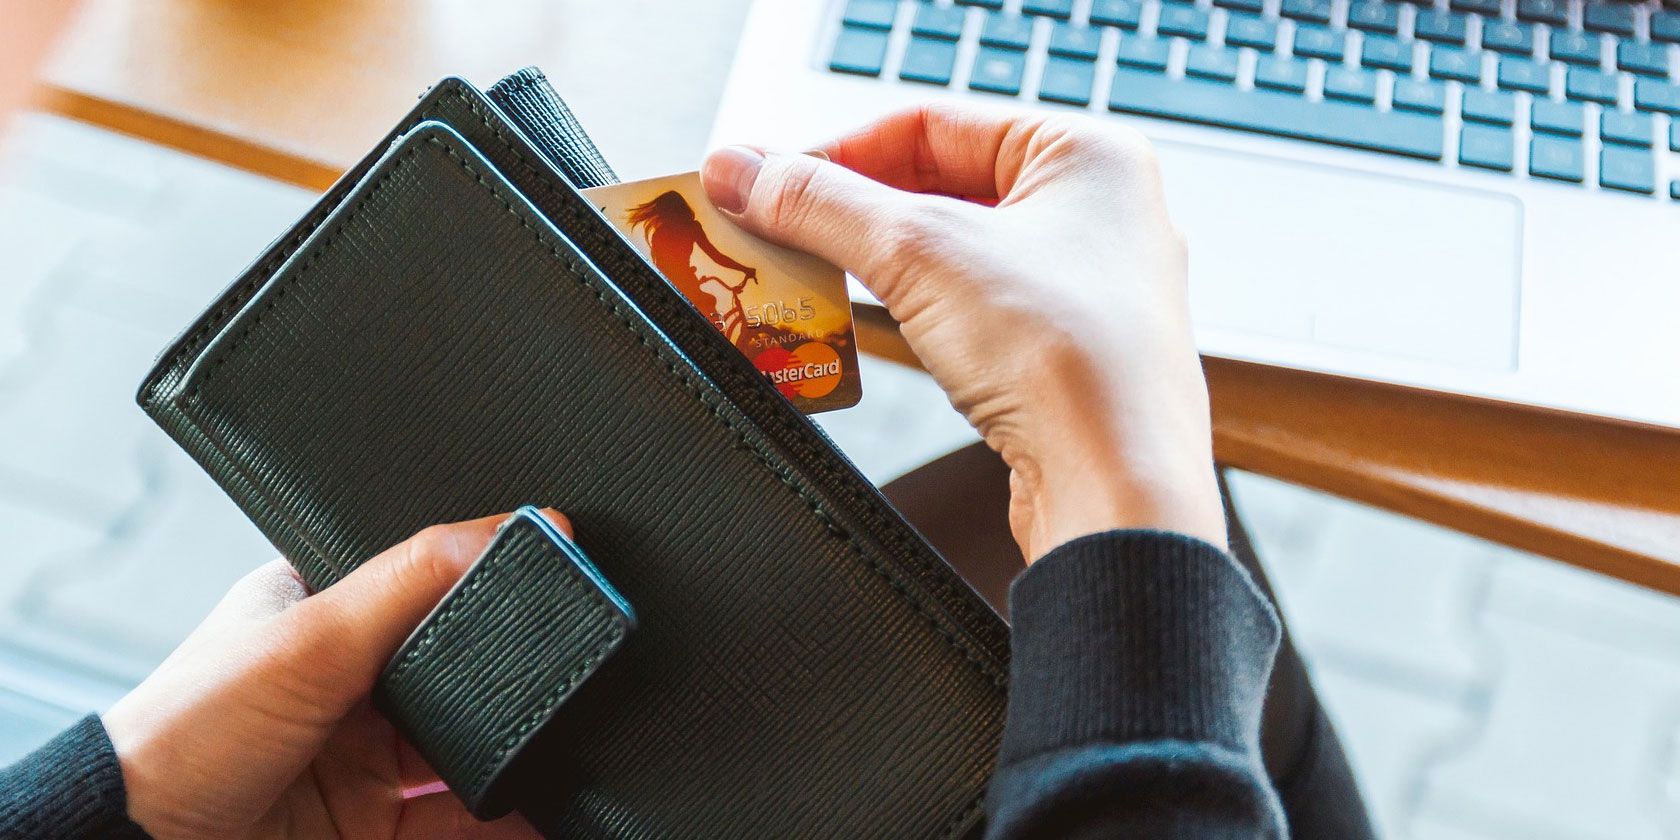
Education. All the way. If you don’t educate yourself before opening your wallet, you’re best off heading to the nearest bathroom and flushing your dollars straight away. Save yourself the time.

Trying out cryptocurrency trading in a mock market is a great first step. Reading articles, blog posts, and more helps, too. But at some point, you’re going to have to take the first step. Start small, and most of all, move slowly.

Read the full article: The 7 Best Risk-Free Cryptocurrency Trading Simulators

https://ift.tt/2OW03v3

via MakeUseOf

The 6 Best Android Gallery Apps Better Than Google Photos

How to Password Protect a Folder in Windows

password-protect-folders

Take a second to consider how much sensitive information you have stored on your computer at this moment. Bank information? Family photos? Financial documents?

As secure as your files feel on your PC, they’re also prime targets for malicious intent. Password protecting your sensitive folders is a basic security step. Think of it as a virtual vault, which encrypts whatever files or additional folders you’d need kept safe.

Read on to learn how to create a password-protected folder to keep your precious files protected, and sneaky onlookers at bay.

Method 1: Text-Based Folder Lock

While Windows 10 doesn’t allow users to password protect folders by default, you can use a batch script to lock folders using a password of your choice. If you aren’t familiar with batch scripts, here’s a primer.

Start by navigating to the folder you’d like to lock. I’ll create a new folder to use as a virtual safe named Safe.

Double-click the folder. You’ll be creating your batch file within the directory that’ll store your locked folder. Create an empty text document within your folder by right-clicking an empty space and selecting New > Text Document.

Within this document, copy and paste the following code:

cls
@ECHO OFF
title Folder Locker
if EXIST "Control Panel.{21EC2020-3AEA-1069-A2DD-08002B30309D}" goto UNLOCK
if NOT EXIST Locker goto MDLOCKER
:CONFIRM
echo Are you sure u want to Lock the folder(Y/N)
set/p "cho=>"
if %cho%==Y goto LOCK
if %cho%==y goto LOCK
if %cho%==n goto END
if %cho%==N goto END
echo Invalid choice.
goto CONFIRM
:LOCK
ren Locker "Control Panel.{21EC2020-3AEA-1069-A2DD-08002B30309D}"
attrib +h +s "Control Panel.{21EC2020-3AEA-1069-A2DD-08002B30309D}"
echo Folder locked
goto End
:UNLOCK
echo Enter password to Unlock folder
set/p "pass=>"
if NOT %pass%==your_password goto FAIL
attrib -h -s "Control Panel.{21EC2020-3AEA-1069-A2DD-08002B30309D}"
ren "Control Panel.{21EC2020-3AEA-1069-A2DD-08002B30309D}" Locker
echo Folder Unlocked successfully
goto End
:FAIL
echo Invalid password
goto end
:MDLOCKER
md Locker
echo Locker created successfully
goto End
:End

To set your password, change the your_password bit in the line if NOT “%pass%==your_password” goto FAIL to a password of your choice:

Once you’ve added your password, head to File > Save As within your Notepad program. Name it anything you’d like, Locker in my case, but ensure you add a .bat extension to your file. In my case, I will name my file Locker.bat (ensuring I’ve included the extension).

Double-click the BAT file to create your Locker folder. This is the folder that will be locked with your password. You should now have a folder and a file named Locker.

Place all your sensitive documents within this Locker folder. Once you’ve placed your files, double-click your Locker.bat file again. A command prompt will open asking if you want to lock your folder. Input Y and press Enter.

Poof! Your folder should disappear. This is a natural byproduct of your BAT file.

To access your files again, double-click on your Locker.bat file. You will be prompted to enter the password you added when creating the file.

Voila! If you enter your password correctly, your Locker folder will reappear again.

Note: This BAT file can be changed via your PC. That means others who are familiar with this trick may be able to change your password. For the most part, however, this nifty little trick will add a much needed buffer to your most sensitive local documents!

If you’d like to learn more about what BAT files can do, we’ve got you covered.

Method 2: ZIP Folder Lock

While the above trick uses the default Notepad program, you can also both lock and condense your sensitive documents using a popular desktop program named 7-Zip.

Typically used to unzip folders and extract files, 7-Zip also allows users to password protect their folders. To follow this method, first download 7-Zip.

Once 7-Zip is downloaded and installed, click the start menu and type 7zip. Select the 7-Zip File Manager option. Then, locate the file or folder you want to protect, click on it, and click the Add option at the top of the window.

Next, enter your new password in the Encryption section. When you’re done, click OK. Check your folder location and you’ll find a ZIP file named the same as your original folder.

Now that you have your zipped file, delete your original folder (as keeping it would defeat the purpose of password protecting your new ZIP file).

It’s a good idea to create another containing folder for your zipped file, as unzipping it may scatter your files in a directory. In the example below, the Sensitive Documents folder will hold my zipped Safe file.

Right-click your zip file and select 7-Zip > Extract Here. You’ll be prompted to enter your password.

Enter your password and your files will appear in your directory.

That’s it! While this method isn’t exactly timely, since you have to undergo the whole process every time you need to add or view your files, it works perfectly and only uses this trusted software.

Method 3: Hide Files and Folders

Now that you’ve locked your folder, you can also take the additional step of hiding your folder from view.

Right-click a file or folder or your choice and select Properties. Check the Hidden option beside Attributes. Click Apply and then OK.

Your file or folder should now disappear. To view your folder again, click on the View tab of your Windows 10 file manager. Then, select Options > Change folder and search options.

In the following File Options window, click on the View tab. Finally, click on the option labeled Show hidden files, folders, and drives under Hidden files and folders. Click Apply and then OK.

You should now be able to view your file or folder. To revert your file or folder back to hidden, head to your File Options window again and select Don’t show hidden files, folders, or drives. That’s it!

Lock Your Windows Folders to Keep Your Data Safe

With the simple methods above, you can choose to implement either one or all three. No matter which you pick, you can rest assured that your previous sensitive documents are safe under an additional layer of protection not enabled by default on your PC.

Sometimes, all it takes is a password lock to prevent theft. That applies to the virtual world as much it does to the real world. And it’s up to you to bulletproof your PC with the best security tools for your computer.

Read the full article: How to Password Protect a Folder in Windows

https://ift.tt/2NRLWdy

via MakeUseOf

7 Ways to Download Videos From Instagram

download-insta-video

Ah, Instagram video. A yardstick by which we can all measure our online popularity—or not.

We’ve already shown you everything you need to know about Instagram video, but what if you want to download them, share them, and view them at your leisure?

Whether it’s your own amazing creations or quality content from your friends, downloading videos from Instagram is as easy as pie. Just choose one of the methods below and get cracking.

1. Video Downloader for Instagram

Available on: Android

Android users can find an abundance of specialist apps for downloading Instagram videos in the Google Play Store (tips for using the Google Play Store).

One of the most popular is Video Downloader for Instagram. It lets you download or repost videos from Instagram with a single tap. The app can even download the tags that accompany the videos.

The downloaded content is automatically added to your phone’s gallery app.

Download: Video Downloader for Instagram (Free)

2. IFTTT

Available on: Android, iOS, Web

Do you want to download all of your Instagram videos? Or maybe save Instagram videos you like? You can set up an IFTTT applet. To get the applet working, you will need an IFTTT account, an Instagram account, and a Dropbox account (how to get more done with Dropbox).

The result is an automatic process in which any Instagram video you add or like is automatically downloaded and added to your chosen Dropbox folder. What could be simpler than that?

3. PostGraber

postgraber home page

Available on: Web

PostGraber differs from a lot of the other web-based Instagram download tools. Whereas most of them can only grab one piece of content per post, PostGraber can download all of the photos and videos that are associated with a single post.

All you need is the URL of the Instagram post you want to download. You can get it on the mobile app by going to Copy Link, or from the browser’s address bar on the web app.

Paste the URL into the box on the PostGraber website and click Go. The web app will take care of the rest.

Note: This app only works with public Instagram posts.

4. Dredown

Available on: Web

Dredown—which is still sometimes referred to by its previous name, Instadown—is one of the original Instagram video download tools, and it’s still going strong.

Like PostGraber, all Dredown needs to work is a URL. Paste the URL into the box and click Dredown. Within a few seconds, your browser will start downloading the MP4 file.

Dredown works with more services than just Instagram. You can also use it to download content from YouTube, Facebook, Keek, Twitter, Twitch, Vine, Vimeo, Metacafe, Vevo, Kohtakte, and Tumblr. For all the services it supports, you just need to URL of the post, video, or photo you want to save.

5. Regrammer

Available on: iOS

Okay, so we’ve covered Android and web apps. But how do you download Instagram videos on iOS?

Well, there are several apps in the App Store that profess the ability to download videos—but they’re often packed with ads and in-app purchases, and are difficult to use.

One exception is Regrammer. The app is entirely free, and although it’s ad-supported, the ads aren’t so obnoxious you’ll want to steer clear.

Once again, you’ll need the URL of the Instagram video you want to download to make the app work. When you have it, open the Regrammer app, paste in the URL, and click Preview.

On the final page, you can choose to either download the video onto your device or repost it under your own name.

Download: Regrammer (Free)

6. OG Instagram

Available on: Android

OG Instagram is not in the Google Play Store. To get your hands on it you’ll need to sideload the app on your Android device.

The app is not just a way to download and save Instagram videos on Android—it’s also a full-featured Instagram client that lets you follow hashtags, use two accounts on the same device, view the profile picture of users (by long-pressing), and share URLs to external apps.

Download: OG Instagram (Free)

7. Gramblast

Available on: Web

We will leave you with one more web app. It’s always sensible to keep a few web apps for downloading Instagram videos in your arsenal, as they will often go down for a couple of days at a time.

By now, you’ll be familiar with the process for using the service. Grab the URL of the video or picture you want, then paste it into the Gramblast web app and click Download.

Depending on the size of the file, you should have a new MP4 on your computer within a matter of seconds. You can use the video to re-upload to a different social network, or just keep it on your hard drive so you can refer back to it later.

Remember Instagram Video Copyrights

As easy as it is to download videos off Instagram, don’t forget that you have no rights over videos you did not create.

Yes, you can download them. Yes, you can enjoy them. But don’t go uploading them as your own, or distributing them in any other way, especially without giving due credit. You wouldn’t want the same thing done to you.

Other Ways to Download Instagram Videos

If these seven apps don’t give the results you want to download videos from Instagram, there are some additional methods you can use.

For example, you can one of the generic apps that let you download streaming videos from websites. VideoGrabby, Video DownloadHelper, and Freemake Video Downloader are all solid options in this department.

Read the full article: 7 Ways to Download Videos From Instagram

https://ift.tt/2DR3gv1

via MakeUseOf

10 LEGO Star Wars Toys Actually Worth Buying Right Now

When Is the Safest Time to Invest in Cryptocurrency?

invest-bitcoin-ethereum

Never.

There will always be a measure of risk when “investing” in Bitcoin, Ethereum, or any other cryptocurrency. However, that risk can be managed.

In this article, we’ll cover the fundamental points you need to know to make a risk-managed investment in cryptocurrency. But a word of warning: do NOT mistake “risk-managed” for “safe” because they are NOT the same thing. Keep reading to find out why.

How Cryptocurrency Investments Work

As with all things traded, digital coins are subject to supply and demand. At any given moment, there are people who have coins and want to sell them (supply) and there are people who want coins and are willing to buy them (demand). Combined, they comprise the coin market.

But not everyone agrees on the value of a coin. Every seller has a minimum price at which they’re willing to sell, and every buyer has a maximum price at which they’re willing to buy.

Crypto market order books

Sellers put their coins on the market at their willing prices, and prospective buyers buy them if the prices are low enough. As lower-priced coins are bought up, only the higher-priced coins remain on the market. As the price goes up, the number of willing buyers diminishes—and if buyers run out, sellers may need to start selling at lower prices. Thus, the price of a coin goes up and down as buyers and sellers enter and leave the market.

The current market price of a specific cryptocurrency is the price of the most recently sold coin.

So how do people make money with cryptocurrency? They buy in at a certain price, wait for the market price to rise, then sell for a profit. However, if the market price never rises above their buy-in price, then selling at a loss is the only option.

In this way, coin investing is similar to stock trading: each coin of a cryptocurrency is like a share in a publicly-traded company, and both coin prices and stock prices are determined by what buyers are willing to spend.

Why Cryptocurrency Investments Are Risky

A coin’s value is tied to how much faith people have in it.

If people really believe that a given crypto project is the future, then they’ll jump aboard the wagon: former non-buyers become buyers, and current buyers become willing to spend more to acquire coins. Sellers become emboldened to hold for the future and become less willing to sell at lower prices. The coin’s price shoots up.

Conversely, if people lose faith and stop believing in the longevity of a coin, then buyers back out and disappear. Sellers lose hope that their coins will be worth anything in the future, so they decide to dump—but they aren’t the only ones. Everyone ends up undercutting each other to offload their coins as fast as possible. The coin’s price plummets.

The problem is, increasing faith in a cryptocurrency is extremely difficult, and even hard-earned faith can evaporate overnight.

BTC all time chart

ETH all time chart

You’ve probably heard that you “need” to invest in cryptocurrencies “while you still can.” Buy now while the price is low so that you can sell when the price shoots back up! And based on the above price-over-time charts, you might be tempted to sink your savings into them. After all, look at those spikes!

If you had invested $1,000 into Bitcoin in January 2017, it would’ve been worth $18,000 in January 2018. If you had invested that same $1,000 into Ethereum in January 2017, it would’ve been worth a whopping $100,000. In just one year! You won’t find that kind of annual return anywhere else.

But high returns come with high risks.

January 2018 saw a huge price rally for nearly every cryptocurrency. If you bought in at these highs, you would have had a very worrying 2018, as the prices subsequently plummeted.

Spikes like this are common in the cryptocurrency world. As of this writing, CoinMarketCap shows over 1,900 different actively-traded cryptocurrencies, many of which experienced their own big spikes similar to what Bitcoin and Ethereum have gone through.

How did these cryptocurrencies fare?

PPC all time chart

Peercoin became big around the end of 2013, skyrocketing in price through the first quarter of 2014 before users lost faith. The price dwindled down and down, with a few hopeful spikes along the way. The price spiked again in January 2018, when the whole market rocketed, but Peercoin failed to sustain this momentum and dwindled once again.

STEEM all time chart

Steem is a younger cryptocurrency, just over two years old as of this writing, that exhibits much of the same patterns as older cryptocurrencies: the price sits stagnant for a quite, a spike comes along, users jump on the wagon, realize the hype wave is over, then sell out before the price plummets. Spikes happened in 2017 and 2018, but none have had a lasting impact on the price.

DOGE all time chart

The same thing happened with Dogecoin, which was once the third-largest cryptocurrency in 2014 but is now barely hanging on in the Top 20. Dogecoin is one of the rare examples of a cryptocurrency that spiked to a higher price later in its life, but note how quickly that spike dissipates: it plummets, spikes again, then loses most of its gains within two months.

And that’s the big risk with cryptocurrency investments: you can get rich overnight, but you can also lose it all overnight. Don’t think of it as an investment—it’s a gamble.

Cryptocurrency investment is a game of spikes. You need to already be in the game by the time a spike arrives in order to ride it up for profits. At the same time, you need to get off that ride before everyone else does, otherwise they’ll run away with the profits and leave you empty-handed.

How is crypto investment different from the stock market?

The main issue is a lack of historical data. Cryptocurrencies debuted with Bitcoin in 2009, which means the crypto market hasn’t even been around for a decade. Enthusiasts look at the 2017 spike in crypto interest as a sign of a healthy future, but there’s just no way to know for sure.

FTSE all time chart

When you look at the US stock market’s history (as shown above), you see all kinds of peaks and valleys, but you also see an upward trend over the long term. We can’t say the same for cryptocurrencies.

Could the US stock market crash and never recover? Sure. It happened to Japan in 1990. But the historical data shows that it’s unlikely. When there’s a crash, you can reasonably hope for a recovery.

There’s no basis for such a hope in cryptocurrency. Could Bitcoin, Ethereum, or any other cryptocurrency soar to higher heights over the next five years? Of course. But could the whole industry collapse and disappear? Absolutely. We simply don’t have enough historical data to do more than guess. It’s still too young and there’s too much uncertainty.

My rule of thumb: if you see a spike in cryptocurrencies, you’ve already missed the hype train. Wait for it to drop, buy in, and hold for another spike—but with the understanding that another spike may never come.

Managing Risk When Investing in Crypto

I’m not saying you shouldn’t invest in cryptocurrencies, but it’s clear that the market is alive and people can still walk away with a killing if they play their cards right.

That being said, here are a few tips to lessen your risk of a total loss:

Don’t put all your eggs in one basket. Don’t stick your entire life savings in cryptocurrency. Unless you’re willing to gamble, crypto shouldn’t be more than 5 percent of your total investment portfolio. And when you do invest in crypto, don’t dump it all into one coin. Diversify between coins that have different missions and different underlying technologies.

Only “invest” money you can afford to lose. Again, cryptocurrencies aren’t really investments—they’re speculations. It’s literally a gamble right now. Expect to lose everything and consider it a bonus if you don’t.

Sell your profits. If you make gains, don’t get greedy. Sell a portion of it to realize profit immediately, then see how the remainder performs. If it goes up again, sell another portion. Don’t “wait for the peak” before you sell—a plunge to zero could wipe you out overnight.

Never store your coins on an exchange. Another Mt. Gox controversy could be right around the corner. Have money on an exchange? Spend it or pull it out. Have coins on an exchange? Transfer them to a cold wallet for secure storage.

Read the full article: When Is the Safest Time to Invest in Cryptocurrency?

https://ift.tt/2zEPeIq

via MakeUseOf

Microsoft Is Ending Support for Skype Classic

Microsoft is preparing to pull support for Skype Classic, officially known as Skype 7.0. Support for the older version of Skype, which has a more classic look and feel to it than the current versions, will end in November on both desktop and mobile.

Microsoft Messes With a Winning Formula

In 2017, Microsoft launched a new version of Skype designed to appeal to a younger demographic. This proved to be rather controversial, as the majority of Skype users are older and not particularly interested in stickers and emojis.

Rather predictably, this led some users to stick with Skype 7.0. In July 2018, Microsoft launched Skype 8.0 and stated that all previous versions would stop working within weeks. Users duly complained, and Microsoft relented. But not for long.

The End Is Nigh for Skype Classic

Microsoft has now announced it will be pulling support for Skype Classic in November. It also added that, “although you may be able to use older versions for a little while, we encourage you to update today to avoid any interruption.”

An update to the original post reads, “As we continue to focus on and improve Skype version 8, support for Skype versions 7, and below will end on November 1, 2018 on desktop devices and November 15, 2018 on mobile and tablet devices.”

To be fair to Microsoft, the company has spent the last year trying to find a happy medium by blending the old and new together. Which meant reintroducing some of the classic features existing users felt were missing from Skype 8.0.

The danger with this approach is ending up with a half-cocked product that no one is particularly happy with. However, Microsoft has now committed to forcing everyone into using the same version of Skype going forward, so we’ll see how that turns out.

There Are Alternatives to Skype…

If you like the way Microsoft has changed Skype recently then upgrade to Skype 8.0 ASAP. But if you’re one of those longterm Skype users who hate the recent changes you might want to consider switching to one of these free Skype alternatives instead.

Read the full article: Microsoft Is Ending Support for Skype Classic

https://ift.tt/2OYdWIV

via MakeUseOf

4 Reasons Why Your Wi-Fi Is So Slow (And How to Fix Them)

Friday, September 28, 2018

5 WhatsApp Apps and Extensions You Didn’t Know You Need

MacBook Trackpad Not Working? 4 Troubleshooting Tips to Try

How (Not) to Upgrade to the Latest Windows 10 Version

windows-10-upgrade-cancel

Windows 10 build 1809 is coming to your PC soon. The official release date is October 2, 2018, but the rollout could take many months. We’ll show you how you can get the latest feature update right now or how to delay it for as long as possible, in case you don’t want to upgrade.

Which Version of Windows Do You Have?

First, find out which version of Windows you’re running right now.

If you’re running Windows 10, go to Start > Settings > System > About and check what it says under Windows Specifications.

How to find out which Windows version or edition you're using.

For a quick check that works on any version of Windows, press Windows + Q, type winver, and hit Enter.

How to quickly find out which Windows version and edition you're on.

If you’re still on Windows 7 or 8, the only way to upgrade to Windows 10 now is to buy a copy and install it. Earlier this year, Microsoft closed the loophole that permitted a free Windows 10 upgrade.

How Not to Upgrade Windows 10

Not upgrading to the latest version of Windows 10 remains a sensible choice. You’ll maximize your time on a stable installation and avoid bugs. Whether you can temporarily delay the Windows 10 October 2018 Update depends on your Windows edition.

Windows 10 Home

As a Home user, you can temporarily disable Windows Update by setting your internet connection to metered.

Go to Start > Settings > Network & Internet > Wi-Fi, select the network you’re connected to, and switch the slider under Set as metered connection to On. This path now also works for Ethernet connections. As soon as you connect to an unmetered Wi-Fi or LAN network, Windows Update will start downloading updates again.

How to set a metered Wi-Fi or Ethernet connection on Windows 10 Home.

Unfortunately, this is just a temporary workaround. Though it could take many weeks, you should prepare for the impending upgrade that Windows Update will eventually drop on you.

Windows 10 Pro, Education, and Business

If you’re on one of these Windows 10 editions, you have the luxury of temporarily deferring feature updates.

To pause updates completely for up to 35 days, head to Settings > Update & Security > Windows Update > Advanced options and under Pause Updates, move the slider into the On position. Note that once updates resume, you will have to install the latest updates before you can pause Windows Update again.

To defer updates, stay in the Advanced options window. Under Choose when updates are installed, select for how many days you want to defer the feature update; the maximum is 365 days. Unless you don’t want to receive security updates, select zero days for quality updates.

Windows 10 Defer Updates

Did the update download, but you’re not ready to install, yet? You can postpone it once more for one week. Go to Settings > Update & Security > Windows Update and select Restart options. Here you can schedule a time and date for the pending update, up to 7 days in the future.

Preparing Your Windows 10 Upgrade

To upgrade to the October 2018 Update, you should be on version 1803, also known as the April 2018 Update. If that’s your Windows version, you’re good to go. Before you upgrade, however, check off these pre-installation To-Dos:

  1. Create a Windows recovery drive.
  2. Back up your product keys.
  3. Enable System Restore.
  4. Back up your important data.

With Windows, you never know what could go wrong. So be prepared and do your Windows housekeeping. You’ll find detailed instructions in our article on what to do before you upgrade to the Windows 10 Fall Creators Update.

The Latest Builds: Become a Windows Insider

As Windows Insider, you’ll always run the latest Windows 10 builds. It’s the fast lane to new features, but you also risk facing countless bugs and problems with the operating system. Are you up for the challenge?

How to Join the Windows Insider Program

To become a Windows Insider, you have to go through the following steps:

  1. Sign up for the Windows Insider Program. You’ll need a Microsoft account.
  2. Make sure you sign into Windows using your Microsoft account: Go to Start > Settings > Accounts > Your info to change how you sign in.
  3. Enroll your Windows 10 computer: Go to Start > Settings > Update & Seurity > Windows Insider Program > Get started to opt in.

You’ll have to link your Microsoft account and choose a Windows Update branch. We recommend the slow ring.

Twice a year, when the Windows Insider build aligns with the latest build that Microsoft is rolling out to the public (the RTM build), you’ll be able to exit the Insider program without having to reinstall. When that’s the case, head to Start > Settings > Update & Security > Windows Insider Program and click Stop Insider Preview builds.

Windows 10 Stop Insider Preview Builds

The Latest Stable Release of Windows 10

Being a Windows Insider means you’ll often run buggy versions of Windows 10. The safe choice is to wait for a stable release of Windows 10 and use one of the following upgrade routes.

Upgrade to Windows 10 Version 1809 via Windows Update

When your computer is ready to upgrade, you’ll receive the October 2018 Update through Windows Update. It’s worth being patient. If Microsoft doesn’t have reliable data for your hardware or if Insiders with your specs experienced lots of issues, the update may not roll out to your system for some time.

To check whether you’re ready to upgrade, head to Start > Settings > Update & Security > Windows Update and click Check for updates. Once the upgrade has downloaded, you’ll see it listed here.

Windows 10 Check for Updates

Before you can upgrade to a new build, however, you’ll have to install any pending security updates. Make sure you didn’t pause or defer feature updates under Advanced options.

Manually Install Windows 10 Using the Media Creation Tool

If Windows Update doesn’t think it’s your turn yet, you can force the upgrade using Microsoft’s Windows 10 Media Creation Tool (open this link in Microsoft Edge).

You can click the Update now link to launch the Update Assistant and initiate the upgrade directly from the website.

Windows 10 Manual Installation

Or click Download tool now to prepare Windows 10 installation media for a clean install.

Please refer to the article linked in the previous paragraph for a step-by-step guide to using the Windows 10 Media Creation tool.

Windows 10 Media Creation Tool

Should You Upgrade Windows 10?

It depends on which version of Windows you’re currently using. Generally, Microsoft will stop supporting each Windows 10 version 18 months after its initial release.

For how long is my Windows version supported with security updates?

Windows 10 Home, Version 1709 or 1803

You should wait until the upgrade is available through Windows Update. And even then, it’s safer to defer the feature update and wait a little longer until Microsoft has fixed common bugs. Although you can roll back to your previous Windows version for 10 days (previously 30 days), it’s not worth the hassle.

Moreover, if you’re presently running the Windows 10 Fall Creators or April 2018 Update, you’ll continue to receive security patches until April or November 2019, respectively. There’s no rush to update right now, so take your time.

Older Windows 10 Home Versions

The only time you should upgrade is when support for your current Windows 10 version ends. But this won’t happen for many years.

The original Windows 10 release, version 1507, as well as versions 1511 (Fall Update), 1607 (Anniversary Update), and 1703 (Creators Update) have all reached their end of service. If you’re still running one of these versions, you’re no longer receiving security patches and should upgrade immediately.

If your machine supports the October 2018 Update and you’re on a Windows 10 version prior to 1803, we’d recommend waiting for the release of the latest feature update and then upgrading manually using the Windows Media Creation Tool, as described above.

Should you be stuck on an older version because your machine can’t upgrade, there’s a silver lining! For systems that see a “Windows 10 is no longer supported on this PC” error while trying to upgrade, Microsoft has extended support until 2023.

Microsoft introduced this exception for PCs using Intel’s Clover Trail processor, but it might extend to other unsupported hardware as well.

“To keep our customers secure, we will provide security updates to these specific devices running the Windows 10 Anniversary Update until January of 2023, which aligns with the original Windows 8.1 extended support period.”

Windows 10 Enterprise and Education Editions

Windows 10 Enterprise and Education users can add an additional six months to the dates above. Earlier this year, Microsoft said:

“Windows 10 version 1511, 1607, 1703 and 1709 will continue to receive monthly servicing updates at no-cost for a period of 6 months past the end of service dates. The security-only updates are available through all normal channels including: Windows Update (WU/WUfB), WSUS, the Update Catalog, and enterprise management solutions and are delivered as standard cumulative update packages.”

And:

“Some versions of Enterprise and Education editions will have an option for an additional paid extension for eligible volume licensing customers. Customers should reach out to their Microsoft account team for more information about a paid program.”

Welcome to the Future of Windows

The good news is that the latest Windows 10 version will hijack your computer for only around 30 minutes. Microsoft has optimized the installation process and enabled many installation steps to run in the background. This means you can continue to use your machine for a lot longer before you have to restart.

Once you’ve successfully upgraded to the Windows 10 October Update, double-check all your privacy-related settings and restore your preferences. You might also want to set up or disable new features.

Read the full article: How (Not) to Upgrade to the Latest Windows 10 Version

https://ift.tt/2xZ6Mgr

via MakeUseOf

Facebook Hack Affects 50 Million Accounts

Around 50 million Facebook users may have had their accounts accessed as part of a major security breach. This is thanks an unknown party or parties exploiting a vulnerability in Facebook’s code and stealing access tokens as a result.

Facebook isn’t having a great year, with the Cambridge Analytica scandal and Mark Zuckerberg’s subsequent (and very awkward) appearance before Congress. This led to calls for people to #DeleteFacebook, and millions are thought to have done so.

And now Facebook has a major security breach on its hands…

Facebook Suffers a Serious Security Breach

As explained in a post on Facebook Newsroom, Facebook discovered a security breach on September 25, 2018. Around 50 million accounts were directly affected, with a further 40 million accounts secured as a precaution.

The attacker had discovered a flaw in Facebook’s code which is thought to have been introduced to its video upload tool in July 2017. This affected the “View As” feature, which allows you to see how your Facebook profile looks to other users.

Thus, the attacker was able to steal access tokens, which are the digital keys that let you stay logged into Facebook without having to enter your password every time. With these access tokens the attacker could potentially take over people’s accounts.

Unfortunately, Facebook doesn’t yet know “whether these accounts were misused or any information accessed.” At this early stage of the investigation the social network also doesn’t know “who’s behind these attacks or where they’re based.”

Facebook Takes Action to Protect Its Users

Facebook has taken decisive action. First, it has fixed the vulnerability and informed law enforcement. Secondly, it has reset the access token of everyone potentially affected. Third, it has temporarily disabled the “View As” feature.

If you’re one of the 90 million people who have had their access tokens revoked you’ll need to log back into Facebook. You’ll also see a notification at the top of your News Feed explaining the situation. But beyond that, neither you or Facebook can do any more.

Maybe It Is Time to Delete Facebook After All

While any security breach resulting from a vulnerability in a company’s code is serious, it looks like this could have been a lot worse. And while 50 million people is a huge number it’s a drop in the ocean when you consider Facebook has 2 billion users.

Still, this sorry saga is likely to reinvigorate the campaign to persuade people to delete Facebook. Making our article listing reasons not to delete Facebook suddenly relevant again. And we doubt this will be the last time either.

Read the full article: Facebook Hack Affects 50 Million Accounts

https://ift.tt/2zEdWZH

via MakeUseOf

How to Get More Matches on the Bumble Dating App

The 7 Best Cheap Computer Chairs for Students on a Budget

How to Factory Reset Your iPhone and iPad

Google Helps You Plan Your Next Vacation

google-plan-summer-vacation

Google is continuing on its mission to help us all plan our vacations more efficiently. Its latest efforts are designed to bring the various elements involved in planning a vacation together using the whole of Google, including Search, Maps, and Trips.

Vacations Can Be a Pain to Plan

In February 2018, Google aligned its vacation planning tools. The company realized that unless you pay a premium for a package holiday, there are so many elements involved that vacations can be a pain to plan. And now it’s improving its planning tools again.

Google explains the most recent changes in a post on The Keyword. The overarching theme is stitching your trip plans together across Google. And that’s the point. Google wants to be the one tool to rule them all when it comes to vacation planning.

Improving Your Vacation Planning Toolset

The first improvement allows you to resume planning where you left off. This means that even if you haven’t booked anything, when you search for a popular travel destination Google will show you relevant suggestions in Search.

As you start booking parts of your holiday Google will further customize your search results. For example, if you’ve already booked a hotel in Rome, the next time you search for Rome Google will show you flight prices, the weather, and any events taking place.

Google is also expanding your ability to track flight prices during the holidays. The company already offers this for Thanksgiving, but will now extend this through Christmas and New Year. This should save you paying over the odds for a flight.

Last but not least, Google wants to help you choose a hotel based on its location. To enable this Google is assigning each hotel a location score based on information pulled from Google Maps. You can then pick a hotel based on its proximity to your interests.

Making It Easier to Plan Your Vacation

Individually these changes are all fairly minor, but when combined they add up to a collection of tools almost guaranteed to make it easier to plan your next vacation. As long as you’re willing to give Google access to all of this information about your trip.

Read the full article: Google Helps You Plan Your Next Vacation

https://ift.tt/2DElTlE

via MakeUseOf

What Is “Five Eyes” Surveillance? VPN Users, Beware!

five-eyes-surveillance

If you’ve ever used a VPN, or are concerned about online privacy, you’ve probably stumbled across references to “Five Eyes,” “Nine Eyes,” and “14 Eyes.”

But what exactly do these surveillance alliances do? And can they affect the security of your VPN service?

What Is Five Eyes?

Five Eyes is a nickname for the United Kingdom–United States of America Agreement (UKUSA).

Despite the official name, UKUSA agreement consists of five countries. They are the UK, US, Canada, Australia, and New Zealand. The deal has its origins in a World War II intelligence-sharing agreement between Britain and America.

Five Eyes has given birth to many of the most notable privacy scandals in recent years, including PRISM, XKeyscore, and Tempora.

Today, its powers are scarily wide-ranging. According to the Electronic Frontier Foundation, the five governments can force any “communications service provider” (including ISPs, social media platforms, email providers, cell phone networks, and more) to:

  • Insert malware on its users’ devices.
  • Ignore existing laws in pursuit of Five Eyes directives.
  • Interfere with people’s user experience.
  • Provide governments with new product designs in advance.
  • Provide user information as requested in secret warrants.

What Is Nine Eyes?

Nine Eyes is another intelligence sharing agreement. It’s grown out of the original Five Eyes alliance. It includes all the Five Eyes members, plus Denmark, France, the Netherlands, and Norway.

Its powers and dedication to information sharing is broadly the same as the Five Eyes agreement.

What Is 14 Eyes?

The 14 Eyes agreement adds a further five countries to the list: Germany, Belgium, Italy, Spain, and Sweden.

Interestingly, both France and Germany have been close to becoming full Five Eyes members in 2009 and 2013 respectively. The two agreements both fell through for various reasons.

Lastly, it’s important to mention Israel and Singapore. Israel reportedly enjoys observer status with the main Five Eyes group, while Singapore has partnered with the group but is not an official member.

What Does This Mean for VPNs?

Given the sweeping powers granted by the three agreements, what impact does it have on your VPN service?

It’s all a question of jurisdiction. When talking about a VPN provider’s jurisdiction, there are three things to consider:

  • Local laws: Some countries outright ban VPN usage.
  • Company location: The state in which the VPN provider is registered and has its physical offices.
  • Server location: VPN providers typically offer servers in many different countries.

From a surveillance perspective, the two things you need to worry about are the company location and the company servers.

A VPN provider with either a physical address, or servers in the countries listed, could be compelled to hand over any information it has, including connection logs and browser traffic. The country might even monitor a VPN server’s inbound and outbound traffic. Worse still, the governments can forbid the provider from even notifying the affected customers; you lose the chance to respond to the invasion of privacy.

And, of course, due to the very nature of the agreements, once your information has been acquired by one country, it’s in the system. Ultimately, it could be shared with the other countries if they request it.

If security is your main priority, you shouldn’t use a VPN that’s domiciled in one of the Five, Nine, or 14 Eyes countries. Nor should you connect to servers in one of those countries using a VPN provider from a non-14 Eyes member.

If you really need to use a VPN provider from one of the Five, Nine, or 14 Eyes member countries (for example, due to a unique feature), make sure you select one that explicitly does not keep logs. However, not even that can adequately protect you.

For example, you don’t need to look any further than the once-popular US-based email provider, Lavabit.

When the FBI found out Edward Snowden had used the service, it requested the company’s logs. The company did not keep logs, so the FBI instead issued a subpoena for the SSL keys. The keys would have given the FBI access to metadata and unencrypted content for all Lavabit users.

To its credit, rather than hand over the information, Lavabit opted to shut down. You cannot be so confident that your VPN provider would be equally willing to fall on its sword.

VPNs in Surveillance Countries: Which to Avoid

A surprising number of mainstream VPN providers have their headquarters in one of the participating countries. Here are a few popular ones to watch out for:

  • Hotspot Shield
  • StrongVPN
  • Private Internet Access
  • LiquidVPN
  • IPVanish
  • HideMyAss
  • SaferVPN
  • VPNSecure
  • Getflix
  • UnoTelly
  • Mullvad
  • PrivateVPN

To reiterate, these services aren’t necessarily bad. If your main reason for using a VPN is to circumvent geo-blocking on Netflix and other online services, you might have no choice but to sign up.

However, if you want a VPN for its security benefits, you should look elsewhere.

Which VPNs Do We Recommend?

If you want to avoid a VPN company that’s located in either a Five, Nine, or 14 Eyes territory, MakeUseOf recommends either ExpressVPN or CyberGhost.

ExpressVPN

Express VPN is based in the British Virgin Islands and thus is not subject to any of the three surveillance sharing agreements.

Other key features include an automatic kill switch (to prevent VPN leaks), split tunneling, service-wide encryption, zero-knowledge DNS, and 148 server locations across 94 countries.

Use this link to get up to 49% off of ExpressVPN!

CyberGhost

CyberGhost is a Romanian company and, therefore, is also not subject to the 14 Eyes information sharing requirements.

You’ll have access to unlimited bandwidth and traffic, DNS and IP leak protection, 256-bit AES encryption, support for OpenVPN, L2TP-IPsec, and PPTP protocols, and simultaneous connections on up to seven devices at the same time.

Both providers have servers in the US and UK, meaning you can still use them to access localized websites and services. Just remember to switch back to a non-14 Eyes country as soon as you no longer need access to the geo-blocked content.

Use this link to get a special discount for CyberGhost!

Learn More About VPNs

If you take away one thing from this article, learn to value the importance of thorough research. Many VPN providers are quick to profess how wonderful they are; if you look at each provider’s homepage, you will find it difficult to unearth the differences. However, dig a little deeper, and you’ll soon discover that some providers are much more secure than others.

If you’d like to learn more before signing up for a VPN provider, check out our articles on the best VPNs for Kodi, the best VPNs according to Reddit, and the best VPNs for Chrome.

Image Credit: antonprado/Depositphotos

Read the full article: What Is “Five Eyes” Surveillance? VPN Users, Beware!

https://ift.tt/2xFqvm7

via MakeUseOf

How to Play MP3 and Other Audio Files on a Raspberry Pi

raspberry-pi-audio-player

Costing as little as $5, you can turn any Raspberry Pi into a whole host of useful devices: a Minecraft server, a retro gaming station, a desktop PC, or even a homemade laptop.

But how useful is it for playing music and audio files?

The Raspberry Pi as a Media Player

Not only can you use a Raspberry Pi as a Kodi media center, a Raspberry Pi can also play music. Thanks to the audio out port (see below), you can pipe music through to a dedicated speaker or simple headphones. With HDMI, you can even send audio to your TV (which you probably already knew).

But how do you play MP3s on Raspberry Pi without installing Kodi first?

Several tools can be installed on Raspbian (or whatever Raspberry Pi operating system you’re using) to play MP3, FLAC, OGG, even WAV files on your Raspberry Pi. With the right software, you might even be able to set up playlists and subscribe to podcasts!

Copying MP3 Files to Your Raspberry Pi

To get started playing MP3 or other audio files on your Raspberry Pi, you’ll need to either download some (via the browser), or copy them across.

You have several options for copying data to your Pi:

  • Transfer files with a USB stick
  • Upload files to your cloud account and download to the Pi
  • Transfer using an external hard disk drive
  • Copy data to the /boot/partition on your Pi’s microSD card
  • Transfer data via SSH using a desktop SFTP app (such as FileZilla)

Find full details on all of these methods using our guide to transferring data between a Raspberry Pi and desktop PC.

Outputting Sound From Your Raspberry Pi

While HDMI is probably adequate, you might want to use the A/V socket on your Raspberry Pi. This might be the case if your HDMI cable doesn’t carry sound, for example, or the monitor speakers are faulty.

The Raspberry Pi 2 and later has a 3.5mm A/V port for use with audio and video TRRS compatible RCA cables. While the colors may not match those on your TV (some swapping around is required), the results are good. It’s thanks to this connector that the Raspberry Pi can be hooked up to old TVs for authentic retro gaming experiences.

In addition to video and audio, the port can also output audio only. A standard headphone jack can be connected, for example, as can a speaker. (For the best results, use a powered loudspeaker.)

Playing Audio in the Command Line With omxplayer

You should find omxplayer is already bundled with your Raspberry Pi. If not, use:

sudo apt update
sudo apt install omxplayer

Run from the terminal, omxplayer has a help file that you can check using:

omxplayer -h

However, to get started, all you need to know is the file path and filename of the audio file you wish to play.

In this example, I’ve copied an MP3 file (Led Zeppelin’s “In My Time of Dying”) to my Raspberry Pi and play it with omxplayer:

omxplayer inmytimeofdying.mp3

It’s really as simple as that:

Play MP3s on Raspberry Pi with omxplayer

However, as you’ll discover when checking the help notes for omxplayer, you can do so much more, such as specify a particular route for the audio. To send the file through your HDMI cable, for example, use the audio pass-through switch, -o:

omxplayer -o hdmi [AUDIO_FILENAME]

You could also use the both command to play the audio through HDMI and the local output. The possibilities for audio (and video) playback with omxplayer are considerable, so once you get to grips with it you’ll find it a great tool to have to hand.

Playing Audio on a Desktop PC With VLC

If you would rather use a desktop computer to enjoy audio on your Raspberry Pi, the best option is VLC Player. Capable of playing all manner of media, VLC Player will play audio in virtually any format.

To install VLC, open a terminal and use:

sudo apt update
sudo apt install vlc

Wait for the software to download and agree to installation:

Play audio in Raspbian with VLC Player

Note: VLC Player on the Raspberry Pi comes in two flavors. There is the main version, for easy installation, and the source version that can be compiled with hardware acceleration for better performance. You probably won’t need hardware acceleration for playing audio, although it might come in useful for high-definition video.

That’s all you need to do. The app will be added to a new menu subfolder called Sound & Video. Launch VLC from the desktop when you’re ready to playback your favorite audio tracks. (By the way, check out our tips on the best hidden VLC features.)

Enjoy Music With Your Raspberry Pi

It doesn’t take long to get music and audio playing on your Raspberry Pi. In fact, the main problem you’ll face is organization. So when you’re migrating your audiobooks or albums to your Pi’s storage, make sure everything is sorted correctly.

Believe us, having multiple directories labeled “Disc 2” is going to cause a lot of problems when you’re searching for a particular song!

Of course, you have other options to play music with your Raspberry Pi. Installing Plex will turn the Raspberry Pi into a media server and player for your home network.

Read the full article: How to Play MP3 and Other Audio Files on a Raspberry Pi

https://ift.tt/2NK76KN

via MakeUseOf

11 Great Apple Watch Bands That Won’t Break the Bank

Can You Trust Your Browser With Credit Card Information?

browser-creditcard-safety

You’re shopping online; you find the perfect item, proceed to checkout, and pay. Your browser remembers your username. It might even remember your password, based on what you’ve entered in the past.

But then it asks whether you want it to save your credit card information. Can you trust your browser with keeping that secure? Should you avoid Autofill altogether? And how can your browser keep your financial data safe when you’re visiting websites?

What Exactly Is Autofill?

We trust our browsers with a huge amount of data, mostly because we feel we have to. You must have confidence that your browsing history, for instance, won’t be leaked en masse. Yet many of us are wary of the private information collected and used for advertising.

Nonetheless, we become complacent and let Autofill (a feature in web browsers like Google Chrome) and Autocomplete do the hard work for us.

No one likes filling in forms, and so Autofill will add in your email, phone number, and address for you if you want. You have to have this function turned on, of course—we’ll come back to this later on because you’ll need to know how toggle settings. Most mainstream browsers do this, notably Google Chrome, Safari, and Microsoft Edge, which boast the lion’s share of the market.

You can also use Autocomplete on Opera and Mozilla Firefox, both of which are especially well-known for their focus on maintaining your privacy.

You might think this is all done through cookies stored automatically, but implementation is more complex than that. It’s not simply a case of storing information: it’s also about presenting it in the appropriate fields.

There’s a section devoted to Autofill on your browser, so you can add in your credit or debit card information and rely on that in future. On Chrome, all you need to do is visit chrome://settings/autofill and enter payment methods.

But wait. Before you do that, you should know the dangers…

Should You Use Autofill for Payment Methods?

The problem with using Autofill for credit card information isn’t about trusting your browser. It’s about hackers gaining access to this through phishing sites.

Phishing is simply a fraudulent means of obtaining personal information. Websites set up by cybercriminals may have text boxes for basic information which we regularly give up anyway. Despite the value of personal data, we often submit our names and email addresses. They don’t feel like a valuable commodity anymore because we use them to sign up for social networks, online shops, and newsletters.

If you’ve got Autofill turned on, these text boxes will be automatically filled in. But some phishing sites have hidden elements. These won’t be seen by users, but dig into a page’s script, and malicious code reveals secret intents. These trick your Autofill function into adding private data which you’ve not approved of on the site but have within your browser.

Not all browsers do this. Chrome and Firefox only add credit card details into boxes you specifically click on. If a form element isn’t visible, then you don’t click in the box, so Autofill doesn’t relinquish any further data.

That’s not the only concern, though. Your main worry should be: what happens if someone else gets access to your browser?

This is possible in a couple of notable ways. The first is simple. Someone uses the same device. You probably trust the people you share a computer with, but junked or recycled hardware can be a serious security threat. Ideally, you’ll clean all data from any devices you’re passing on.

Another means is, once more, through phishing. Take Vega Stealer for example. This malware was spread through an email campaign primarily targeted at the marketing and PR sector. Vega Stealer’s main purpose was to collect details stored within Chrome and Firefox, i.e. cookies and credentials stored for Autofill.

Essentially, you store data locally, but that doesn’t mean a third-party can’t access it.

Can You Trust Your Browser to Transmit Data?

If you can’t entirely trust your browser to Autocomplete your financial details, how can you trust it with payment details at all?

Browsers recognize that they have a duty of care. If they don’t look after users, those disgruntled customers will switch to one of their competitors.

Data sent between your device and a site’s server should be encrypted. This means private information is rendered unreadable to anyone without the correct decryption key, i.e. your password. Check a site is secure by looking at the URL; if it reads “HTTPS”, that extra “S” stands for “Secure”.

You could also use a Virtual Private Network (VPN), which acts as a tunnel between two destinations. Picture a tunnel between your PC and the website you’re using. No other parties can look at what’s going through that tunnel unless they’re at either end-point. VPNs even protect your data when your device is connected to a public network.

As VPNs go, we highly recommend ExpressVPN (save up to 49% off using this link) and CyberGhost.

VPNs are typically a regular expense, but Opera has one already built-in. It’s not turned on by default, so you’ll need to go to the browser settings, then Privacy and security > Enable VPN.

Sadly, other browsers don’t boast this same feature. This is partly because VPNs stop the collection of cookies, which many consider enhance your online experience—though, as Vega Stealer demonstrates, they can also be exploited.

And let’s not forget that you don’t have a choice but to trust your browser to some degree. If you shop online, you must have confidence that your browser takes the necessary security measures. Otherwise, you’re reduced to solely visiting bricks-and-mortar stores.

How Do You Turn Off Autofill?

The process is different depending on the browser you use. Still, it’s typically very easy to do. On Chrome, for example, click on the vertical ellipsis in the top right-hand corner then go on Settings. Or take a shortcut by going to chrome://settings/autofill.

From there, you can turn Autofill off completely, or just instruct Chrome not to collect payment methods. Our look at Autofill’s privacy implications explains how to disable this feature in all mainstream browsers.

Read the full article: Can You Trust Your Browser With Credit Card Information?

https://ift.tt/2NR5yik

via MakeUseOf