Tuesday, May 29, 2018

How to Screen Capture Tweets with a Twitter Bot

Introducing Screenshot Guru, a new Twitter bot that will help you easily take high-resolution screenshots of tweets. There are a plethora of screen capture apps available, including the good old Print+Screen combo but with Screenshot Guru, you get crisp and beautiful screenshots sans the clutter.

Screenshot Guru offers 3 different options for screen capturing tweets. You have a web app for desktops, a Google Chrome extension and a Twitter bot @screenshotguru for people who are looking for a way to easily screenshot tweets on their Android or iPhone.

Let’s explore in more detail.

1. Web App – Go to screenshot.guru and type the URL of any web page or tweet that you would like to save as a PNG image. Solve the CAPTCHA and you’ll have a crisp retina screenshot ready in a second or two.

2. Chrome Extension – Install the Twitter Screenshots addon from the Google Chrome store and then switch to the Twitter website. You’ll see a little camera icon in every tweet – click the icon and it will instantly transform the tweet into a high-res PNG screenshot that will exist forever even if the original tweet is gone.

twitter-screenshots.png

3. Twitter Bot – Screenshot Guru is available as a Twitter bot that works both on the Twitter website and mobile apps. You can DM tweets to the @screenshotguru bot and it will send a screenshot image back to you in a private DM.

Sending a tweet via DM is easy (watch video tutorial). Tap on the share icon from a tweet on your Twitter timeline and then tap “Send via Direct Message”. Type screenshotguru as recipient account and tap the Send icon.

The Screenshot Guru app is written in Node.js and hosted on the Google Cloud Platform. The screen captures are done through headless Chrome (Puppeteer) while the images are stored on Google Cloud Storage. The Twitter Bot is running on Google App Engine.

Also see: Write your own Twitter Bot

The post How to Screen Capture Tweets with a Twitter Bot appeared first on Digital Inspiration.


via Labnol

Thursday, May 24, 2018

Leantime Is The Opinionated Project Management System for Startups

Entrepreneurs and folks who work in the corporate world frequently find that with every idea they have, they end up using the Lean Canvas template to test and validate whether they are on the right track.  Often, though, they find that what they end up with isn’t very ‘lean,’ which can look like post-it notes all over the office, messy and hard-to-read boards, and difficulty tracking where they are in the process. A lot of the available solutions have been systems that have been too simple or quite complex, doing either only a fraction of what users needed – or way more than wanted and requiring too much set up. Enter Leantime.
 
leantimedashboard
 
Leantime is an opinionated project management system for startup minded teams, combining the fundamentals of design thinking, lean principles, and agile practices into one comprehensive and decisive system that allows startups and small teams to quickly and easily ideate, plan and execute from start to finish. Designed to be plug and play, Leantime allows users to manage their ideas and tasks in one place, and eliminate wasted time.
 
As simple and user-friendly as dragging-and-dropping your To Do list, Leantime allows users to:

  • Ideate their solutions, test their assumptions and innovate effortlessly, and then turn their research into To Dos they can build;
  • Execute their solutions and communicate progress with their team, investors, and clients;
  • Learn more about their team and progress with Leantime’s intuitive dashboard
  • Simplify both their business development and project management processes
  • Innovate, ideate, build and track all of their progress in a single easy to use system.
  • Build their products faster and more efficiently using the best practices of design thinking, lean and agile


Interested?

Building a company while building a product is hard, and getting organized, staying on track, and delivering is even harder. Leantime know the ins and outs of starting up lean and can help you move from startup to enterprise. Signing up with Leantime is free for your first three users – no credit card required.


Photos

UnsplashLeantime

The post Leantime Is The Opinionated Project Management System for Startups appeared first on KillerStartups.


via KillerStartups

Wednesday, May 23, 2018

Laboratory Consultation Services Provides State-Mandated Online Courses For New York and California

If you work for New York state and are looking for a course in infection control, child abuse prevention, or school violence prevention, or work California state and are in need of a way to get your state-mandated dental courses out of the way, Laboratory Consultation Services is the solution you’re looking for. LCS is the leading online course provider for state-mandated courses, allowing you to select and complete your course and then download your certificate immediately.


lab

While the original company was started in the 1970s by a group of experienced laboratory professionals to provide consulting services to commercial and physician-office based clinical laboratories, the current iteration providing state-approved courses has only been around in the Internet era. The site provides easy, safe, affordable, and secure courses for download and provides tons of industry information that is completely free for all users. In addition, LCS sustains a list of useful resources relevant to the entire market and has top-rated customer service which always answers questions in the timeliest manner.

LCS initially only offered courses relevant to New York state, but has since launched an expansion effort, hoping to offer their courses to different states to provide the convenience of online continuing education to a broader audience. First on the list was California, which they currently offer several dental-related courses for.

Lab2

LCS’s courses have been successfully completed by thousands of professionals in (to date) 47 states and Puerto Rico and 37 foreign countries on six continents. Their staff continually reviews the content and presentation of their courses to keep them as up to date, informative and user-friendly as possible.


Interested?

Head over to the Laboratory Consultation Services website to check out a list of their current course offerings for New York and California, and sign up for the ones you need.


Photos

UnsplashLaboratory Consultation Services

The post Laboratory Consultation Services Provides State-Mandated Online Courses For New York and California appeared first on KillerStartups.


via KillerStartups

Tuesday, May 22, 2018

Read This Before You Buy Any Udemy Course

Looking to learn coding this summer? Well, there are plenty of free resources on the Internet to quickly get you started but if you prefer proper instructor-led video courses, go with Udemy. If you are new here, Udemy is an online marketplace where you’ll find courses on everything from calligraphy to photography to programming.

I’ve purchased more than two dozen Udemy courses around web development from different instructors – the list includes courses on React, Redux, JavaScript, Node.js, ES6, Express, Webpack, Firebase, TypeScript – and have been really impressed with the overall quality of the training content. You pay a one-time fee for any course and, unlike Pluralsight or Lynda LinkedIn Learning that charge a monthly subscription, your Udemy course will be yours forever.

Most video courses on Udemy are priced between $20 and $200 but before you key in the credit card, ready this.

Avoid Impulse Buying

Udemy offers massive discounts almost every week and the $150 course you are looking to buy could be available for as low as $10 the next day, or even the next hour.

Do not make ‘impulse’ purchases on Udemy. Add the Udemy course to your wish list or place it in your shopping cart and you could soon have an email from Udemy itself saying that course has gone on sale.

Support the Instructor

Udemy has a simple revenue-sharing agreement with instructors. If the instructor brings the student to Udemy through their own links, Udemy’s commission is mere 3% of the sale price. If a student finds a course by directly searching on Udemy, the instructor’s share is only 50% of the sale.

Check the blog, Twitter or Facebook pages of the Udemy teacher. Buy the course through links shared by Udemy teachers on their social media pages and you’ll be indirectly helping them as they’ll get most of the sale proceeds.

Avoid Coupon Sites

Search for “Udemy Discount Coupons” on Google and a million websites will pop-up. The problem is the 99.9% of these sites offer outdated/expired coupons and their sole purpose is to serve ads or get their own cookie in your browser.

Use Browser, not Mobile Apps

You can buy Udemy courses on their website or through their mobile apps. The interesting thing is that the same course may be priced differently depending on the platform you are on. It’s just like some airline company showing higher prices to people who are browsing on an iPhone.

I simultaneously searched for React.js courses on Udemy on iOS, Android, and Chrome and the prices varied everywhere. The prices displayed were lowest when I opened Udemy on the desktop in Chrome’s incognito mode.

Udemy Website on Chrome

udemy-user

Udemy Android App

udemy-android

Udemy iPad App

udemy-ios-ipad

Udemy Website – Incognito mode

udemy-incognito

The bottom line is that you should never purchase Udemy courses at the list price and always use a desktop to complete the purchase. They probably have to pay Google / Apple a share in the sale and hence the courses are priced higher inside Udemy’s mobile apps.

The post Read This Before You Buy Any Udemy Course appeared first on Digital Inspiration.


via Labnol

7 Ways to Stay Productive During Business Travel

Growing your business can often include travel which can be exciting but hectic at the same time. Whenever I travel, I always feel flustered and super behind on business tasks during and after the trip.

According to a study conducted by CWT Solutions Group, the average time lost doing productive work was an average of 7 hours. That’s almost an entire workday. If you’re taking a business trip or even a workstation where you’ll still need to run your business on the go, consider these strategies to help you stay productive during your business travels.

Map Out Meetings and Your Calendar Before the Trip

This is the most important task to complete before you even begin traveling. Some people assume they will have downtime during a long commute or flight and decide to set up their schedule then but it’s best if you map everything out ahead of time.

Be realistic about your goals during the trip and when you’ll have time to get things done. Then, adjust your calendar based on those time blocks. If you have some meetings lined up, clearly communicate the details with everyone well in advance and make sure you have the technology and availability to attend.

Get Prepared With the Right Tools

Taking your business with you on-the-go means you’ll need to make it mobile. If you do a lot of work online already, this should be easy but you want to make sure you have all the tools you need.

You don’t want to be stuck charging your laptop or phone in an airport for hours on end or have your computer randomly shut down for an update during an important meeting. Make sure you prepare yourself by bringing battery packs, software programs, headphones, inventory/samples, and other devices and tools that will help you get some work done stress-free during your business trip.

No one wants to pay for these things at an expensive tourist shop or airport store so it pays to be prepared.

Eliminate Non-Urgent Work Distractions

When traveling, there’s probably little chance that you’ll be able to be as productive as you would be in your normal work setting. Odds are, you’re going to be getting much less work done while you’re on the road even if you are super efficient and plan well.

That said, it’s important to prioritize your business tasks while traveling. You won’t be able to answer every email or take on every task so choose the ones that are most important. Let others know you will be out of town and when you’ll return by setting up an autoresponder message for your email account.

Also, communicate with your team and assign roles to help lighten your workload while you’re gone. As a result, you’ll be left with only the responsibility of the high priority tasks and less likely to be distracted by the non-urgent ones that can wait until your return.

Research the Airport’s Accommodations In Advance

The airport is one of the best places to get some productive work done online for your business. There’s really not much to do when you’re sitting around waiting for a flight if you know you’re going to have some downtime, be sure to fill it accordingly.

To optimize your time, do some research on the airport prior to arriving. Do they have free WiFi? What about charging stations or quiet rooms?

Depending on your airline and any loyalty rewards programs you’re apart of, you may have access to the private airport lounge where you can work and take calls in a quieter setting.

You may also want to plan out what you can do on the plane. Maybe you can listen to a podcast or audiobook or even knock out some emails. Free in-flight WiFi may be available if you’re a frequent flyer or hold a rewards credit card. I usually pay around $8 to access the internet during a flight and it’s worth it because I usually complete work that earns me more than that small payment so it makes sense.

Use Project Integration Tools

Working on solo or team projects during your trip? Using project integration tools like Trello, Asana, and even Google Drive can help you keep organized, stay connected, and work efficiently. You’ll also want to consider sharing your calendar and making quick updates and changes as your schedule adapts during your trip.

What’s great is that you can access all of these tools with a mobile device which makes them ideal for travel.

Find An Office Away From the Office

Staying focused enough to work on the road can be difficult. Whenever I do business-related travel whether, for a conference or retreat, I always feel super lazy and just want to let everything fall by the wayside.

If that’s your intention, fine. But if you truly want to be somewhat productive, changing your setting could do the trick. Sure, you’re probably not going to want to work when you’re on the beach or hanging out at the hotel bar all afternoon.

If you were to hit up the local library, a coffee shop, or even the business center in your hotel, that could spark some motivation to knock some tasks off your to-do list. If you’ve ever thought about joining a coworking space, some larger franchises allow you to visit their other offices and work in them for free while you travel.

The trick is to create an office setting away from home that motivates and inspires you to get some work done for your business. This may only mean spending 2 hours in the morning cranking out projects and the rest of the day enjoying your trip which is perfectly fine.

Organize a Lunch or Dinner Meeting

Sometimes networking with the right people can be a really effective way to grow your business even while traveling. If you’re visiting an area where you know a colleague or business friend resides, consider setting up a lunch or dinner meetings.

This can also be a great way to introduce yourself to someone you admire and would like to work with. It may sound a little awkward to invite someone out who you don’t know personally, but it’s surprising that most people will come out and join you even for coffee if they’re available. If you’re in the area, why not give it a try?

Having in-person meetings like this can be very valuable and allow you to connect with the person on a more authentic level than you would if you met them at a conference or networking event.

How do you stay productive when traveling for business?

The post 7 Ways to Stay Productive During Business Travel appeared first on KillerStartups.


via KillerStartups

Monday, May 21, 2018

What Established Small Businesses Need Most: Strategic Financial Plans

Money is a simultaneous necessity and sore spot for business owners. Many leaders of small- or medium-sized companies have trouble obtaining funding, and keeping money cycling can pose problems. A 2018 CB Insights analysis showed that 29 percent of failed startups ran out of money, and small businesses earn between 20 and 28 percent of their income during the holiday season.

These stats highlight the precarious financial position most growing businesses find themselves in. Many of the options available to them are short-term fixes, money that’s accessible for brief windows of time as emergency funds. The current economy is set up to reward businesses that are already financially successful and merely witness those trying to achieve stability or growth.

That means short-term fixes won’t solve the problem. Small- and medium-sized businesses need long-term strategic financial plans to help them stay solvent — and stay in business.

Assessing Where They Stand

The first step is to determine where these growing businesses stand currently. Using a company’s monthly cash flow report to determine the business’s net burn rate will help the company see how much it’s actually spending on a monthly basis.

That past figure can then influence future figures: cash flow projections. These should already be included in a business’s budget, but assessing the hard costs and predicting how they’ll change is imperative for comparing what’s current with what will be needed. Many expenses are fixed — like rent — but consider whether you plan to hire more employees and will, therefore, need a bigger space. Higher rent and more employees can significantly increase your needs.

The stage of the business needs to be considered in making these assessments, as well as the economy — if an industry has seen deflated sales as a whole, a growing company will have scaled-down expectations of how quickly growth will occur. Likewise, a business that cornered a niche market and has been making many more sales than expected needs to adjust its view of how much money it will have to spend to maintain its pace.

Making Ends Meet Over the Long Term

Without taking this longer view of business needs, owners find themselves needing money in a pinch. The downside — besides the stress it can cause the owner and her employees — is that seeking additional funds at the last minute is never a last-minute endeavor. It can take weeks or even months to compile the financials, obtain the documentation, and fill out the applications needed for loans from traditional financial institutions. Quick fixes are anything but quick.

It’s essential to predict how much money will be needed over the next five years — while this amount will undoubtedly shift, obtaining a stream of money that can be accessed over that span of time is a much better investment for small or medium businesses. The trick is finding long-term financing, which may be down unexpected avenues.

Online Lending

Online lending, like bank loans, can offer expansive funding for a business, from one-time loans to lines of credit that are accessible when a company needs it. Online lending, however, tends to have less stringent requirements than traditional lenders as far as revenue, tenure, and credit ratings are concerned. Online lending platforms typically have fewer layers of reviews, and some now range up to $250,000. Best of all for larger established businesses that still struggle with accessing capital — despite making millions of dollars’ worth of revenue — these lenders assess more than credit history and don’t usually ask for extensive collateral.

Remain at Home, an at-home healthcare company specializing in skilled companion care, services patients who receive government-sponsored healthcare beyond typical Medicare or Medicaid services. While “government-sponsored” means payment is guaranteed by Uncle Sam, the payments don’t always arrive when they’re expected. Yet, because the company’s primary collateral is its people, banks are unwilling to offer the company unsecured loans. Remain at Home’s founder, Brian Carrigan, turned to an online lending platform, Kabbage, to access an ongoing line of credit of $250,000 to cover substantial operational costs across multiple U.S. locations. The company sees Kabbage as a strategic financial partner offering a solution he was unable to find in other traditional or alternative lenders.

Home Equity Lines of Credit

Home equity lines of credit can be obtained through a variety of lenders; these loans use the equity an owner has built up in her home as security for a revolving line of credit. HELOCs often come with lower interest rates than other loans, and a line of credit only accrues interest as it’s used. The draw periods are typically long, around 10 years, and homeowners can often borrow up to 85 percent of the value of their home, minus the amount owed.

Senna House Buyers, a Houston-based house buying company, used a HELOC to finance its growth. Its owner, Sam Craven, obtained a $25,000 line of credit on his primary home, which helped fuel 300 deals for the company. He utilized the equity sitting in his house to fund his business and was later able to sell the house at a profit after paying off the line of credit.

Business Credit Cards

Anyone with a credit card knows it’s a risky way to finance an entire business, but business credit cards can help with individual “strides” of a long-term financial plan. Business credit cards ask owners to jump through fewer hoops to qualify, have high credit limits, and often offer deals on starting interest rates and bonus rewards; the best options also offer cash back. Business credit cards create a separation between a business owner’s personal finances and business finances, strengthening the owner’s ability to build and access credit over the long haul.

One marketing agency used a business credit card to fund a series of campaigns for clients; the firm didn’t have the cash to immediately pay for the advertising spots needed or the filming required, but it knew payment would come on the other side. After the campaign sprints were done and the deliverables had been sent, the clients paid, and the agency immediately paid off its credit card balance — with the campaigns convincing two clients to extend their contracts.

Long-term financial planning is essential to help owners of small and medium growing businesses spot problems before they occur, and it empowers them to get the funding they’ll need in the future now. Getting out of the cycle of short-term fixes not only helps businesses survive, but it also ensures they thrive.

The post What Established Small Businesses Need Most: Strategic Financial Plans appeared first on KillerStartups.


via KillerStartups

Everything You Need to Know About Raspberry Pi GPIO Pins

The Ultimate How-To Guide for Chromebook Beginners

Chromebooks have deservedly earned a reputation for being easy-to-use, even for people who aren’t technologically savvy. Chromebooks aren’t just perfect for students, they’re also solid options for seniors.

But just because the operating system is straightforward, it doesn’t mean there aren’t some parts of it that require further explanation. Without further ado, here’s an ultimate how-to guide for your Chromebook.

How to Take a Screenshot on a Chromebook

Chromebooks offer two ways to take screenshots natively. You can either capture the full screen or a part of a screen.

To capture the entire screen on your Chromebook, hold down Control and press the Switch Window key. It’s on the top row of your keyboard in what would be the F5 position on a non-Chromebook device.

Note: If you own a Chromebook with a 360-degree hinge, you can also press Power + Volume Down, just like an Android device.

To capture part of your screen, press Control + Shift + Switch Window. The mouse cursor will change into a crosshair. Just click and drag the crosshair over the part of the screen you want to save.

If your screengrab was successful, you will see a notification pop up in the lower right-hand corner.

You can find all your screenshots in the Download folder. They are not automatically saved into Google Drive.

How to Right-Click on a Chromebook

As with screenshots, there are two ways to perform the right-click action on your Chromebook.

The most common method is to use the trackpad. Move the mouse to whatever item you want to right-click on, then tap the trackpad with two fingers at the same time.

The lesser-known method uses the keyboard. Press and hold the Alt key then tap one finger on the trackpad instead of two.

Of course, technically, there’s a third way—use a USB mouse!

How to Rotate the Screen on a Chromebook

Depending on the model of Chromebook you own, there might be times when it’s more practical to use your machine in portrait rather than landscape view.

It’s also a useful trick to know in case you ever need to flip your screen 180-degrees, for example, if you are trying to show something to someone sat on the opposite side of the table.

ultimate chromebook guide basics

Rotating the screen is easy. You can move through four 90-degree turns by pressing Control + Shift + Refresh.

You can only rotate in a clockwise motion.

How to Copy and Paste on a Chromebook

We won’t dwell on this one for too long. Most users will already know how to copy and paste, but it still perplexes new Chromebook users who expect the process to be widely different to what they are used to.

In practice, the process is exactly the same as the method you’d use on Windows. Use Control + C to copy, Control + V to paste, and Control + X to cut. You can also use the right-click context menu.

How to Print on a Chromebook

Printing has always been the Chromebook’s Achilles heel. It’s never been a straightforward process.

Before beginning, you need to know if your printer is “Cloud Ready.” Check Google’s list of compatible printers if you’re not sure.

If it is Cloud Ready, follow the instructions below:

  1. Open Chrome and type chrome://devices in the address bar.
  2. Locate your printer in the New Device section of the page.
  3. Click on Register.

If it’s not Cloud Ready but has Wi-Fi capabilities, follow these instructions instead:

  1. Open Chrome on a Windows or Mac operating system.
  2. Type chrome://devices in the address bar.
  3. Click Add Printer in the Classic Printers section of the page.
  4. Mark the checkbox next to the printer you want to add.
  5. Select Add Printer.

ultimate chromebook guide basics

After completing either of the above processes, you can go to your Cloud Print portal to ensure setup was successful.

Lastly, if you want to add a local printer without using the Cloud Print app, use these guidelines:

  1. Open the Chromebook’s Settings menu (accessible through the system tray).
  2. Scroll down and click on Advanced.
  3. Go to Printers > Add Printer.
  4. Give the printer a name and enter its IP address.
  5. Click on Add.

Note: You cannot add a non-Wi-Fi-enabled printer to your Chromebook.

How to Zoom Out on a Chromebook

Chromebooks offer two ways to zoom in and out. It depends whether you want to increase the size of a single page/app, or of your whole screen.

To zoom in and out on a single app, press Control + Plus or Control + Minus accordingly. You can reset your screen’s zoom by pressing Control + 0.

If you’d rather change the zoom level across the entire operating system, press Control + Shift + Plus or Control + Shift + Minus. This shortcut will also change the size of your app dock, thus letting you fit more apps on it if you’re running out of space.

How to Change a Chromebook’s Owner

If you’re planning to sell your Chromebook, or even just give it to another family member, you will need to change the device’s owner.

The only safe and secure way to accomplish this is to do a factory reset AKA Powerwash. Performing a Powerwash will delete all data from the computer, including the users and any data in the download folder. Therefore, ensure you make a backup before proceeding.

To Powerwash your machine, open the Chromebook’s Settings menu and navigate to Advanced > Powerwash > Powerwash.

When it becomes available, click on the Restart button. You will be taken through the device setup screens. The Google Account you enter when prompted will automatically become the Chromebook owner.

How to Invert Colors on a Chromebook

Like almost all operating systems, Chromebooks come with a broad range of accessibility tools. One of them allows you to invert the colors on your screen. In Chromebook-speak, the feature is called “High Contrast Mode,” but the end product is the same.

ultimate chromebook guide basics

There are two ways to invert the colors. The simplest method is to use the keyboard shortcut; press Search + Shift + H. However, this shortcut will only work if the Search key is still mapped to the search function; if you’ve assigned it to caps lock, it won’t work.

The alternative approach requires you to dive into the Settings menu. Open the menu and go to Advanced > Manage Accessibility Features. In the display section, slide the toggle next to Use high contrast mode into the On position.

How to Connect to Wi-Fi on a Chromebook

How you connect to Wi-Fi depends on the type of network you want to connect to. Firstly, make sure Wi-Fi is turned on. Click on your profile photo and select No network. Make sure the toggle at the top of the popup window is in the On position.

ultimate chromebook guide basics

To connect to a visible network that’s within range, click on the network’s name and enter the password if needed. Meanwhile, to connect to a hidden, unlisted network, repeat the above steps but instead choose Join other network. Enter the network information and hit Connect.

What Else Do You Need to Know About Chromebooks?

The nine queries we’ve covered in this article are some of the web’s most searched Chromebook questions.

However, it’s not an exhaustive guide, so if you still have questions, feel free to reach out in the comments below.

Alternatively, you can keep reading more Chromebook content elsewhere on the site. We’ve covered everything from the most useful Chromebook shortcuts to fixing common Chromebook errors.

https://ift.tt/2IDmK42

via MakeUseOf

The 5 Best File Manager Apps for iPhones and iPads

How to Download and Save YouTube Videos on iPhone

4 Key Google Slides Tips and Tricks to Know

Google Slides is arguably the leading free slideshow presentation app. Microsoft PowerPoint is more feature-rich, but the excessive cost of an Office 365 subscription means many people have converted to Google’s product. So, if Google Slides forms an important part of your daily workflow, keep reading. We’re going to introduce you to four quick tricks that’ll instantly turn you into a power user.

1. Zoom In and Out

If you like to create beautiful, artistic slides, you might need to focus on one part of a slide in more detail.

It’s easy to do. To zoom in, press Control + Shift + Plus. To zoom out, press Control + Shift + Minus.

2. Dictate Your Slides With Voice

Are you working on a long presentation? It’s no fun to spend all day typing. Why not try dictating your slides instead?

To dictate a slide, go to Tools > Voice type speaker notes. It will bring up a small microphone icon on your screen. Click on it and start talking.

3. Add Sound to Your Presentations

It’s relatively straightforward to add images and videos to one of your slides, but what about audio? There’s no “Insert” button for audio in the same way as there is for other media.

The solution? Just copy and paste the URL of a YouTube video, Spotify song, or other online audio track. The sound will start playing when the slide in question pops up.

4. Present via Chromecast

Who needs HDMI cables these days? As long as you take a Chromecast with you, you present directly from your computer to the screen without a cable in sight.

Go to Present > Present on another screen to get started.

If you’d like to learn more, we’ve got you covered. We’ve given you tips on how to use videos in the Google Slides app, explained how to auto-loop presentations, and a whole lot more.

https://ift.tt/eA8V8J

via MakeUseOf

How to Keep Your Mobile Browsing Private

Explore the World’s Natural Wonders With Google Earth’s Geography Quiz

Remember when Google Earth Pro used to cost a mind-boggling $400? Google now offers it for free, turning an already beloved product into our go-to method for learning more about Earth and its geographic treasures.

If you love geography and the wonders of the world, then take this opportunity to explore the world from your armchair. Tucked away inside Google Earth is a wonderful little geography quiz in partnership with Atlas Obscura.

Google Earth’s Geography Quiz

Google Earth Quiz

The Natural Wonders Quiz on Google Earth is a multiple-choice challenge that will ask you to identify special locations around the world. As the Google Earth blog says,

“Atlas Obscura takes you to some of the most beautiful—and intriguing—places on the planet. Know where Morning Glory Pool is? Or the hot springs of Dallol? See how well you know your planet, and explore these places in Google Earth.”

The questions and the locales are fertile ground for a site like Atlas Obscura. The popular traveler’s guidebook loves to dig up rare and hidden wonders around the world. It’s a perfect blend of history and geography. So, just click on the blue Let’s Go button and hit a spot on the blue orb of Google Earth.

Pick an answer from the multiple choices and Google Earth will give you the answer. Either way, you will get to jump to the specific spot on the 3D globe and explore it further. Go from cool ice caves in Alaska to the blazing salt mines of Ethiopia. Learn about geographical features and romantic legends.

In the end, just walk away with a better appreciation of the world we live in. There are only seven questions in the first edition of this quiz. Google Earth will continue to update the quizzes with other themes as they hint the next one might be about “magnificent castles and palaces”. Until then, don’t miss these Google Earth gems.

https://ift.tt/2IEWbeY

via MakeUseOf

How to Find the Best Mortgage Rates Online

Mortgage rates are complex. And figuring out how to get the best rate is even more so. But with the right tools and a solid understanding of how mortgage rates work, you can find the best rates online.

This guide is available to download as a free PDF. Download How to Find the Best Mortgage Rates Online now. Feel free to copy and share this with your friends and family.

This guide will help you understand:

  • What a mortgage rate is
  • How mortgage rates are determined and calculated
  • How to research today’s mortgage rates
  • How to find mortgage forecasts and trends
  • How to get the most useful information out of a mortgage rate calculator

What Is a Mortgage Rate?

If you’re just getting started in the mortgage research process, you might not have a great idea of what a mortgage rate actually is. So we’ll clear it up.

A mortgage rate is the rate of interest that you pay on the loan you’ve received to buy a house. It’s the cost you pay to the lender in exchange for giving you the loan.

Your mortgage rate is one of the most significant factors in determining the ultimate cost of your house.

If you’re familiar with other types of loans (like credit cards), it’s important to realize that mortgage rate is not the same as annual percentage rate (APR). Your APR is likely higher than your mortgage rate, as it includes other fees.

Fortunately, APR isn’t usually a lot higher than the mortgage rate, and the loan estimate that you receive from a lender will include both.

In general, you don’t need to worry about your mortgage APR. You can, however, run this mortgage APR calculator to compare loans from different providers.

What Determines Your Mortgage Rate

Several factors affect mortgage rates. The first—and most important—is the current economic climate and trends. Mortgage rates respond to various economic triggers, like the strength of bonds, the rate at which people are buying houses, and wages.

There’s not much you can do about these factors other than timing your purchase well. We’ll talk about paying attention to mortgage forecasts and trends in a moment.

The other factor that makes a big difference is your credit rating. Your lender will pull your credit score from all three reporting bureaus.

Credit score reported on Mint.com

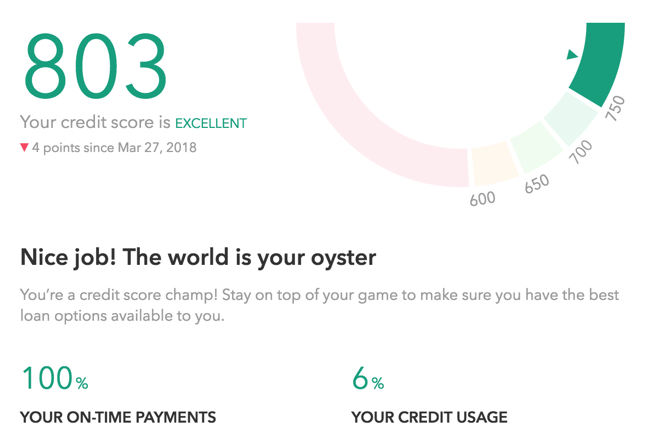
There’s no hard and fast rule, but if your rating dips into the mid-600s, you may find it difficult to get a mortgage. And you’ll likely get a higher interest rate if you do.

Should you wait and try to raise your credit rating before you get a mortgage? The answer may depend on other trends.

If your credit score is below 700 or so, it’s a good idea to make an effort to get it back up. Use a budgeting service like Mint to get regular credit score updates and monitor your spending and payment habits.

Even if you decide to get a mortgage at a higher rate now, you could refinance to a better rate later if you raise your credit score.

How Mortgage Interest Is Calculated

Most mortgages accrue monthly. Here’s how to calculate mortgage interest on a monthly basis, with an example:

  • Divide mortgage rate by 12 (4.75% / 12 = .0039583)
  • Multiply remaining mortgage principal by result ($225,000 * 0.0039583 = $890.62)

In this example, the remaining loan balance after accruing interest would be $225,890.62. An amortization schedule can help you understand this information. We’ll talk about those in a moment when we discuss mortgage calculators.

Some loans, called “simple interest mortgages,” accrue interest daily, which means the rate is divided by 365 and added to the total each day. If you’re good about making payments, this shouldn’t cause too much of a problem. But if you’re even a day late, you’ll pay more.

As you start the process of researching mortgage rates, it’s important to understand that there are many factors involved. Take mortgage points, for example.

Mortgage points (also called discount points) let you pay your lender some money up front to reduce the mortgage rate of your loan. This can save you a lot of money in the long run, but it depends on your lender. (For more information, check out Better Money Habits’ primer on mortgage points).

If you have an adjustable-rate mortgage (ARM), your mortgage rate can fluctuate over the life of the loan, which will also change how interest is calculated and how much you’ll pay over the life of the loan.

How Interest Affects Your Mortgage Payments

To see how the interest on your loan accrues over the life of a loan, you can check out an amortization schedule.

We’ll talk more about amortization schedules at the end of this article, but if you want to get started now, I recommend using MortgageCalculator.org to get an idea of how much interest you’re paying.

As you’ll see, your early payments go almost completely to paying off the interest on the loan. Each payment only makes a small dent in the principal balance. Later in the loan period, a larger percentage of your payments start going toward the principal.

Many 30-year loans result in lifetime interest that ends up costing 60% or more of the borrowed amount. That means if you get a $300,000 loan, you may pay back a total of $480,000 or more. It’s a good thing to keep in mind while you’re making a long-term financial plan.

How to Research Current Mortgage Rates

Now that you have a better idea of how your mortgage rate affects what you pay, let’s look at some tools for estimating what your mortgage rate will actually be. It’s important to note that your mortgage rate usually isn’t set until you close on your house.

If you’re not closing for another six months, today’s mortgage rates might not be all that useful. Nonetheless, it’s a good idea to keep an eye on them if you’re considering buying a house anytime soon.

Mortgage News Daily is a great place to start. They provide the results of their survey of lenders and originators to give you an accurate representation of the day’s rates:

Daily mortgage rates

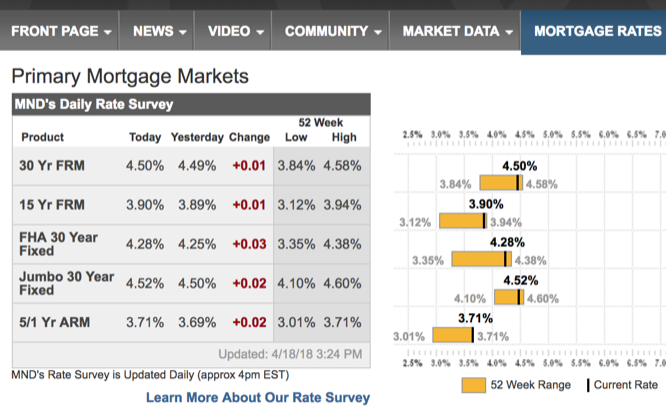
Rates are provided for 30-year fixed-rate, 15-year fixed-rate, Federal Housing Authority (FHA) 30-year fixed, jumbo 30-year fixed, and 5/1 ARM. You can scroll down to find a variety of other mortgage rates as well.

Unless you’re planning on getting a mortgage right away, the most useful information is probably the change and the location within the 52-week spread. In the image above, mortgage rates have gone up, and they’re close to as high as they’ve been in a year.

Mortgage News Daily also has a daily report that gives you information on rate changes, suspected changes in the near future, and suggestions on whether you should lock your interest rate.

You can subscribe to the report to get an email update every day with the latest rates and information.

For a simpler view of national rates, head to the Wells Fargo’s Mortgage Rates page.

Wells Fargo mortgage rates

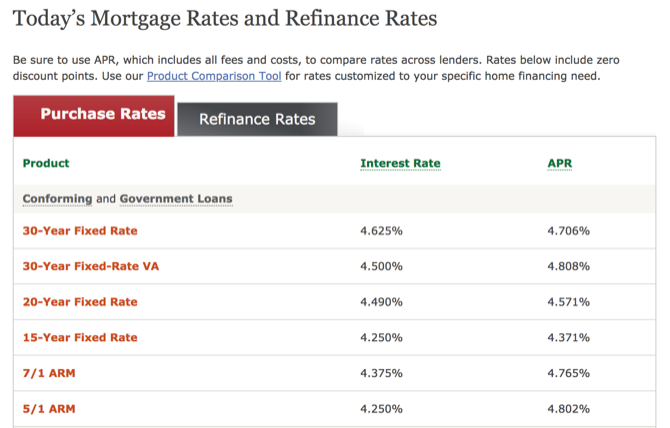
While these rates only apply to mortgages from Wells Fargo, they’ll give you a quick look at the current rates.

When I checked today, the Wells Fargo rates were higher than those reported by the Mortgage News Daily survey. In some cases, it was a tenth of a percent; in others, it was closer to .05%. So keep that in mind.

Of course, mortgage rates aren’t the same everywhere in the country. To find a sampling of mortgage rates in your area, head to Bankrate’s mortgage page. Here you’ll need to enter the value of the home you’re looking to buy, your down payment, credit score, and ZIP code.

mortgage rates from Bankrate

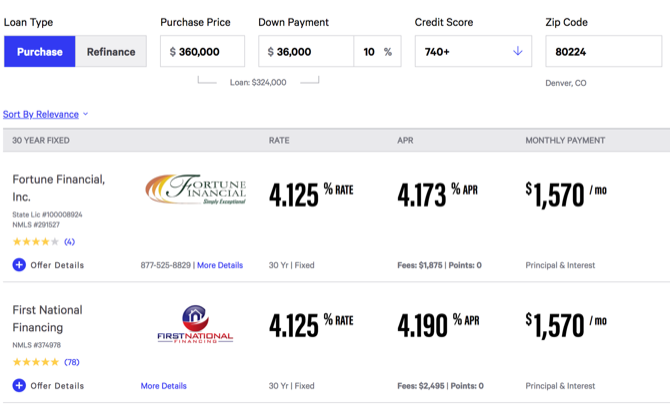
You’ll get a sampling of what different lenders are offering in your area—you’ll see the rate, fees, APR, and monthly payment.

With these sites, you should be able to get a good idea of the average mortgage rate around the country and near where you live.

But is it a good time to get a mortgage, or should you hold off? Let’s take a look at mortgage forecasts to find out.

How to Understand Mortgage Rates Trends and Forecasts

Should you get a mortgage now? Or should you wait to see if rates get better? That’s what the mortgage forecast will tell you. Or try to tell you.

The US economy is volatile and can see large swings in short periods of time. That tends to have an effect on bonds, which in turn affect mortgage rates. So how do you know whether you should get a mortgage now or wait?

Unfortunately, there’s no single place to go to find a simple mortgage rate projection chart that tells you everything you need to know. Instead, you’ll have to look for reports.

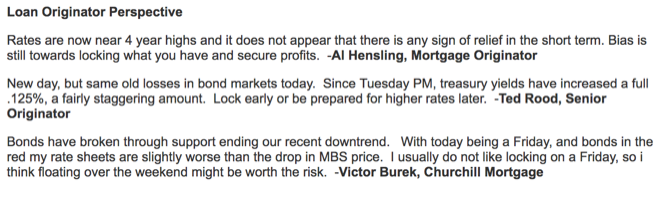
Mortgage Rate Watch from Mortgage News Daily is a good place to start. Their daily reports often contain projections about where the market will be headed, and the contributions from licensed loan originators provide industry insights.

Bankrate’s Mortgage Trend Index also gathers opinions from industry insiders as to whether the mortgage rate is predicted to rise, fall, or stay the same over the course of the week.

For a more quantitative view of mortgage rate trends, you may want to visit Realtor.com’s trends page. While it won’t make predictions on where rates will be in the future, you can see where they’ve been in the past, and that can give you an idea of what could be coming.

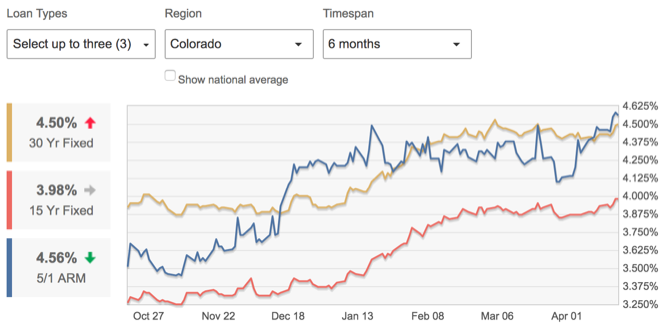
You can also limit the trends to your current location or the place where you’d like to buy to get more detailed information.

In the end, mortgage rate forecasts are just guesses. But they can give you an idea of when you should get the best mortgage rates. It’s always a good idea to talk to a financial advisor (or an independent mortgage broker) to get their opinion on the matter, as well.

Getting the Most Out of a Mortgage Calculator

While signing your mortgage at the right time will go a long way toward getting you the best rate possible, there are a lot of other things to think about, too. And a high-quality mortgage calculator will help you figure those things out.

There are certainly some simple mortgage calculators out there—Google even has one built into its results pages:

Mortgage calculator in Google's results page

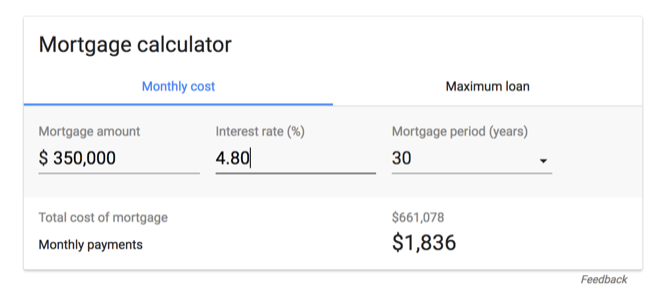
These simple calculators let you enter the size of your mortgage, your down payment, and the term. Then you get estimated monthly payments.

But if you want to really understand your mortgage rate and what it means, you’re going to want to use one of the more complicated calculators. They take into account things like fees, closing costs, prepayment penalties, and so on.

MortgageCalculator.org is one of the best mortgage calculators around. Here’s the information you’ll need to use it effectively:

  • Home value
  • Down payment
  • Loan amount
  • Interest rate
  • Loan term
  • Start date
  • Annual property tax
  • Cost of private mortgage insurance
  • Annual home insurance cost
  • Monthly HOA Dues

With that, you’ll get a full amortization table that tells you how much you’ll pay per month, when your loan will be paid off, the total amount of interest you’ll pay, the amount of money you’ll save if you pay bi-weekly instead of monthly, and more.

It’ll take you a while to collect all this information, but most of it should be readily available from your bank, the property listing, and your real estate agent.

Once you’ve collected the information and put it in the mortgage calculator, you’ll get a result like this:

Mortgage calculator result

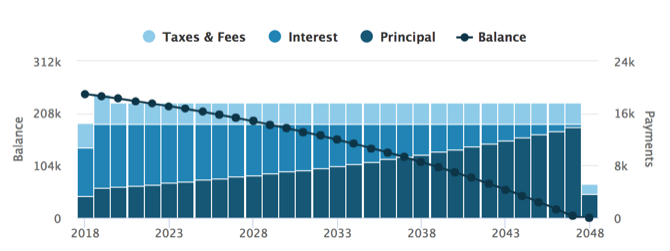
This view shows you what you pay each year, and breaks that amount down into taxes and fees, interest, and principal. As you can see, the earlier years of the loan are spent mainly paying back interest, while you start to make a larger dent in the principal later on.

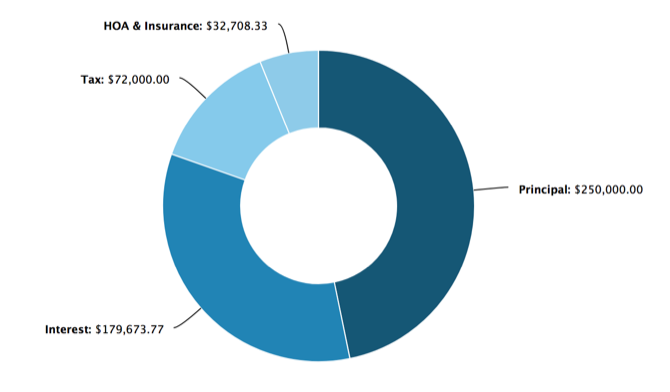
Clicking on View Loan Breakdown will give you total amounts for each over the life of the loan:

Mortgage loan breakdown

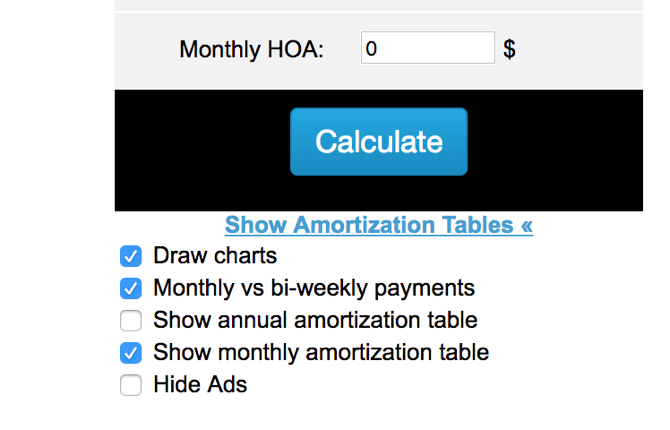
Finally, you can view an amortization table, which shows you how your payments break down each month. To get this table on MortgageCalculator.org, scroll down and click Show Amortization Tables, then select monthly or annual:

Show amortization tables on MortgageCalculator.org

When you click Calculate again, you’ll get a full breakdown of each payment:

Monthly mortgage amortization table

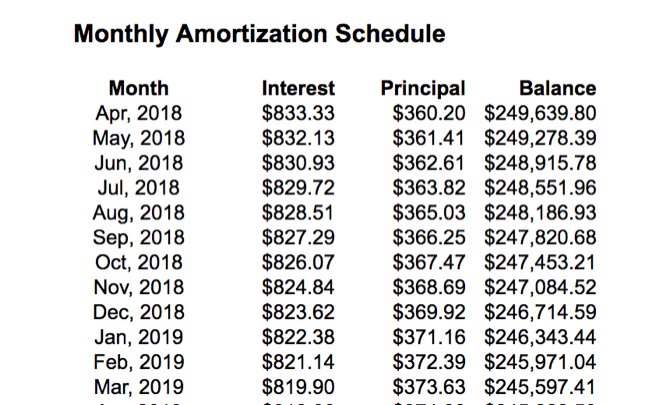
Change your mortgage rate, down payment, or any other number to see how your monthly payment breakdown changes, and you’ll start to really understand your mortgage rate.

You’ll notice that even a small change in your mortgage rate can make a difference over 30 years.

Using a Mortgage Calculator With Prepayments

Want to see how some extra payments would help pay down your mortgage? You need a prepayment mortgage calculator.

One of the best calculators for this purpose is from HSH. Enter the amount of your loan, the loan term, and the interest rate. Then, enter your desired monthly payment or how quickly you’d like to pay the loan off. Click Calculate:

HSH mortgage prepayment calculator

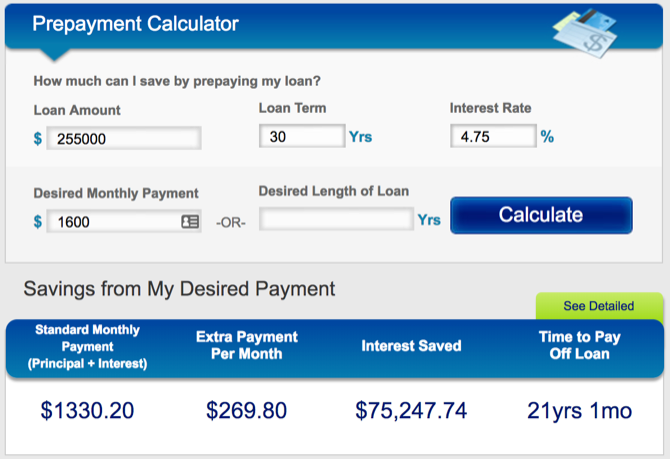
You’ll see how much extra you’re paying (or need to pay), how long it will take to pay off the loan, and how much money you’ll save in interest. As you can see, a couple hundred extra dollars each money can save you a phenomenal amount of money in the long run.

The Best Mortgage Calculator

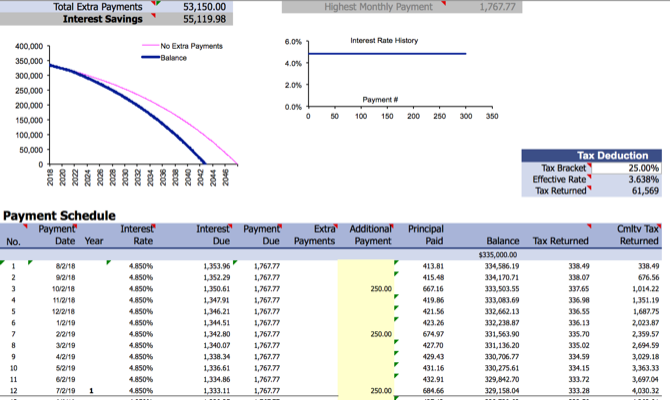
If you want the absolute best mortgage calculator, you’ll want this Excel spreadsheet from Vertex 42. You’ll need a lot of information to take full advantage of it, including all your mortgage rate information, your tax bracket, planned extra payments, property taxes, home insurance, and a few more things.

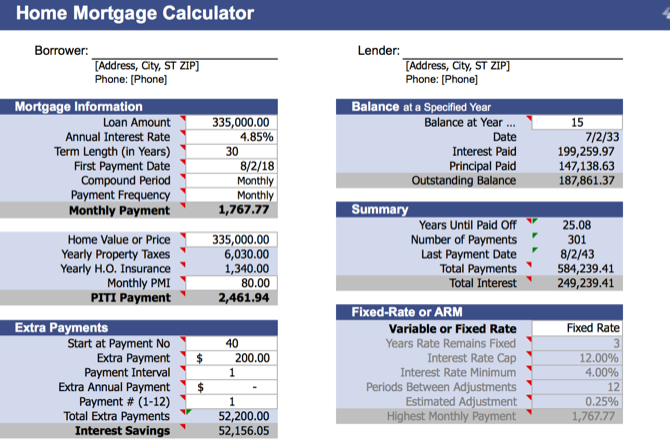
But if you can collect all that information, you’ll get everything you could want from a mortgage calculator. You’ll get a full amortization table. The total amount of interest paid. The total amount of tax breaks received. The effect of increased monthly payments or one-time extra payments. Anything you could want.

It takes a while to gather and enter all of the information you need, but this mortgage calculator can’t be beat.

Vertex 42 also has other great mortgage calculators that aren’t quite so complicated. Check out their Mortgage Calculators for Excel page to peruse and download them!

Mortgage Calculator App for On-the-Go Estimates

When you’re thinking about buying a house, you’re going to be on the go a lot. You’ll be looking at houses, visiting banks, checking out new locations, and generally spending a lot of time in the car.

To get a quick calculation of your potential mortgage payments on a house from your phone, try the QuickenLoans Mortgage Calculator app.

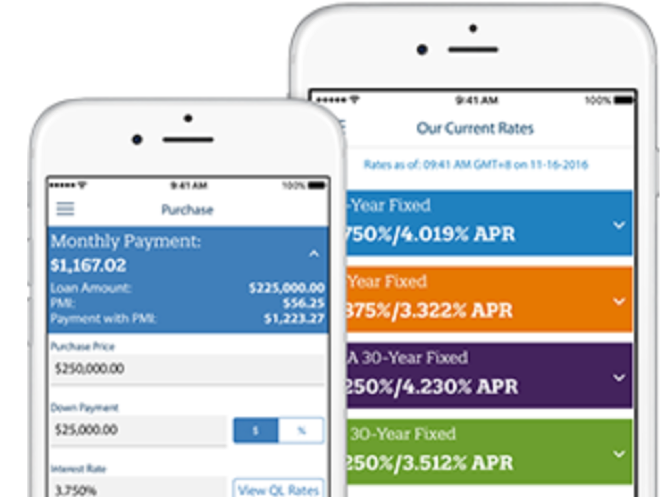
While it’s meant to get you to use Quicken for your mortgage, it does have a decent interface for getting this information quickly. You could also upload a mortgage calculator spreadsheet to the Google Sheets app and update it as you go.

Download: QuickenLoans Mortgage Calculator for Android | iOS (Free)

How to Get a Better Mortgage Rate

Armed with all of this information, you’re ready to go out and get the best mortgage rate possible. You’ll know what the average rates are, whether it’s a good time to buy, what you can afford, and what you can expect to pay for it.

With all of that knowledge in hand, you’ll be able to work with a banker to get the best mortgage rate. It could be a banker from one of the banks you found on a mortgage comparison site. Or from your own bank. Or an independent broker.

No matter who you decide to work with, you’ll be able to use this information to make sure you’re getting the best mortgage possible. Just don’t forget that mortgage is a debt and you need to be smart to get out of it.

https://ift.tt/2GBtHkn

via MakeUseOf

Saturday, May 19, 2018

Google Is Making HTTPS the Chrome Default

With well over half of all websites now encrypted, it’s time to think of HTTPS as the default option rather than the exception. That is, at least, according to Google, which is changing the way Chrome handles secure vs. non-secure web pages. And about time too.

Over the last year there has been a push to switch all websites to use HTTPS (Hyper Text Transfer Protocol Secure). Google has been especially keen for sites to make the switch, and with more sites complying, it’s time to change the way we view the web.

Switching From HTTP to HTTPS

At the moment, sites that aren’t secure don’t have any special labels attached. As far as Chrome is concerned they’re considered the standard. On the flipside, sites which have HTTPS switched on get a green “Secure” label with a lock symbol attached.

However, this is all set to change over the next few months. As outlined on the Chromium Blog, with the release of Chrome 69 in September, the “Secure” label will disappear. And then at some point in the future, Google will remove the lock symbol as well.

In addition to this, with the release of Chrome 70 in October, standard HTTP pages will be labelled with a “Not Secure” warning with a red triangle attached. In other words, Google is turning everything on its head and labelling HTTP rather than HTTPS.

Google’s reasoning for making this change is that “users should expect that the web is safe by default”. So, rather than having HTTP as the standard to be expected and HTTPS as a rare beast to be celebrated, HTTPS becomes the standard and HTTP is vilified.

Google Ups the HTTPS Ante

This actually makes a lot of sense. Thanks to companies such as Google, more of the web is now encrypted, which means that’s the default. Unfortunately for sites which still haven’t made the switch from HTTP to HTTPS this just piles the pressure on.

It’s shocking it has taken this long for most of the web to switch to HTTPS. We were explaining what HTTPS means back in 2011, and it has taken seven years to get to this point. Still that was before we understood quite how much we’re all being surveilled.

Image Credit: Stephen Shankland/Flickr

https://ift.tt/eA8V8J

via MakeUseOf

Friday, May 18, 2018

5 Famous Websites That Died (And Their Best Alternatives Today)

The rapidly changing nature of the internet means that services can fall out of favor as quickly as they explode in interest. Who knows if we’ll refer to Facebook and WhatsApp in the same sentence as MySpace and AIM in a few years?

Today we’re going to take a step back and look at once-popular web services that went extinct. We’ll see exactly why they went defunct, and provide the best alternatives to them.

Note that in this list, we’re only including old websites that are no longer available. We’ve left out services like Digg that are a shadow of their former selves but still in service.

1. ChaCha

Founded: 2006 | Defunct: 2016

Before internet access was ubiquitous on mobile phones, people had to wait to get answers for their questions when they weren’t home. If you were out with friends and wanted to know the weather across the world or some obscure piece of sports trivia, you couldn’t easily Google it on the go.

In addition, search engines of the time weren’t always good at answering questions like they are now. They could match keywords, but questions tripped them up.

That’s where ChaCha came in. It was a human-powered search engine that you interacted with via texting. Sending an SMS to 242-242 with your question would lead to a team member replying with an answer. Since it was free, and most people had access to texting, it was a great way to get quick information when you weren’t at a computer.

ChaCha paid its part-time workers a few cents per answer. And while the company had strong beginnings with an investment from Jeff Bezos, the widespread adoption of smartphones meant that its services became increasingly unnecessary.

In late 2016, ChaCha shut down completely due to a lack of funding. The company’s owner moved to Hawaii but couldn’t even pay the employees what they were due. It’s a sad case of a model that was brilliant at the time but became unnecessary as Google became more powerful and ubiquitous.

ChaCha Alternatives

Google’s free mobile apps can answer pretty much anything ChaCha could. Its recent updates have made refinements to Featured Snippets, which pull relevant info from a page so you get an answer to your question without even leaving the results page.

If you’d prefer a human answer to your questions, the Stack Exchange network of sites is a great place for questions and answers. Quora is a similar service, and you can always ask questions on Reddit and other forums too.

2. Grooveshark

Founded: 2006 | Defunct: 2015

Grooveshark My Music

People have wanted to find free music online since the dawn of the internet. While downloading from old websites like LimeWire was a popular option, that came with the risk of a virus infection. Grooveshark provided music fans with a way to listen to whatever they liked in a browser for free.

Since you streamed music instead of downloading it, it was a safer alternative to other piracy services. Remember that at the time, Spotify wasn’t widely available yet and Pandora only allowed you to listen to the radio. Grooveshark letting you search for any song and create your own playlists was quite convenient.

This site allowed anyone to upload music so others could find it. While it wasn’t always a super polished experience (miscategorized and partial songs popped up often) it was good enough for a lot of people.

Though it didn’t allow users to download tracks, Grooveshark was still an illegal service. It had several bouts with the law that didn’t produce lasting results, but that changed in 2015. The site settled with the big three records companies and immediately shut down.

You can read a more detailed history of the service in our Grooveshark retrospective.

Grooveshark Alternatives

As you’re probably aware, you have lots of options for replacing Grooveshark. Spotify is probably the closest alternative, as it lets you stream millions of songs on your desktop for free. However, you’ll need to pay for a Premium subscription if you want to remove the ads.

If you don’t like Spotify, you can try one of the many other music streaming services. Most of them have a free plan that should more than fill the void Grooveshark left behind.

3. Megaupload

Founded: 2005 | Defunct: 2012

Megaupload was an extremely popular service for uploading and sharing content both legal and illegal. It seemed that nearly everyone who wanted to make a file available for others in YouTube descriptions, forum posts, or similar put it on Megaupload. In fact, when the service closed down, it held 25 petabytes of data!

One of the biggest legal problems with Megaupload was that when a user uploaded a file that matched one already on the service, the uploader asked to create another link to the file instead of adding a duplicate. Under DMCA, Megaupload only had to remove a link when the copyright holder requested it. Thus, a DMCA takedown could potentially remove just one link from the many pointing to an illegal file.

In early 2012, the US Department of Justice took control of Megaupload and shut it down. The government claimed that several behaviors on the site proved criminal intent. These included the fact that only the most popular files were kept available for download, the ad-focused revenue scheme was dependent on maximizing downloads, and more.

Megaupload was semi-reborn as Mega a year later. This version encrypts files before uploading, meaning the company can’t access them. It also doesn’t use the matching system to create multiple links to one file, so Mega should be more government-proof.

On a similar note, Rapidshare was a service much like Megaupload. Once the latter was taken down, Rapidshare changed its ways to avoid a similar fate. This killed the service’s popularity and crippled the company, resulting in its closing down in 2015.

Megaupload Alternatives

Mega is a decent alternative to Megaupload. If you don’t want to use it, any cloud storage provider like Dropbox or Google Drive works too.

Barring that, check out tons of easy ways to share files without cloud storage.

4. Orkut

Founded: 2004 | Defunct: 2014

Orkut was a wildly popular social media website before the dominance of Facebook. It was most popular in India and Brazil and was created by Orkut Büyükkökten as an independent project while he was working for Google.

At first, Orkut made networking more open by allowing anyone to visit your profile unless they were on your block list. It had standard social features like creating polls, sharing videos, and liking posts.

Nothing particularly interesting happened to cause Orkut’s demise. While it enjoyed popularity in a few regions, much of the world didn’t use it. This meant that Google’s other products like YouTube and Blogger outpaced Orkut.

Combined with the dominance of Facebook and Google+, which Google was still pushing at the time, the company cut the dead weight in late 2014.

Orkut Alternatives

You’re probably already on an alternative to Orkut. The best social network is the one that most of your friends use. Facebook is an obvious choice, while Twitter, Instagram, and Snapchat are also popular.

5. Heat.net

Founded: 1997 | Defunct: 2000

One of the lesser-known old websites, Heat was ahead of its time. Heat.net was an online gaming platform from Sega. It let you enjoy first and second-party games, along with other big games like Quake 2, online with other players. The subscription cost $10 per month and included chat lobbies.

But the service quickly ran into problems. It rewarded players with currency named “degrees” simply for staying connected to the service. It didn’t take long for players to abuse this, as they’d leave their computers connected but idle and earn degrees for doing nothing. You could spend these degrees on games, magazines, and computer hardware.

Sega reduced the value of degrees to combat this problem, but it wasn’t enough. The company closed down Heat.net in 2000 and replaced it with SegaNet, a new online service for the Dreamcast. However, the Dreamcast failed due to the hype from the upcoming PlayStation 2, resulting in Sega discontinuing the console in early 2001.

This, in turn, led to Sega exiting the video game console business entirely. It’s easy to trace modern online services like Xbox Live back to Heat.net, so it definitely had an impact.

Heat.net Alternatives

Steam is the closest modern service to Heat.net on PC, as it lets you buy and play games online with others. If you play on a console, you can subscribe to PlayStation Plus or Xbox Live to enjoy many of the same features.

Popular Old Websites That Died: Gone but Not Forgotten

You’ll note that we didn’t include any Google services here. But in fact, Google has killed off so many services that it’s hard to count them all.

These five services were all popular for some time but faded as technology advanced. But whether they were superseded by superior alternatives, forced to shut down due to illegal content, or just couldn’t keep up, none could stay afloat.

It’s fun to take a nostalgic look back to see what was popular years ago, and what we can learn. Thankfully, all these old websites have modern equivalents.

For more, check out these famous programs that no longer exist.

https://ift.tt/2wULfbD

via MakeUseOf

How to View and Recover Your Microsoft Outlook Password

Microsoft Outlook is one of the most popular email clients around, regularly ranking among the top clients. It’s only beaten by Apple’s integrated mail solution and Gmail for global email opens. Most people use Outlook at some time in their lives.

Given those millions of users, it is understandable that at some point, someone will forget their Outlook password. And in those moments, you need a tool that can retrieve the password while keeping your data intact.

Here are three tools to help with Outlook password recovery. But first, we need to understand the difference between PST and OST files and how they store and password-protect your mail in Outlook.

Differences Between Outlook PST and OST Files

The way Outlook stores, manages, and secures your data depends on the type of account you are using. There are two main types of Outlook data files:

  • PST: A Personal Storage Table is the storage system Outlook uses for POP and IMAP accounts. Your email is delivered to and stored on the mail server, and is only accessible while online. You can take backups of your email to work on, but this also creates a new PST file. When you move to a new computer, PST files transfer easily between systems.
  • OST: You can use an Offline Storage Table file when you want to keep an entire local backup of an email account. All the data is stored on your computer as well as the mail server. This means the entire user account email database is accessible, regardless of network connection. Changes sync when the user establishes a connection with the mail server.

There are two more vital differences between the two file types.

By and large, PST data files store vital information, such as passwords, to the local machine. This password locks unauthorized users out of the Outlook account, protecting emails and user data in the process. The OST data file also uses local storage but doesn’t contain any passwords. As such, the PST file is open for password retrieval. (Do note that OST passwords aren’t much more secure.)

The second difference is a bug in Microsoft Outlook’s password protection that relates to password storage.

The Microsoft Outlook PST Password Protection Bug

When you enter a password on a website, the site (hopefully) doesn’t store it in plaintext. Plaintext is what you’re reading now, so you can see why storing a password in this form isn’t so wise. The website takes your password and creates a hash.

A hash is a long string of alphanumeric characters that represent your password and is tied to your username. When you type your username and password combination, the database returns a positive response, and you enter your account. But if an attacker enters the database, all they see is a long list of confusing hash values.

Here’s the problem with Outlook: Instead of using a complex hashing algorithm (ideally with a salt), Microsoft appears to have cut some security corners using the basic CRC32 algorithm.

The bad news is that each CRC32 hash has a lot of matching values, meaning there’s a strong chance a password retrieval program will unlock your file. This is great if you need your PST file unlocked, but utterly terrible if you want to keep it secure.

This is where Outlook password recovery tools come in.

PST Tools for Outlook Password Recovery

There are several tools you can use to retrieve PST passwords and unlock your data file.

1. PstPassword

microsoft outlook password recovery tools

Nirsoft’s PstPassword is a great free utility that automatically retrieves PST passwords for local data files. PstPassword displays three potential passwords due to the encryption bug. If the first option fails, you have two more choices. (In fact, PstPassword generates a long list of CRC32 hashes that might unlock the data file.)

PstPassword doesn’t require installation, either. However, your system might detect it as a malicious file (as it is harvesting passwords, something that you don’t want at other times).

2. Kernel Outlook PST Password Recovery Tool

Kernel Outlook PST Password Recovery Tool is a limited free utility. The major limitation is the size of the PST file the tool will unlock. Kernel’s tool will unlock PST files up to 500MB for free. However, if your data file size surpasses that you will need to upgrade to the Home License for $39.

The tool quickly analyzes your PST files, providing a hash value for you to enter. Unlike PstPassword, Kernel only grants a single password hash to try. However, if that doesn’t work, Kernel also has the option to remove the password protection from the PST file (as well as adding a new one if you desire).

3. Recovery Toolbox for Outlook Password

Recovery Toolbox

Our final tool is Recovery Toolbox for Outlook Password. Recovery Toolbox costs $19 but comes with a few more options than either free option. For example, Recovery Toolbox can:

  • Recover and show passwords for PST data files
  • Reset PST data file passwords
  • Recover and remove some passwords for OST data files

The major difference is support for OST files. The paid version of Recovery Toolbox shows and removes OST passwords, too, giving it a slight advantage. That said, other free online tools will uncover even the most secure Outlook OST data file passwords, too.

Testing the PST Password Protection Bug

You can check the password protection bug out for yourself using PstPassword.

Open Outlook and head to File > Account Settings > Data Files. Press Add to create a new data file, giving it a temporary name. Next, head to Settings > Change Password. Leaving the “Old password” field empty (as it is a new data file), enter a strong new password in the “New password” and “Verify password” fields. (In fact, I’m using a Secure Password Generator to create a super-strong 16-character password.)

microsoft outlook password recovery tools

You might note that despite the 16-character password, Outlook only accepts 15-characters. Regardless, press OK, close the panel, then close Outlook.

Download, then open PstPassword. It should automatically detect your newly created PST file, as well as any existing data files, too. Now, alongside your test file, there are three potential passwords. Because the password is over a certain amount of characters, PstPassword displays the hash values.

Open Outlook again and enter one of the hash values. If it doesn’t work, try the next one. In the event the first three don’t work, right-click the test data file and select Get more passwords.

microsoft outlook password recovery tools

Mail PassView is another free password viewing and recovery tool from Nirsoft. Mail PassView uncovers OST data file passwords, rather than PST data files. However, as OST data file passwords are usually set via mail server rather than in Outlook itself, the tool cannot remove passwords or offer alternatives.

Still, Mail PassView is a useful free tool for recovering your Outlook password.

Outlook Password Recovery Complete!

One of these tools will grant you access to your Microsoft Outlook PST data file. Some Microsoft Office programs have strong integrated encryption. However, you have seen the Outlook password protection bug and how you can easily uncover a lost password.

https://ift.tt/2rQWOM2

via MakeUseOf

7 Tips for Making Your Instagram Stories Stand Out

It’s hard to imagine anything easier than posting a story on Instagram. After all, it only takes a few seconds and three taps to take a photo or video and immediately share it on your profile. Especially as Stories are often seen as the unpolished antidote to many users’ curated Instagram feeds.

But there’s more to Instagram Stories than meets the eye. When used properly, they are an incredible tool for driving engagement with your followers, building connections with other users, and sharing your life with the people you care about.

When used improperly, however, Stories can quickly become annoying and over-long monologues that are confusing to anyone but their creator. Here are our best Instagram Stories tips to help your posts stand out from the crowd.

What Are Instagram Stories?

In case you’re still unfamiliar with the Stories feature (pioneered by Snapchat and quickly integrated into Facebook and Instagram), here’s what you need to know.

Essentially, an Instagram story is a sequential collection of photos and videos that is visible on your Instagram profile to any of your followers for 24 hours. After 24 hours, the story disappears.

Instagram Stories fill a variety of purposes. They can tell the behind-the-scenes story of an impressive Instagram post, provide insider information about a promotion, or can be a fun way to share an event in your life that doesn’t warrant a formal post.

Posting a story is easy: open Instagram, and tap the camera icon in the top left. Take a photo, and hit Send To, then press Share next to the contact labelled “Your Story”.

Of course, there’s a whole lot more to know, including Instagram mistakes you should avoid making.

1. Post Quality Photos and Videos

While this Instagram Story tip may seem like common sense, it’s often overlooked by Instagram users. Instagram stories are less formal than official Instagram posts, and leave some room for unedited photos or videos that sound more like a casual conversation.

However, if you are looking for social media success, everything you post needs to be worth your audience’s attention.

Here’s a quick checklist:

  • Photos and videos should be in focus and interesting
  • Simple editing (such as straightening horizons, cropping, and color correction) can go a long way
  • Text should be readable, and not overly long
  • Videos with voiceovers shouldn’t cut off at awkward times or in the middle of a sentence
  • Standard strategies for making your Instagram photos stand out still apply—you can never go wrong with a little extra editing!

Also, just because Stories gives you the freedom to post as many photos or videos as you want doesn’t mean that you should post every photo or video you take. Your complete story shouldn’t last longer than two or three minutes—and that’s an absolute maximum. Stories are designed to give people a quick and exclusive look “behind the scenes” of your social media; lengthy commentary is better suited to a blog post or YouTube video.

2. Give Context for Your Instagram Stories

One of the biggest mistakes Instagram users make is posting stories that don’t make any sense. But, you also don’t want to spend your time typing out lengthy explanations that no one will read, or offering voice overs that no one will listen to.

Instead, Instagram offers simple stickers (found in the top right of the photo-editing screen) for each image or video. Use these stickers to identify your location, provide a time stamp, tag the people you’re with, or to add a relevant hashtag.

Paired with a sentence or two on Instagram Stories’ “Type” screen (swipe all the way left after opening the Stories camera), your story will make sense to everyone who views it.

3. Be Interesting

Instagram has a ton of great features specifically for Stories. And since one of the main purposes of Instagram Stories is to show off a more personal (and fun!) side of your social media, you should take full advantage of these features whenever possible!

Great Instagram Stories features include:

  • Taking and sharing Boomerangs
  • A Focus filter that ensures your face stands out from the background
  • A “Superzoom” filter that can be paired with different sound clips (including “bounce”, “TV show”, “dramatic”, and “beats”) to help emphasize a key item or person in your story
  • Playing a video in rewind
  • A “Hands Free” mode that lets you take video clips without holding down the shutter button
  • A “Stop Motion” mode that lets you create short, looping videos out of still photos
  • Your choice of a changing selection of live filters (press and hold on someone’s face or tap on the smiley face at the bottom right of the screen) that can give you silly accessories, distort your face in funny ways, or even work some Photoshop magic
  • A huge variety of stickers, GIFs, and emojis that you can add anywhere on your image/video

Have fun exploring these Instagram Stories tricks to make your Instagram Stories stand out from the crowd.

4. Ask Questions on Instagram Stories

One easy way to get viewers invested in your Instagram Story is to ask them to share their opinion. Instagram offers two easy tools to get input from the people watching your story.

First, you can choose to create a poll. Simply select the “Poll” sticker, type in your question, and then enter two options for viewers to choose between. As people select either option the poll will constantly update its percentage.

Want something a little less polarizing? Choose the slider sticker instead. You can customize both the question you ask and the sticker you use to label the slider. Viewers can then drag the slider to the intensity of their reaction to your question.

5. Cultivate a Community on Instagram

One of the potential downsides to Instagram Stories is that your followers can’t respond publicly to your posts through comments. And while the polls and sliders shown above are fun, they don’t allow for a lot of nuance. Many successful Instagram accounts address this shortcoming by posting screenshots of thoughtful responses that have landed in their direct messages.

This strategy can be a great way to build a community around your Instagram account—but be careful to respect your followers’ privacy. It’s always best to ask before tagging someone’s username or showing identifying information in a screenshot. You can also always draw over any identifying information using the marker tool.

6. Think Outside the Box

Instagram has a ton of great features that are native to the app. But you can also add to your stories from any photos (or screenshots of photos) that you’ve saved to your phone over the last 24 hours. This feature opens up a world of possibilities , especially when paired with awesome third-party Instagram apps.

When it comes to Instagram Stories, the only limits are your creativity and your audience’s attention span. Stories offer a truly unique method of telling stories and sharing information, and third-party apps and editing features can go a long way towards helping you to achieve any effect you want.

7. Branch Out

While they may seem gimmicky at first, Instagram Stories are a powerful way of reaching followers. Whether you’re promoting a brand on Instagram, establishing a business, or just sharing what you had for breakfast, it’s important to use Instagram Stories as a way to link viewers in to your other social media accounts.

Don’t be afraid to direct viewers to other social media accounts through your Stories.

For example, after showing a behind-the-scenes interview, you can ask viewers to go view the final product on YouTube, enter a contest on your blog, or visit a specific site with a coupon code.

If you have over 10,000 followers (or are a verified account) you can even include a link directly in your story. If you have fewer followers than that, you can always use the old “link in bio” trick!

Instagram Stories are also key for promoting other accounts that you enjoy, building hype for a promotion, or helping viewers to feel more connected to you as an individual.

What’s Your Instagram Story?

Stories on platforms like Instagram and Snapchat have been one of the biggest recent shifts in social media. Their flexibility is a key component of that—the way you make your stories can be completely different than anyone else’s.

That being said, it’s important to make sure that what you are doing is working. Be sure to monitor who’s viewing your Instagram Story and adjust your strategies as needed until you reach the audience you want to reach!

https://ift.tt/eA8V8J

via MakeUseOf